Can’t activate Exchange Server – Use this Exchange Powershell command to activate your Exchange Server

I recently had an issue where through ECP I was unable to activate a new Exchange server 2019 I was building. I believe my issue may have been I was logged into the ECP of an older Exchange (2016) server as the 2019 server’s ECP wasn’t yet accessible.

In any case, you can use this command to activate Exchange servers from the Exchange Powershell:

Set-ExchangeServer -Identity MyNewExchangeServer -ProductKey 12345-12345-12345-12345-12345

Once this has been successfully issued, you will need to restart the Microsoft Exchange Information Store service.


Change the default OU’s in AD for new Users and Computers

By default, when new users & computers are created in active directory where the OU hasn’t been specified at creation, AD defaults to the following OU’s:

  • Users go into: DC=domain,DC=tld\Users
  • Computers go into: DC=domain,DC=tld\Computers

These can be changed to go into OU’s that you choose by issuing the following commands in an elevated PowerShell session / command prompt and change directory to:

cd C:\Windows\System32\

Users:

redirusr “OU=<newuserou>,DC=<domainname>,DC=com”

Computers:

redircmp “OU=<newcomputerou>,DC=<domainname>,DC=com”

Hint: Obtain the OU distinguish name from the advanced properties of the OU itself.

Sophos SG/XG/XGS Hardware Brochure

Attached here is the hardware brochures for the Sophos SG R1, R2, R3, XG, and XGS firewall appliances.

  • Click here for Sophos SG R1 series hardware appliances
  • Click here for Sophos SG R2/R3 series hardware appliances
  • Click here for Sophos XG series hardware appliances
  • Click here for Sophos XGS series hardware appliances

Copyrights apply to the original copyright holders, simply mirrored here for educational / historical / archival purposes.

Restrict High Memory Usage by Information Store on Exchange 2007 / 2010 (also SBS 2008 / 2011)

Scope:

Microsoft Exchange Server 2007 and Microsoft Exchange Server 2010 (in conjuncion with Active Directory), or Microsoft Small Business Server 2008 / 2011.

Issue:

Microsoft Exchange Information Store (store.exe) consuming excessive amounts of system memory, often causing the server performance to take a significant hit.

Solution:

On the domain controller, open ADSI Edit (adsiedit.msc)

Connect to Well Known Name Context: Configuration

Drill into: Configuration > Services > Microsoft Exchange > [domainName] > Administrative Groups > Exchange Administrative Group > Servers > [serverName]

Right click on the server name and right click Information Store, then go to Properties

In the properties window, scroll down to the two attributes:

  • msExchESEParamCacheSizeMax
  • msExchESEParamCacheSizeMin

By default, the values of both are <not set>

We need to set values for both, if you only set values for the Max, then without the Min, the setting will not take place.

For Exchange 2007 (SBS 2008):

  • 1GB – 131072
  • 2Gb – 262144
  • 4Gb – 524288
  • 6Gb – 786432
  • 8Gb – 1048576

For Exchange 2010 (SBS 2011):

  • 1Gb – 32768
  • 4Gb – 131072
  • 6Gb – 196608
  • 8Gb – 262144
  • 12Gb – 393216

Note that Exchange 2007 uses a page size of 8KB and Exchange 2010 uses a page size of 32KB (hence the differing values).

Restart (or schedule restart) the Exchange server once the values have been applied.

Notes:

Although this solution is documented by Microsoft its not a supported configuration.

Don’t set the Max values too small otherwise your mailbox store may run into other issues and if too small, will cause more disk paging instead.

Raspbian / Debian apt-get update buster InRelease changed its suite from stable to oldstable

Issue:

Running Debian or Raspbian Buster and issuing the command(s):

apt-get update

or

sudo apt-get update

Doesn’t appear to go through and provides the following output messages:

Get:1 http://raspbian.raspberrypi.org/raspbian buster InRelease [15.0 kB]
Get:2 http://archive.raspberrypi.org/debian buster InRelease [32.6 kB]
Reading package lists... Done
E: Repository 'http://raspbian.raspberrypi.org/raspbian buster InRelease' changed its 'Suite' value from 'stable' to 'oldstable'
N: This must be accepted explicitly before updates for this repository can be applied. See apt-secure(8) manpage for details.
E: Repository 'http://archive.raspberrypi.org/debian buster InRelease' changed its 'Suite' value from 'testing' to 'oldstable'
N: This must be accepted explicitly before updates for this repository can be applied. See apt-secure(8) manpage for details.


Cause:

Debian has not too long ago updated the release from Buster to Bullseye, which means that Buster is no longer the ‘In Release’ build of Debian or Raspbian Linux.


Solution:

You need to let APT change the ‘suite’ values from stable to oldstable by issuing the command(s):

apt-get update --allow-releaseinfo-change

or

sudo apt-get update --allow-releaseinfo-change


Sophos SG UTM – WAF Setup for UniFi Controller

Scope:

This post will guide you to setting up the Web Application Firewall to present the UniFi controller to the Internet with a reverse proxy & SSL certificate.


Prerequisites:

  • A fully qualified domain namd (FQDN) for the UniFi controller (eg: unifi.domain.tld)
  • Public hosted DNS record for the above FQDN pointing to the public IP address terminated at the Sophos SG/UTM
  • A static public IP address terminated at the Sophos SG/UTM
  • SSL Certificate(s) matching the FQDN(s) installed on the Sophos (see Let’s Encrypt if you want to use this feature)
  • Internal UniFi controller you wish to make externally accessible via the WAF


Setup Internal Server:

Login to the SG UTM

Head to Webserver Protection > Web Application Firewall in the side menu

Click on the Real Webservers tab

Click the New Real Webserver… button

  • Enter the name to be the same as the Internal UniFi controller host, add an underscore followed by the port number. Example: UNIFI_8080
  • In the host picker, add the host. If the host item doesn’t actually exist in the Sophos, click the + icon to create a new internal host entry
  • The type options are HTTP and HTTPS. Use HTTP for ports 8080, 8880, and use HTTPS for 8443, 8843, etc.
  • Set the port to match what you entered after the underscore in the Name field
  • Click Save

Repeat for the rest of the entries for the UniFi controller so you have an entry for each of the four required services ports

Now head to the Virtual Webservers tab

Click the New Virtual Webserver… button

  • Enter the name as the public FQDN followed by an underscore and the port number – makes for ease of identification
  • Select the WAN interface the FQDN resolves to via public DNS
  • Set the appropriate type (HTTP, HTTPS, or HTTPS & redirect) – see below for these
  • Set the port to match the port you specified in the name (warning, when you change the above type, the port reset to the default (80 or 443)
  • Enter in the FQDN in the domains list
  • Place a tick next to the appropriate matching Real webserver with the matching port located inthe Real Webservers for path ‘/’ list
  • For the firewall profile, right now we won’t select anything – this can be adjusted at a later stage if / when required.
  • Don’t change the theme
  • Expand out the Advanced section and ensure all three selections items are deselected as these are not used for UniFi controllers.
  • Click save and repeat for each required virtual server.

Note, when adding in virtual webserver with the type set to either HTTPS or HTTPS & redirect, the Certificate dropdown list becomes available – this is where you will select the appropriate SSL certificate with the matching FQDN (or wildcard certificate).


Once they have been added, the virtual servers will look like this:

Note:

  • Ports 6789, 8080 and 8880 need to be set to HTTP
  • Ports 8443 and 8843 need to be set to HTTPS

Now we need to enable WebSocket passthrough for the 8443 entry otherwise the controller will contantly complain that WebSockets aren’t working

Click on the Site Path Routing tab

Locate the site path routing entry automatically created for the 8443 entry and click Edit

Expand out the Advanced box and place a tick next to the checkbox item labelled Enable WebSocket passthrough

Ensure all the Real Servers and Virtual Servers are switched on

Next we need to check the Firewall NAT settings

Head over to Network Protection > NAT

Click on the NAT tab

Locate and turn off any NAT rules that may be present for the UniFi controller using the same ports as you configured in the Web Application Firewall (so ensure that these are OFF: 8080, 8443, 6789, 8843, and 8880)

Ensure a NAT rule exists and is enabled for STUN to passthrough to the controller.

Create a New NAT Rule…

  • Rule type: DNAT
  • For traffic from: Any
  • Using service: STUN 3478 (you may need to create this rule, it will be a UDP port)
  • Going to: the same public WAN interface you are using on the WAF for the UniFi controller
  • Change the destination to: the internal UniFi controller host
  • Tick to enable Automatic firewall rule
  • Click save.

Switch on the new NAT rule to activate it.

Finally, we need to create an outbound firewall to allow the internal UniFi controller to access the network beyond the firewall

Head to Network Protection > Firewall

Click New Rule…

  • Create a new Group called UniFi
  • Source: select the internal UniFi host
  • Service: Any
  • Destinations: Any
  • Action: Allow
  • Save
  • Enable the rule to activate it.

Now you should have a working UniFi controller that is publicly accessible (and internally accessible) that is behind the Sophos WAF and you an use the FQDN to access it with a valid SSL certificate.


Some Notes & WIP:

In the above examples, the virtual web server for 8880 is currently disabled and a NAT rule exists for 8880 instead, as this port is used for the UniFi controller’s guest WiFi web portal. I am in the middle of troubleshooting an issue where this wouldn’t work from behind the WAF. I will update this space once I have resolved this.


Kali Linux 2022.1 Installation error: “Installation step failed”

Date: 2022-02-21

Kali Linux versions affected: Kali 2022.1 x64 (may also affect others), both GUI and TUI installer environments

Problem:

During the installation of Kali, at the software selection installation, the installer proceeds to copy the files, and produces an error – reducing the package selection down to only the top 10, appears to allow installation without error, but then requires all further package installs to be performed OS installation.

Error Produced:

Workaround:

Access a spare console using either CTRL+F2 or CTRL+F3

Please press Enter to activate this console

BusyBox v1.30.1 (Debian 1:1.30.1-4) built-in shell (ash)
Enter 'help' for a list of built-in-commands.

~ # cd /var/log
/var/log # tail -f syslog

Find the target installation using the command:

df -h

Locate your dev device and comfirm the target folder – for me it was /target

Chroot your way into that folder:

chroot /target

Edit the sources file:

nano /etc/apt/sources.list

Comment out the line for the sources pointing to the cdrom

#deb cdrom:[Kali GNU/Linux 2020.3rc2 _Kali-last-snapshot_ - Official amd64 NETINST with firmware 20200728-20:31]/ kali-rolling contrib main non-free

Now add a new sources line to pull down the repositories from the internet:

deb http://http.kali.org/kali kali-rolling main non-free contrib
deb-src http://http.kali.org/kali kali-rolling main non-free contrib

Save and close the file, then update:

apt-get update

Once updated successfully, head back to the installer by pressing CTRL+F5 or CTRL+F7

Perform the software selection and install the OS. Note that the installation will now pull all sources from the internet instead of the CD / USB resources.

Useful Links for all things 3D Printing

This post is purely a web directory and notes for things I personally find useful for all things related to 3D printing!

Free models of community submissions for print: https://thingiverse.com/

Resources for my first purchased (not custom or self designed) 3D printer: https://www.voxelab3dp.com/product/aquila-diy-fdm-3d-printer


Some CAD applications:

3D Print host server: https://octoprint.org

Calibration resources:

Configure Windows NTP Servers in Active Directory Environment Using Group Policy

Scope:

Setup a fully functional & authorities time service across Active Directory to ensure all AD joined Windows systems are properly time-synced to the domain controller(s) and also to external sources when abroad.

The Primary Domain Controller:

In Active Directory, the PDC Emulator should get the time from an external time source and then all member computers of this domain will get the correct time from the PDC. Since the PDC Emulator can move around, we make sure the GPO is applied only to the current PDC Emulator using a WMI filter.

Go to the WMI Filters section in GPMC and create a new filter like the following:

Here’s the query for you to copy’n’paste:

Select * from Win32_ComputerSystem where DomainRole = 5

Create a GPO called NTP Policy – PDC and apply it to the Domain Controllers OU

Apply the WMI filter you created earlier

Drill down into:

Computer Configuration/Policies/Administrative Templates/System/Windows Time Service/Time Providers

Edit all three policy items in this folder:

Next, we need to allow the NTP requests to hit the domain controller, so drill down into:

Computer Configuration\Policies\Windows Settings\Security Policies\Windows Defender Firewall with Advanced Security\Windows Defender Firewall with Advanced Security\Inbound Rules

Right-click on the Inbound Rules tree item and select New Rule…

Choose Port and click Next

Select UDP and specify port 23. Click Next

Select Allow the connection and click Next

Ensure all network profiles are selected and click Next

Give the rule a name, such as NTP-in and click Finish

The final result will look something like this:

Additional Domain Controllers:

Now we need to create another WMI Filter called BDC Emulator and use the following query:

Select * from Win32_ComputerSystem where DomainRole = 4

Create a new GPO in the Domain Controllers OU called NTP Policy – BDC

Link the WMI Filter for BDC Emulator

Now edit this GPO and drill down to:

Computer Configuration/Policies/Administrative Templates/System/Windows Time Service/Time Providers

Double-click Enable Windows NTP Client

Set to Enabled and click OK

Double-click on Configure Windows NTP Client

Set Type to NTP

Set NtpServer to hold the PDC and also a couple of external time providers that match what you specified in the PDC GPO

Click OK and close that policy

Congratulations! You have configured the NTP GPOs for the domain controllers.

Now we need to configure NTP for the rest of the domain members

Configure NTP for Domain Member Systems:

Finally, create a new GPO and link it to the OU where member servers, laptops, and workstations reside

Call it something like NTP Policy – Member Systems

Again, drill down to:

Computer Configuration/Policies/Administrative Templates/System/Windows Time Service/Time Providers

Double-click Enable Windows NTP Client

Set to Enabled and click OK

Double-click on Configure Windows NTP Client

Set Type to NTP

Set NtpServer to hold the PDC and also a couple of external time providers that match what you specified in the PDC GPO

Click OK and close that policy

Congratulations! You should now have successfully configured full AD NTP sync across the network.

Perform a gpupdate on systems to ensure policies are applying, use gpresult to ensure the policies are being read & applied.

In some cases, you may need to restart the Windows Time Service or reboot systems.


NTP GPO details explained

So what all these settings mean.

Configuring Windows NTP Client: Enabled

NtpServer:

  • Here you specify which NtpServers to use separated by a space but also with a special NTP flag. I decided to use the public ntp.org pools:
0.se.pool.ntp.org,0x1 1.se.pool.ntp.org,0x1 2.se.pool.ntp.org,0x1 3.se.pool.ntp.org,0x1

The NtpFlags are explained in detail here but 0x1 means: “Instead of following the NTP specification, wait for the interval specified in the SpecialPollInterval entry before attempting to recontact this time source. Setting this flag decreases network usage, but it also decreases accuracy.” where SpecialPollInterval is specified in the GPO (in our, case 3600 seconds)

  • The rest of the settings are explained in the GPO Help.

Enable Windows NTP Client: Enabled

  • Is a must, otherwise the computer will not sync with other NTP serves since it’s disabled by default.

Enable Windows NTP Server: Enabled

  • Is a must, otherwise the computer will not allow other computers to sync with it since it’s disabled by default.

Where is the configuration stored?

First, never edit the registry for NTP. If something is not working, clear the configuration and start from scratch and configure NTP using GPO or W32tm.exe. Do this by running the following commands:

Stop-Service w32time

w32tm /unregister

w32tm /register

Start-Service w32time

Still, you might want to check where the configuration is. When using GPO, the configuration is stored here:

HKLM\SOFTWARE\Policies\Microsoft\W32Time\Parameters

Note that this is different if you’re using w32tm.exe, then the configuration is stored here:

HKLM\SYSTEM\CurrentControlSet\Services\W32Time\Parameters

Useful tools when troubleshooting NTP

W32tm is still your friend and here are my favorites:

w32tm.exe /resync /rediscover /nowait

Resynchronize the clock as soon as possible, disregarding all accumulated error statistics. It will not wait for resynchronization and will force redetection of sources.

w32tm /query /peers

Displays all configured peers you have configured

w32tm /query /source

Displays the currently used time source. Note that after a restart of the service, it might show Local CMOS Clock until everything has refreshed properly.

w32tm /query /status

Displays the current status

w32tm /query /configuration

Displays the configuration

w32tm /debug /enable /file:C:\Temp\w32tmdebug.log /size:10485760 /entries:0-300

If you really want to get dirty, enable the debug log

Troubleshooting

Many things can go wrong when configuring NTP. Here are some suggestions:

  • Don’t forget to allow NTP traffic (udp/123) in your firewall(s) – if you have 3rd party firewalls, check them also
  • Enable the debug log and check that the service actually tries to communicate with the NTP serves. You can lower the SpecialPollInterval to 30 seconds to speed up your troubleshooting.
  • Restart the service and maybe even the server, sometimes this has solved it.
  • Also monitor the event log since the service logs there too.
  • If the domain controller is a Hyper-V VM, disable Time Synchronization on the guest

Attachments

This attachment is a client script that can be used to force reconfiguration of the local sync setup of workstations and member servers…

clocksyncupdate.cmd

Hacking a Sophos SG Appliance to accept a UTM Home License

Forward:

This document assumes that you have purchased (either new or second hand) a Sophos SG (or XG) hardware appliance and are looking to use the Sophos SG UTM 9, with the LCD front panel remaining functional, all on the free Home license (for home use of course).

Requirements:

You will need:

  • USB DVD Drive (burner if your PC/Mac doesn’t also have a DVD burner installed)
  • Blank DVD disk
  • USB keyboard
  • VGA / HDMI screen (VGA / HDMI depending on the Sophos appliance you have – SG2xx has VGA, SG3xx has HDMI for example)
  • Home license of UTM9 – sign up for an account at myutm.sophos.com
  • ISO file for Sophos hardware appliance – obtain from here (official), or here (unofficial mirror – Australia only)

We’re going to freshly reinstall the UTM OS so you obtain a free 30-day trial license which will allow you to get the appliance up & running…

Burn the ISO to the blank DVD

Connect the USB DVD drive to the Sophos USB port and insert the disk

Power on and boot from the DVD

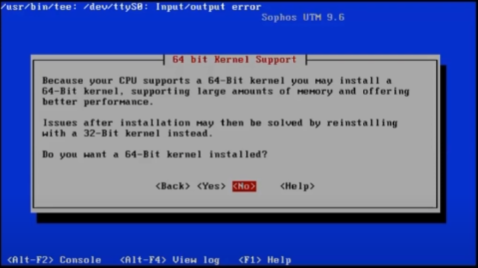
If your appliance has or will have more than 3.5GB RAM, always install the 64bit kernel when prompted.

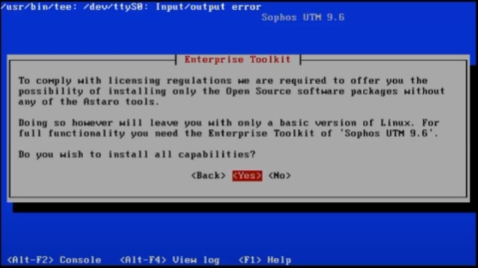
When prompted to install all capabilities or only Open Source software, always choose to install all capabilities.

Go through and follow the steps to complete the installation. Once done, it will reboot and you want to make sure it boots from the internal disk – not the DVD.

Post Installation Configuration:

Get to the point where the Sophos has booted from the internal drive with the freshly installed SG UTM OS

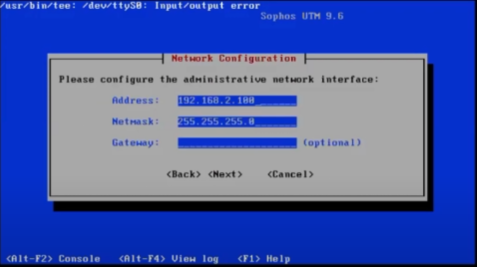
Connect your computer to the LAN interface, set a static IP address in the same range as the IP address displayed on the Sophos console screen, but don’t choose the same IP address as the Sophos on your PC.

Open a browser and point it to the https port 4444 of the Sophos IP, so if the IP address of the Sophos is 192.168.2.100, then in the browser, point to: https://192.168.2.100:4444/

Hint, the IP address was also set during the OS installation as seen here:

Set a hostname, organisation name, city, country, admin password and admin email address.

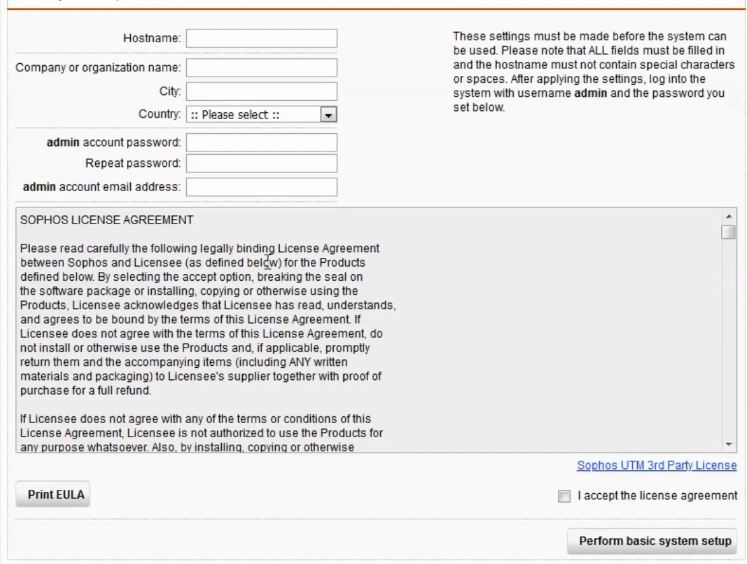
The organisation name, city, country, etc., are used to generate a self-signed certificate and nothing really beyond this.

Hint, a DNS resolved fully qualified host name makes life easier.

Once you’ve done, this the Sophos will log out, generate a new self-signed SSL certificate, and reload the admin page.

Your browser will kick up a small fuss about the SSL not being valid, proceed anyway

Login using admin as the user name and the password you just specified

You have the choice to Continue as a new setup or restore from backup.

Choose to setup as a new appliance (select Continue), as there are a couple of caveats when restoring from backup

Next screen is important, its where you would normally upload to install your license – BUT DON’T – instead, just click next to use a 30 day trial license.

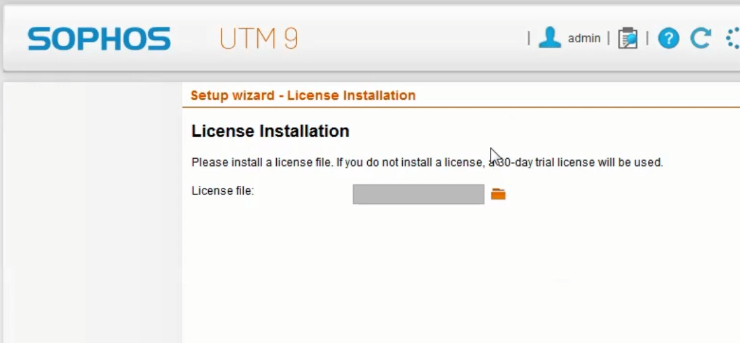
If you try to upload your home license, it will detect that you’re using a hardware appliance & will not let you use it. The reason we freshly installed the OS is to obtain a new 30 day trial license, which otherwise would not have been made available to us.

At the next screen, you can confirm or change the LAN IP of the appliance, and also enable & configure a DHCP server on this interface.

Next it will want you to configure the WAN interface

Then it will ask about the services to enable & configure – leave this as defaults and click Next

Once you get through the basic setup screens, click Finish and you’ll be at the management home screen

Enable SSH and set the loginuser and root passwords:

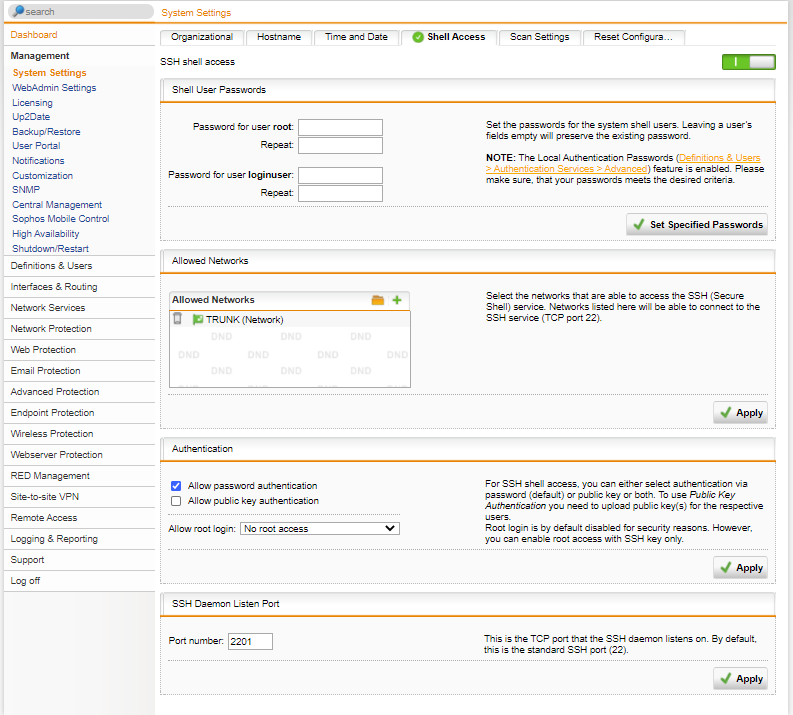
  • From the left menu, click Management > System Settings
  • From the top, select the Shell Access tab
  • Click the switch to ON to enable shell access
  • Set a password for both the loginuser and root accounts, then click Set Specified Passwords
  • Next, under Allowed Networks, add in the LAN (Network) and click Apply
  • Next, under Authentication, tick Allow password authentication and click Apply
  • Finally, change the SSH port to something else, like 2222, or 2201, or something like this, and click Apply (if the firewall is online or you intend on retaining SSH access) as SSH ports are constantly being scanned.

Edit System Configuration Files:

Either using the connected console (keyboard & display) or SSH from Putty or Terminal, login to the Sophos using the account: loginuser

If you changed the port number above, then use that when connecting in via SSH.

Once logged in, you’re about to do something often frowned upon:

sudo sh

Enter the root password

Now enter the following commands:

rename /etc/asg /etc/asx
mv /etc/asg /etc/asx
vi /etc/asx

Take note of the contents of this file – you’re looking to note down these three lines:

ASG_VERSION=
LCD4LINUX_HW=
ASG_SUBTYPE=

Exit VI.

Now create a new file: /etc/asg

vi /etc/asg

Add in the following (again setting the appliance model & revision appropriately noted down before), in my case:

ASG_VERSION="310"
LCD4LINUX_HW="LCD-SERIAL380"
ASG_SUBTYPE="r2"

Save, exit, and reboot the appliance.

Update Appliance License from 30-day Trial to Home Edition:

Now that the above has all been completed, the LCD should still be reflecting current stats (confirm this by monitoring the CPU & RAM usage changes on LCD and comparing them to the management screen in the web UI), we can go ahead and change out the 30-day trial license for the free Home edition license.

Why Sophos locked down the hardware appliances from home license use is a little bizarre and annoying, but the fact that these R1 and R2 appliances are making their way onto the second hand market in giant waves, means that people will snap them up for home use, hit the license restriction, and decide to wipe them & install alternate firewall OSes on them, like pfSense / OPNsense, etc. Really, this is a set back in two ways: 1) Sophos are encouraging eWaste by not permitting home user licenses to re-use old enterprise hardware, and 2) they cause would be home users or enthusiasts to shy away from the Sophos SG/UTM firewall product as they can’t use it on the actual hardware appliance, so they opt for alternatives. /rant

Download your home license file from your myutm.sophos.com account, and upload this into the Sophos in Management > Licensing > Installation

The Home license will activate many useful features for basic and advanced home labs, and will need to be renewed every (I believe) 2-3 years

.

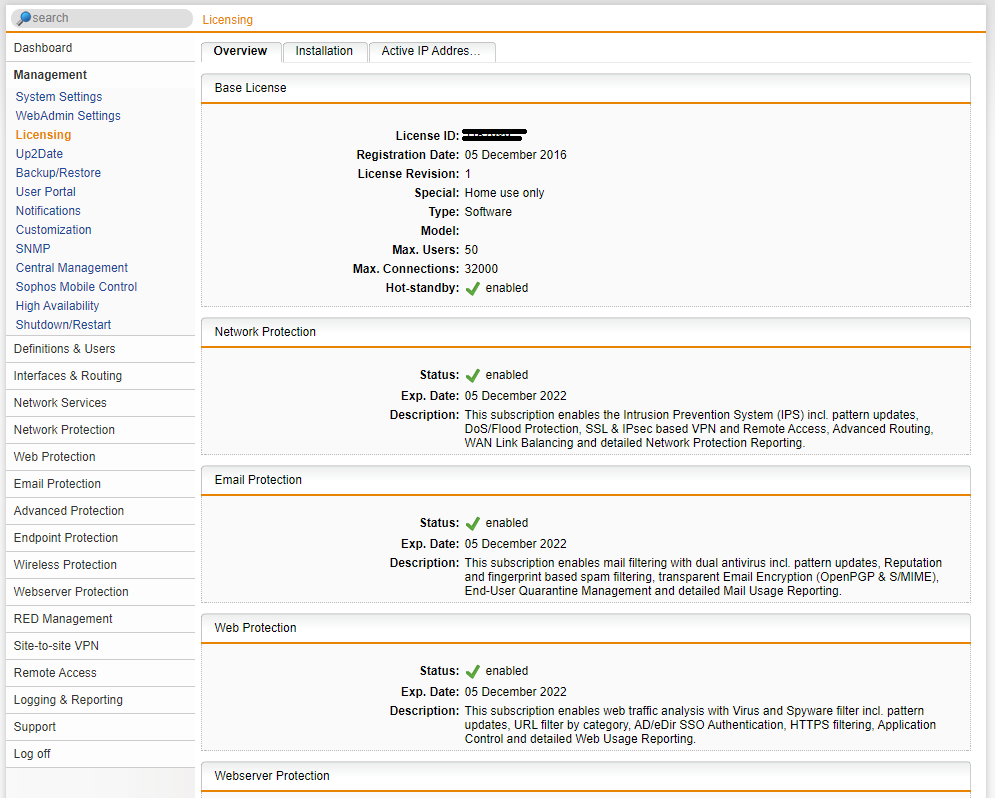
Something to note, Sophos SG UTM Home License edition has a user device limit of 50 issued IP addresses that are allowed to traverse the firewall. For many home environments with small families, this is probably substantial. There’s also a 10% tolerance on this 50 IP limit, so realistically, 55 devices.

However, larger families, where each family member has at lease 2-3 internet connected devices (say phone, tablet, and laptop), plus a few TVs, game consoles, WiFi access points, etc, you’ll soon run out of IP addresses very quickly. My home is in this larger category, there are currently seven of us living here, multiple “cloud-managed” switches, access points &and  security cameras, two Xbox consoles, three Apple TVs, every person has at least three devices, and we are well over our limit. On top of this, I have a home IT lab with over 20 virtual machines, two physical servers, and additional workstations & laptops (all for lab / test use). I have NEVER had this pose an issue – every device is still able to connect to the internet, despite having well over 100 IPs assigned. I’m not sure why this is the case for me – maybe because there are VLANs in place???

At the end of the day, what Sophos offer out of the box for a free three-year home license is a very generous offering. It would be nice if there was a home-premium style license, where you retained all the same features, but the IP limit was lifted to either 500 or unlimited, and you paid something like US$100 every three years.

What some users out there with Sophos UTM have done to overcome this is to have a second basic router behind the main Sophos – all WiFi devices and family devices would sit behind this second router – leaving only essential systems behind the Sophos. I also initially had my network setup like this, but found it was unnecessary (in my case).

Final note: the free home license also provides high availability (HA) so if you have more than one hardware firewall running UTM9, you can set them up in HA which is really handy for installing firmware updates with zero downtime! Again, something I have working in my home environment.