Windows Server

Upgrade FRS to DFSR

Active Directory Domain Controllers need to replicate data & files with each other – NETLOGON share, GPO’s settings, etc… Traditionally, server used File Replication Service (FRS) to perform this task. FRS however is old, limited in its functionality, and as such, no longer supported beyond Windows Server 2016. Microsoft has replaced FRS with Distribution File System Replication (DFSR or DFSr) so in this guide, we’ll cover the steps to identify which service is in use (FRS or DFSR) and how to migrate from FRS to DFSR.

As DFSR was introduced with most of its functionality in Windows Server 2008 R2, AD environments with Windows Server 2008 (non-R2) and older do not support being migrated to DFSR and cannot exist as domain controllers where DFSR is in use between other domain controllers. In such instances, the best practice method is to deploy a middle-ground domain controller running Windows Server 2016, migrate all FSMO roles, decommission the old domain controller(s), then from there migrate from FRS to DFSR, then deploy the new actual domain controller(s) as per the project scope.

Checking for FRS vs DFSR:

On the domain controller, launch an elevated command prompt and issue the command:

dfsrmig /getmigrationstate

If the output migration state is “Eliminated” then FRS is not in use, so no need to follow this guide any further.

If the output migration state is “Start” then FRS is in use and is ready for migrations to DFSR.

Note: the possible outputs are: Start, Prepared, Redirected, and Eliminated.

Upgrade from FRS to DFSR:

There are four key steps to migrate from FRS to DFSR and they’re all performed in an elevated command prompt or elevated powershell session

First step is to change the migration state to 1:

dfsrmig /setglobalstate 1

Once this has been issued, you can then reissue the following to get the state status:

dfsrmig /getmigrationstate

once its completed, you can move on to step 2

Next step is to change the migration state to 2:

dfsrmig /setglobalstate 2

Once this has been issued, you can then reissue the following to get the state status:

dfsrmig /getmigrationstate

once its completed, you can move on to step 3

Next step is to change the migration state to 3:

dfsrmig /setglobalstate 3

Once this has been issued, you can then reissue the following to get the state status:

dfsrmig /getmigrationstate

once its completed, you can move on to step 4

Final step is to change the migration state to 4:

dfsrmig /setglobalstate 4

Once this has been issued, you can then reissue the following to get the state status:

dfsrmig /getmigrationstate

once its completed (Eliminated), migration from FRS to DFSR has been completed.

Checking in Services.msc, FRS service should have already been stopped and DFSR should now be running & set to Automatic Start.
ADPREP Error When Promoting New Domain Controller

When attempting to promote a new domain controller into an existing active directory environment, an error was encountered that wasn’t previously seen.

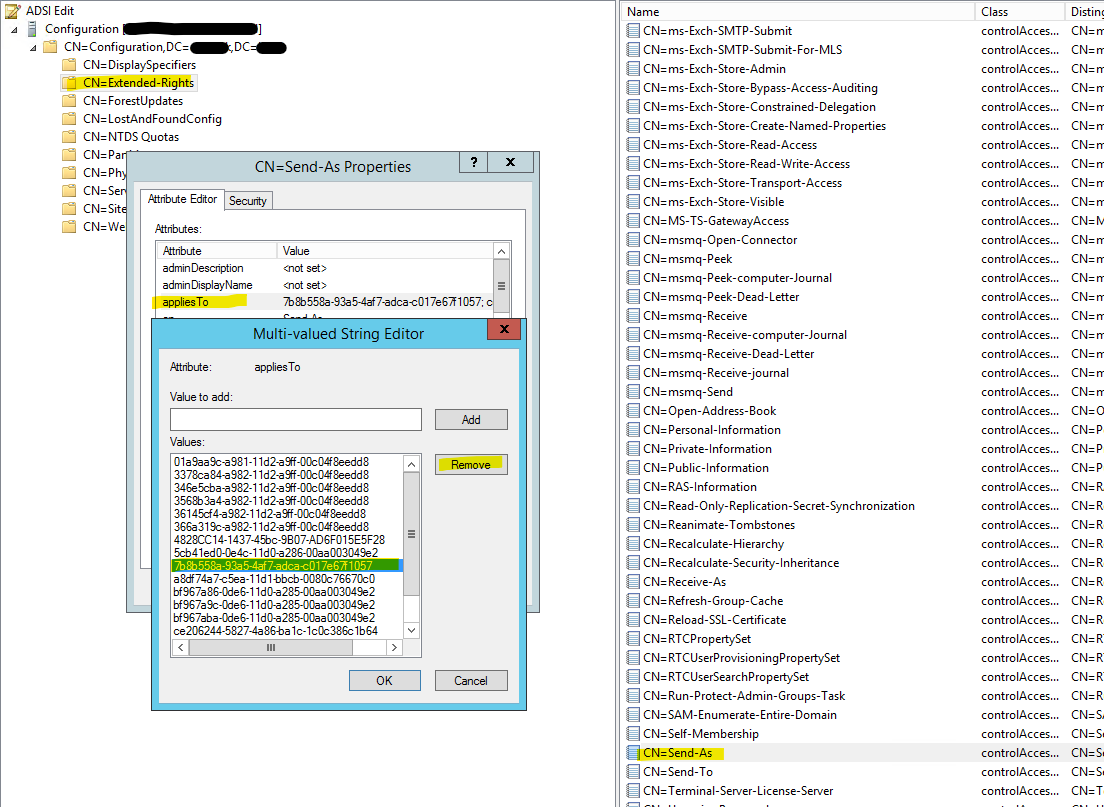
Error: The DN is CN=Send-As,CN=Extended-Rights,CN=Configuration,DC=. 
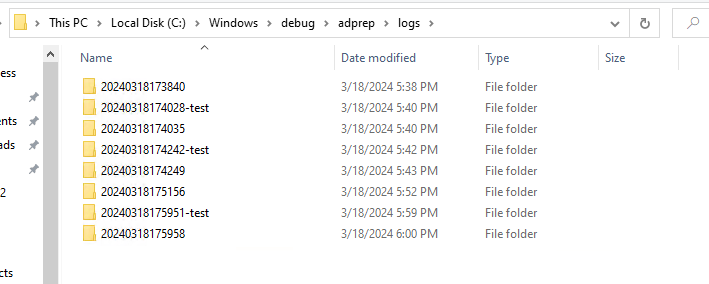
The error logs were located: C:\Windows\debug\adprep\logs\

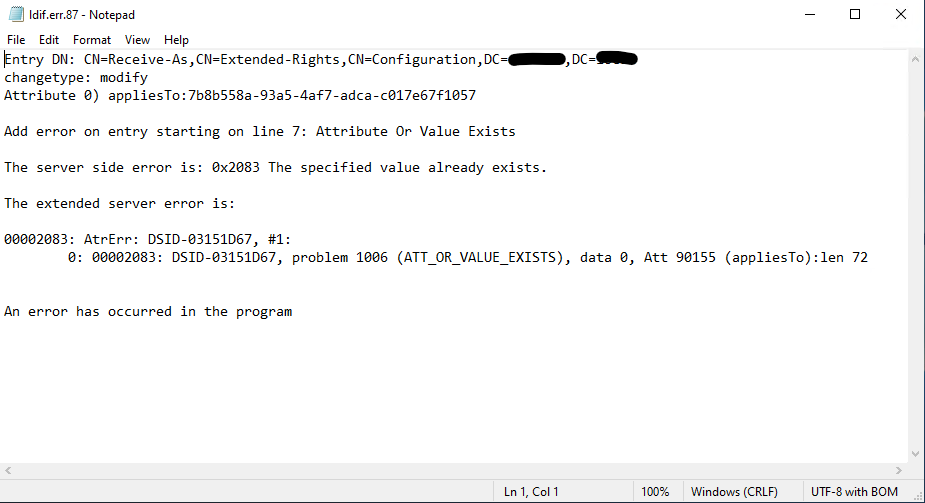
Looking into these folders, find the file ending in .87 and open in Notepad

Note the Attribute 0 appliesTo value

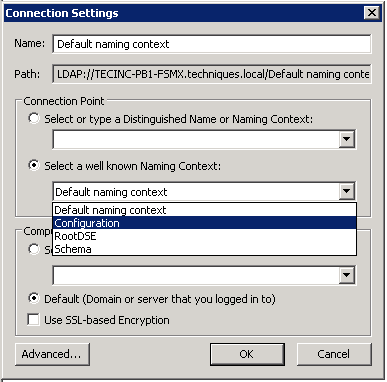
On a functional domain controller, launch ADSI Edit and connect to Configuration

Inside of CN=Extended-Rights, edit the “appliesTo” attribute for the below list of entries to remove the value data mentioned in the log file

List of items to edit:

CN=Send-As,CN=Extended-Rights,CN=Configuration,DC=domain,DC=tld 
CN=Receive-As,CN=Extended-Rights,CN=Configuration,DC=domain,DC=tld 
CN=Personal-Information,CN=Extended-Rights,CN=Configuration,DC=domain,DC=tld 
CN=Public-Information,CN=Extended-Rights,CN=Configuration,DC=domain,DC=tld 
CN=Allowed-To-Authenticate,CN=Extended-Rights,CN=Configuration,DC=domain,DC=tld 
CN=MS-TS-GatewayAccess,CN=Extended-Rights,CN=Configuration,DC=domain,DC=tld 
CN=Validated-SPN,CN=Extended-Rights,CN=Configuration,DC=domain,DC=tld

Once these have been done, attempt to run ADPREP again.

Perform AD Health Check & Clean UP – Before Adding New DC

This guide is intended to demonstrate the key tasks to perform before adding a new Domain Controller to Active Directory, or, when performing extended maintenance on older AD environments where domain controllers have been added & removed in its lifetime.

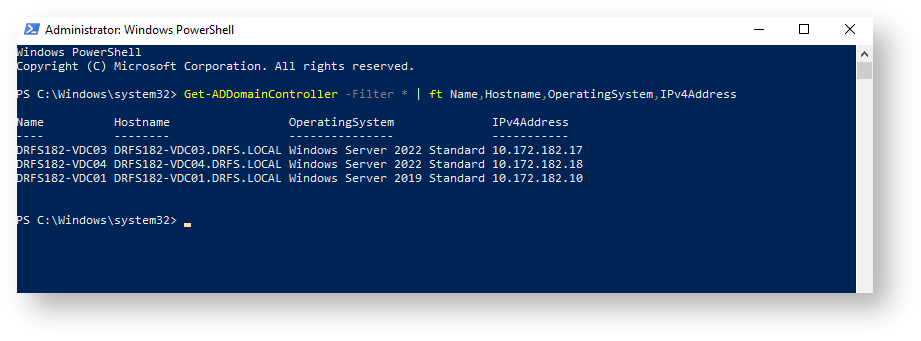
Get a list of all Domain Controllers using an administrative level PowerShell session:

Get-ADDomainController -Filter * | ft Name,Hostname,OperatingSystem,IPv4Address

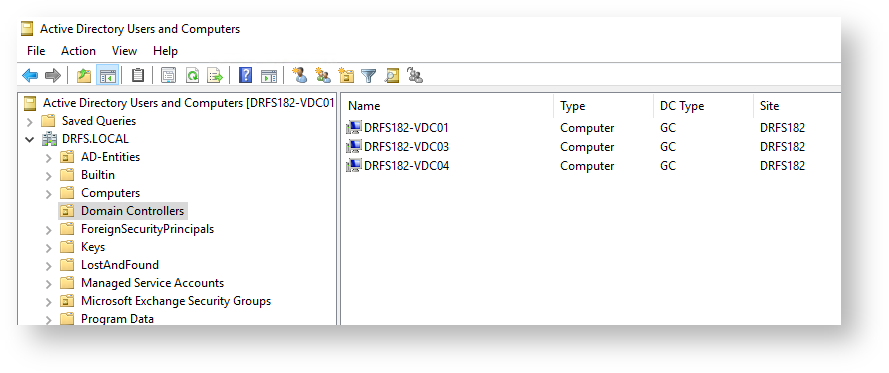
Confirm in Active Directory Users and Computers (ADUC) that this list corresponds with the Domain Controllers OU (typical in simple environments that they all live in the same OU)

Note there are three domain controllers and they’re all Global Catalog located in the same site

Next, launch ADSI Edit

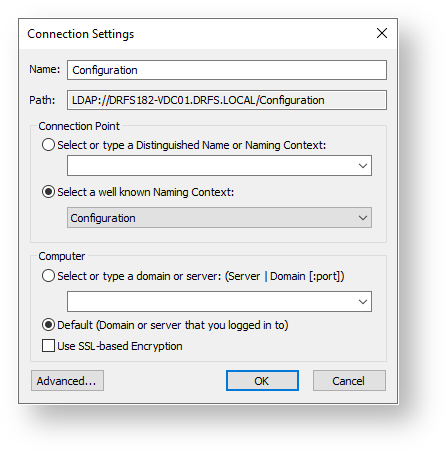
Right-click ADSI Edit in the top of the left tree, click Connect to…

Under the drop down list labelled “Select a well known Naming Context:” select Configuration

Click OK

Expand out:

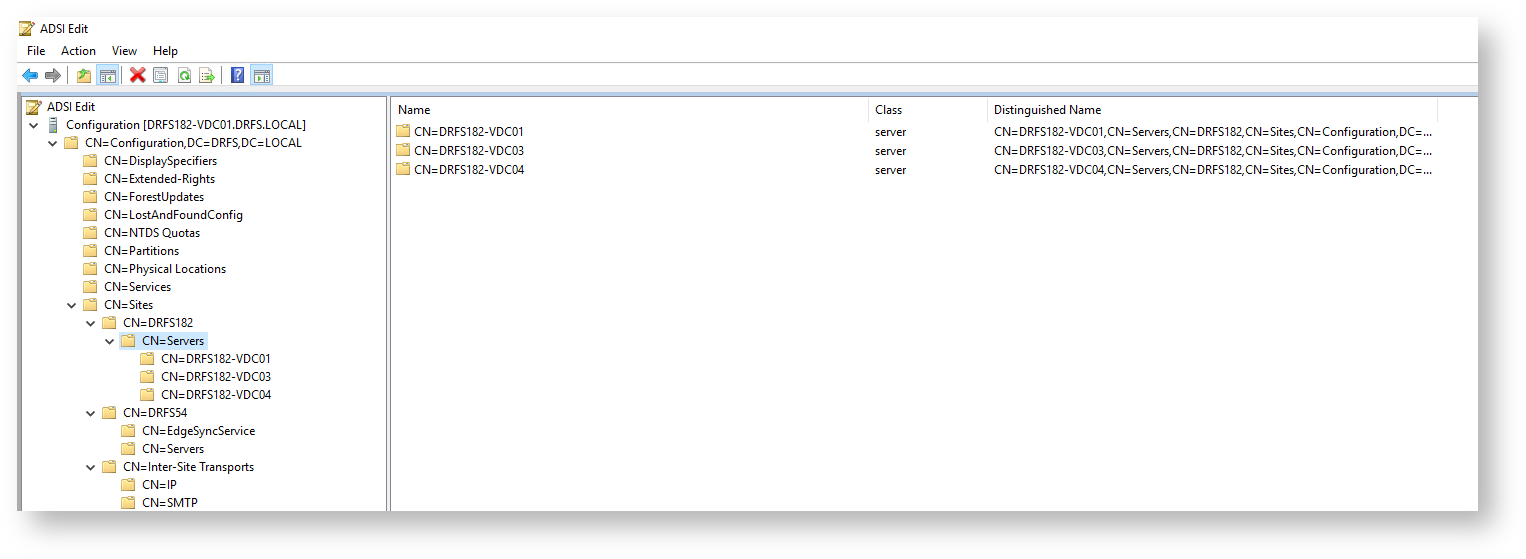
Configuration > CN=Configuration > CN=Sites > CN=(site name) > CN=Servers

Confirm that this list matches that of what you got out of PowerShell earlier

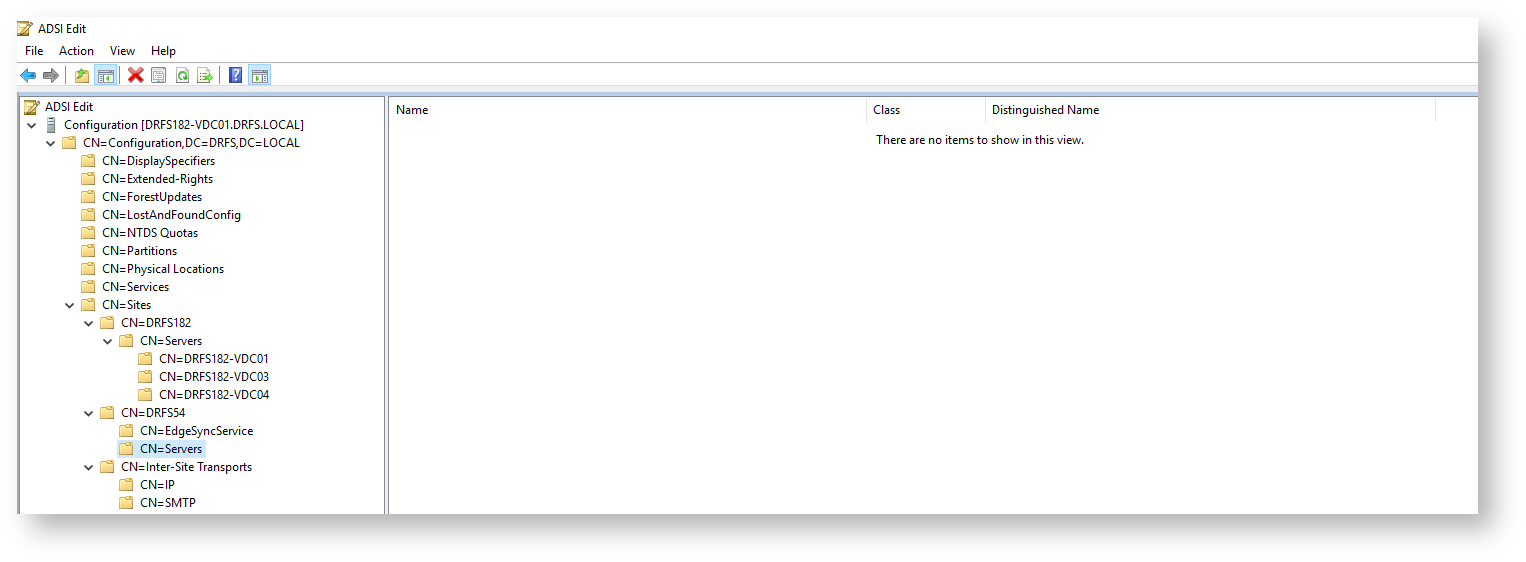
Check each of the CN=Sites for all other CN=Servers – you’re confirming all sites for the presence of their DC (if they have them) or for any remnants of previous domain controllers still present in ADSI Configuration…

Example: This AD environment has multiple sites, and the site named DRFS54 no longer has any domain controllers, so after demoting them, a clean up was performed to ensure there are no remnants of them…

Next, launch the DNS Manager

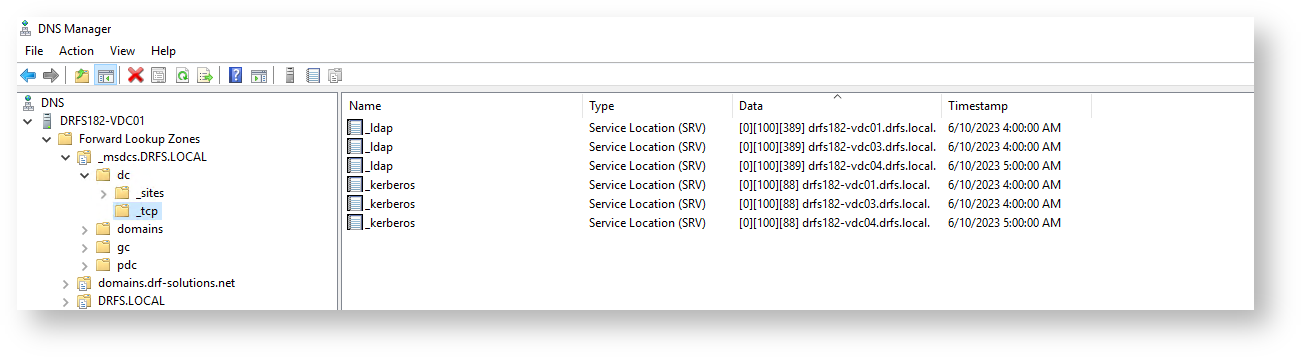
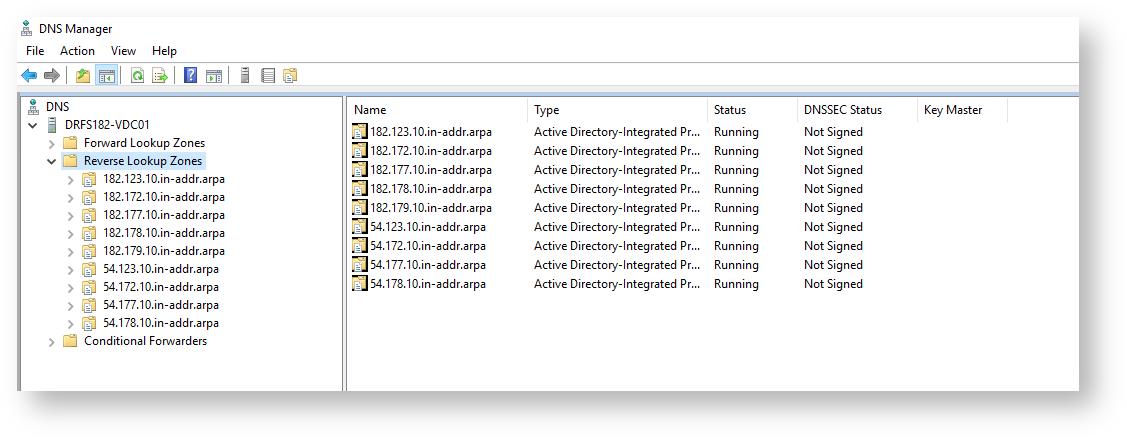
You’ll need to expand out EVERY folder for both forward and reverse lookup zones on the left – you’re going to comb through EVERY one of these – checking for previous, no longer existent domain controllers listed, and ensuring that each zone has only current domain controllers listed…

So in the various AD-specific zones & meta data, check that no old DC’s remain – remove any old ones

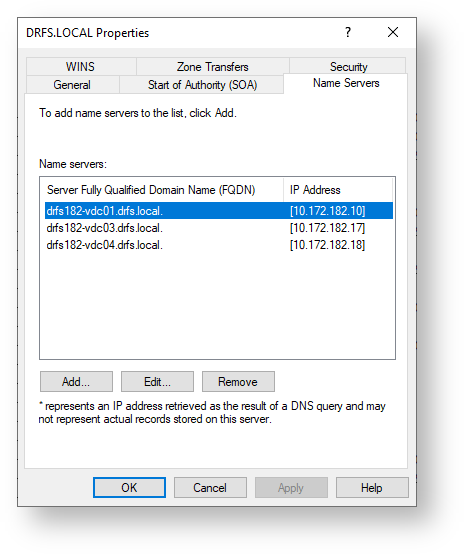
For each zone, right click and select Properties, then click the Name Servers tab

Check & confirm that only current servers are listed – remove any old ones

Repeat the same for all Reverse Lookup Zones. If there are none, it would be good to create any required reverse lookup zones – but do this after the full health check has been completed & errors fixed… A reverse lookup zone will be required for any LAN & VPN subnet that might contain other PCs & servers that will communicate with AD, so in the case where there are multiple sites and remote access, each site and the VPN subnets will be created here.

Next we’ll move onto DCDIAG

Using an elevated command prompt from one of the domain controllers, issue the command:

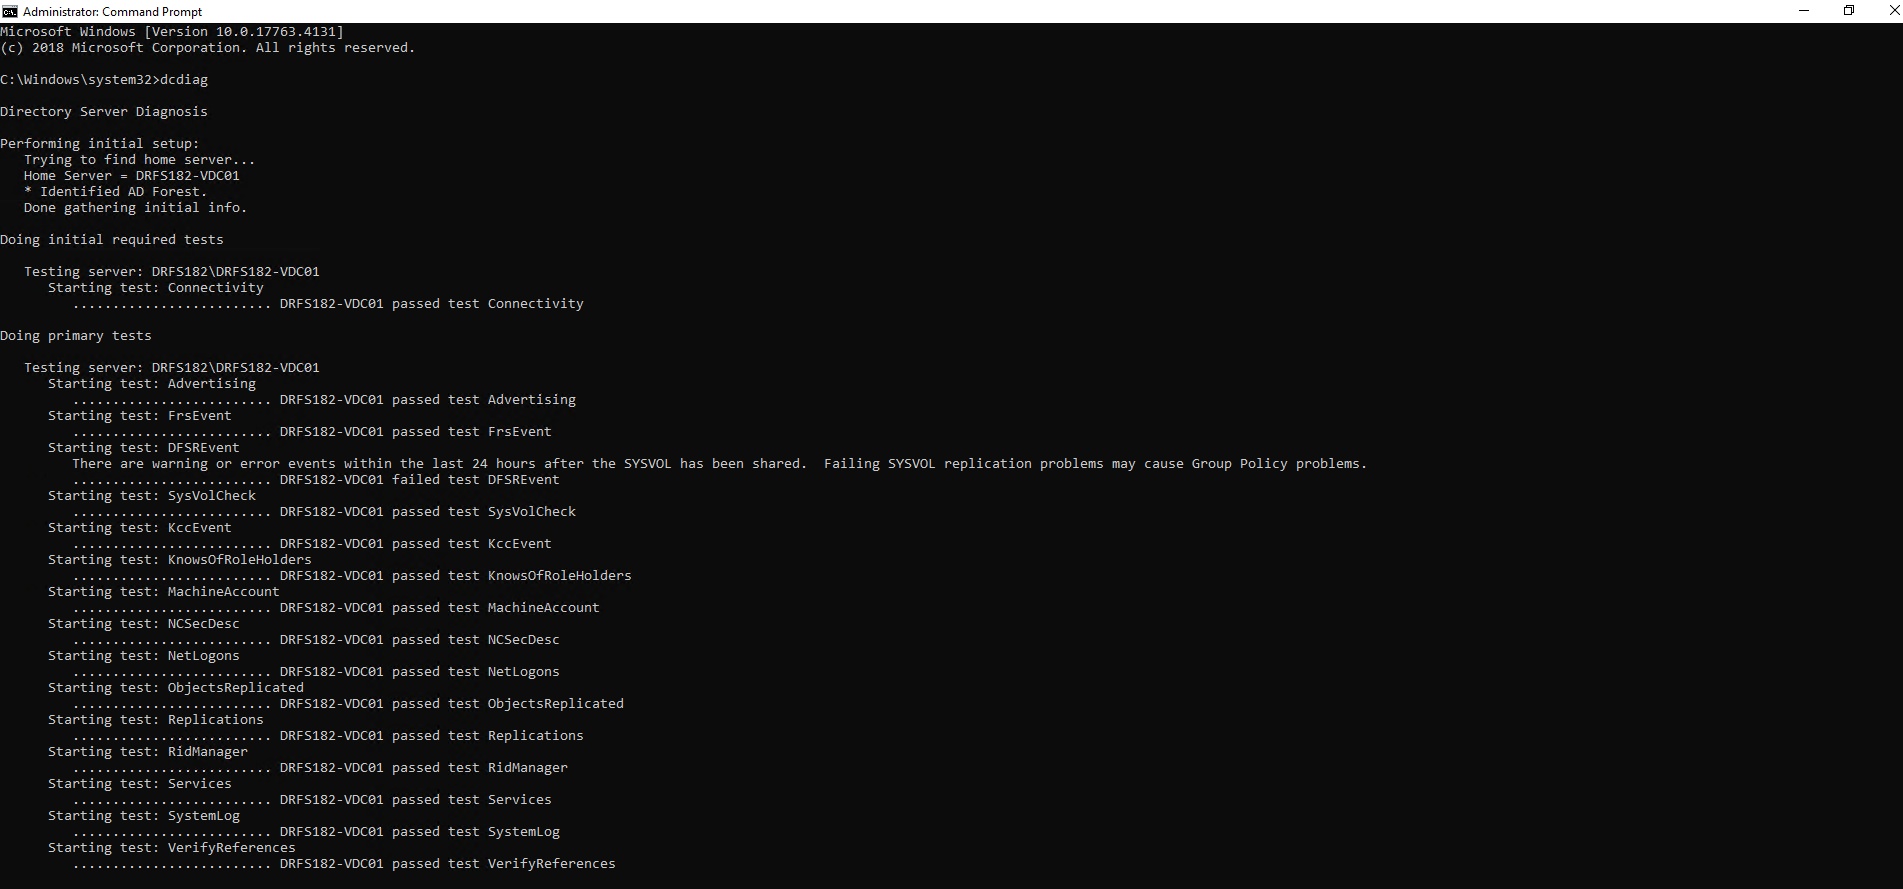
DCDIAG

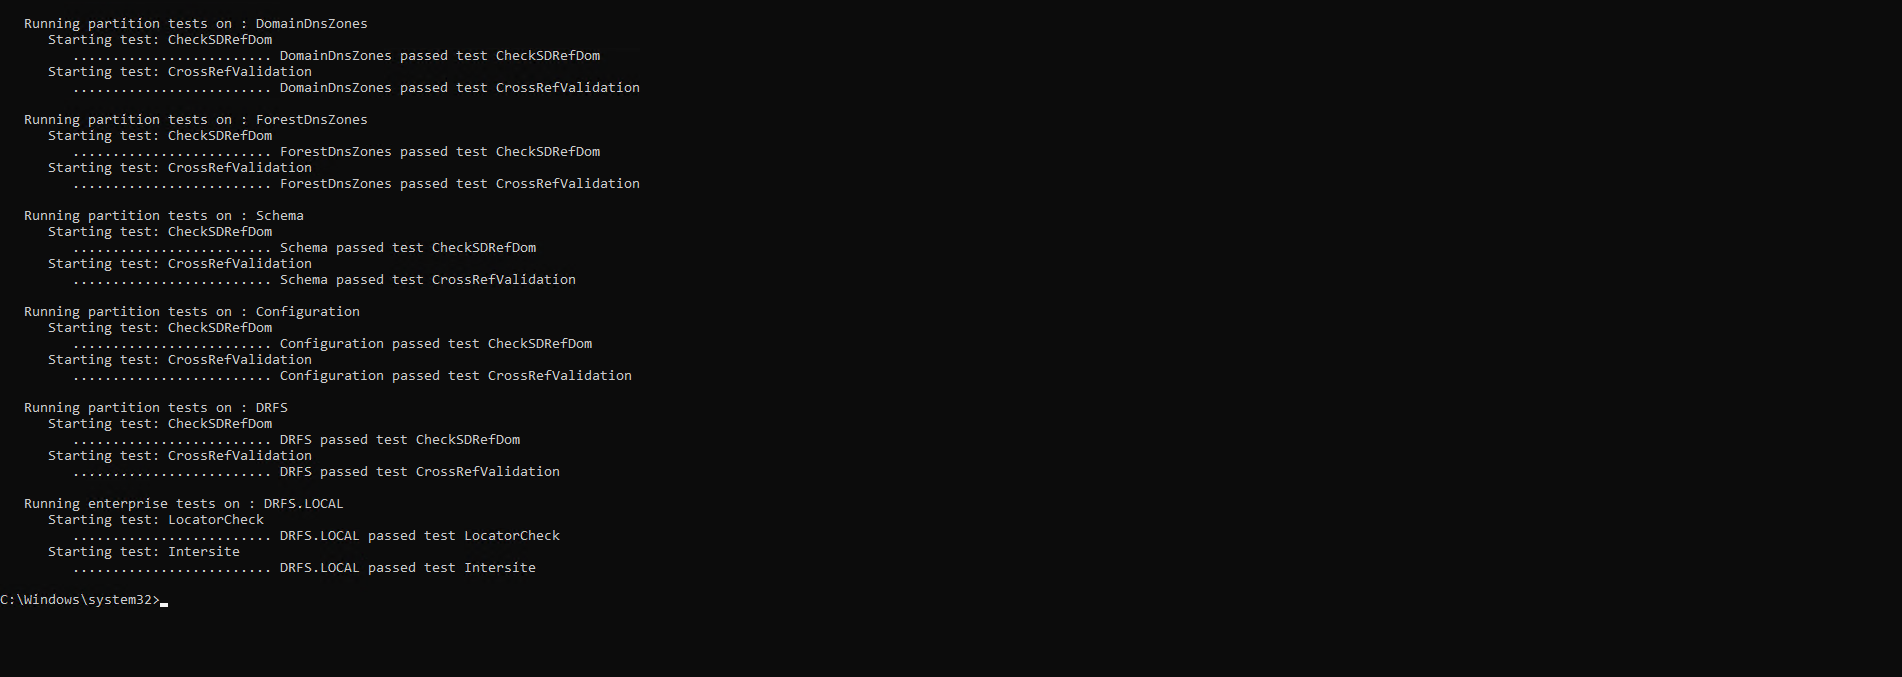
Check the output for any errors

Repeat this on every domain controller

If the domain controller has a VSS-level backup job or has been rebooted in the last 24 hours, you may receive the following error:

Starting test: DFSREvent
There are warning or error events within the last 24 hours after the SYSVOL has been shared. Failing SYSVOL replication problems may cause Group Policy problems.

This is normal and expected, as during either of the above mentioned scenarios, the DFSR service is stopped or paused, a VSS (volume snap shot) is taken, then the service is started again.

Check for other errors and fix up as best as you can – if you’ve had to perform a clean up, then you may need to wait up to 48 hours before some of the errors clear up and no longer show up in DCDIAG results. Google and ChatGPT are your friends here when it comes to errors.

Next, in an elevated command prompt, issue the command:

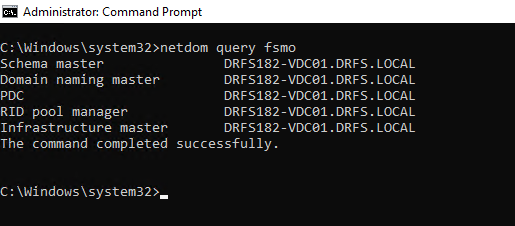
netdom query fsmo

This will output what AD believes is the primary role holding domain controller. If the AD is relatively old, has had servers added & removed in its lifetime, then. perform this check on every domain controller to ensure congruency.

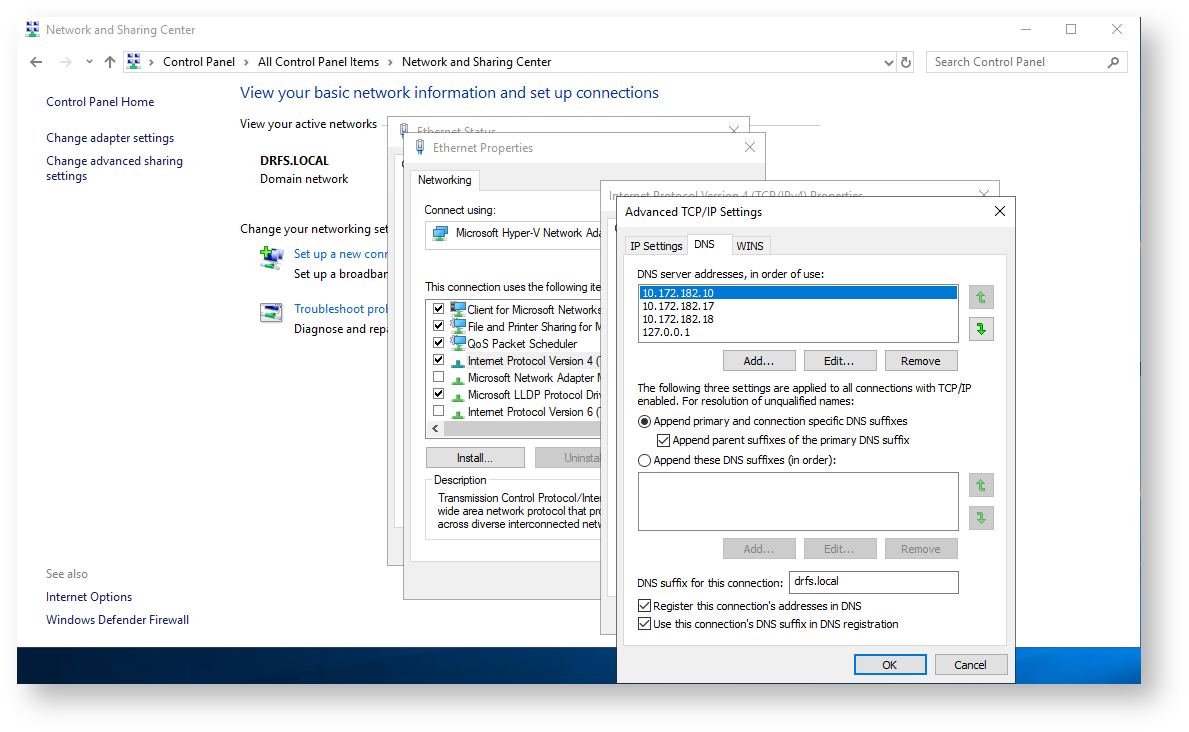
On every domain controller – edit the NIC DNS settings to ensure that every DC has each domain controller’s IP Address as a DNS server, ideally with the PDC/FSMO as the primary IP Address, then all other DCs, followed by its own IP address, fianlly followed up with 127.0.0.1 as the last DNS lookup IP address.

Ensure the AD domain name is in the DNS suffix with registration enabled.

After ensuring this is completed on every domain controller, wait up to 24 hours and perform a final DCDIAG on each domain controller. What you’re looking to achieve is a clean bill of health in DCDIAG as pictured in the above examples!

Now go back and add in the missing Reverse Lookup Zones in DNS manager – check this has replicated across to each DC.

Note: The example AD environment above is for illustration purposes only, may not be reflective of the environment you’re attempting to follow this guide in, and is a testing lab only.

Setup Hyper-V Replication Between Hosts Not AD Domain Joined

Scope:

In this post, we cover the steps required to allow Hyper-V VM replication to occur between Hyper-V hosts that are not domain joined, not in a cluster, not managed by anything else, and are completely standalone.


Preparations:

Hostname Changes:

As Kerberos is only available in the active directory domain, we will need to use HTTPS / SSL certificates to authenticate the Hyper-V hosts with one another. We will do this using Self-Signed SSL certificates that are signed by a test CA.

First thing to do is to ensure that each host has a fully qualified domain name (FQDN) even if its a local FQDN, and is resolvable using DNS over IPv4.

Open a command prompt or powershell session, change directory to: C:\Windows\system32

Enter in:

control sysdm.cpl

This will launch the Control Panel’s System CPL file – the legacy version before modern versions of Windows swapped this out for the System page in the Settings app.

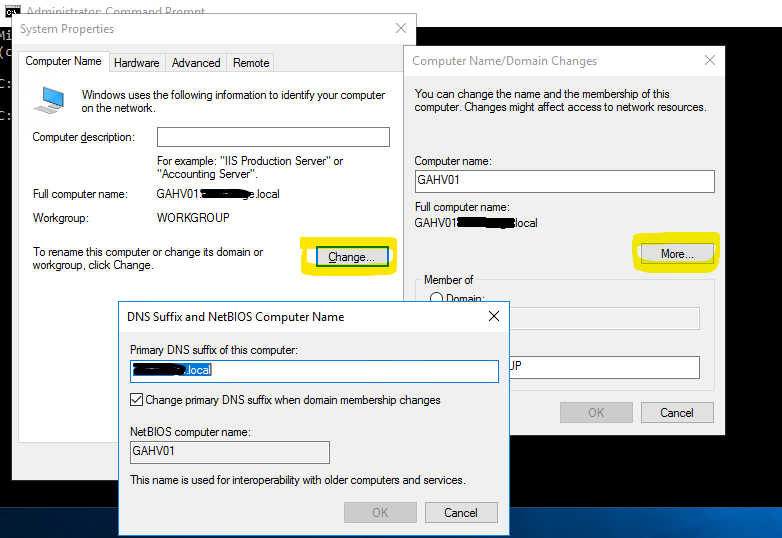
Under the Computer Name tab, click the Change button, the in the name change window, click the More button.

In this screen, add a local or private domain name & suffix to the system.

This will require a reboot of the Hyper-V host for the name change to take effect.

Repeat this on the other Hyper-V host(s). Ideally, you want the domain.tld to match across all hosts.

Ensure the ethernet adapters have this domain in the DNS search suffix list and that the local DNS server is aware of these FQDNs & has A records for each hosts entry.

Generate SSL Certificates:

The next step is to generate the SSL certificates for each host. Pick a host – just the one. Using PowerShell, issue the command:

New-SelfSignedCertificate -DnsName "host1.domain.local" -CertStoreLocation "cert:\LocalMachine\My" -TestRoot
  • The DnsName in quote marks should be reflective of the FQDN hostname of the server.
  • The CertStoreLocation tells the PS SSL generator where to place the generated certificate – we’re installing it in the Personal store on the Computer account.
  • The -TestRoot flag is really key to this, as we’re going to use the built in testing CA to co-sign the certs – which will need to be trusted also.

Repeat the same step on the same host to generate a certificate for each other Hyper-V host that you will be using in the replications, so:

New-SelfSignedCertificate -DnsName "host2.domain.local" -CertStoreLocation "cert:\LocalMachine\My" -TestRoot

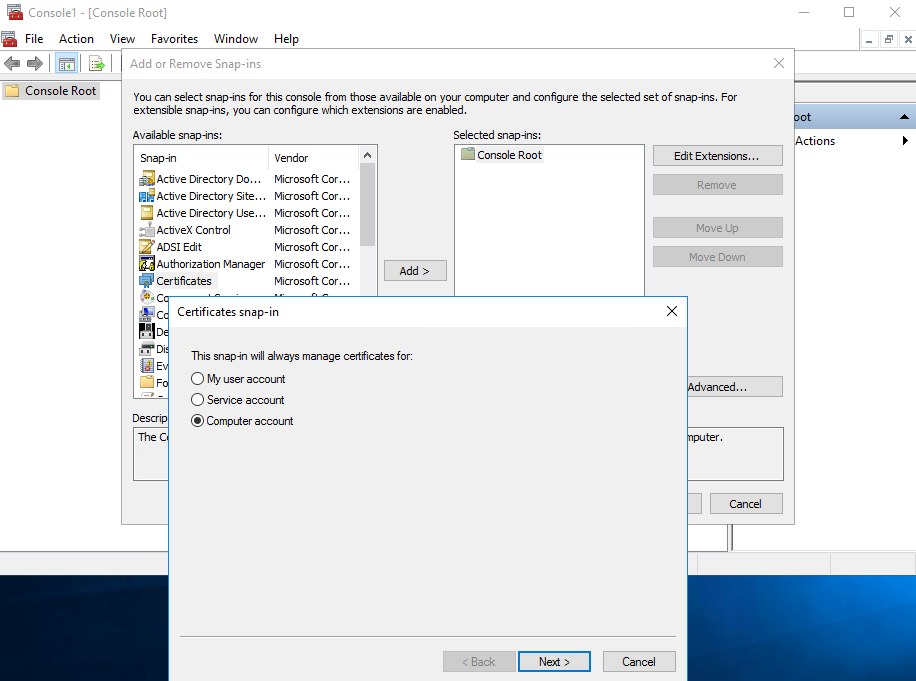
Now launch mmc.exe

In the File menu select Add/Remove Snapin

Choose Certificates from the list and add

Choose Computer account when prompted

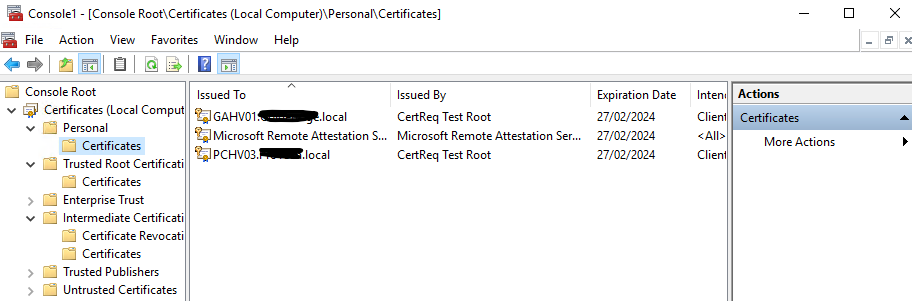
You will see the certs you created listed.

Double-clicking on these will show they’re not signed. This is because we need to move the CertReq Test Root certificate from the folder:

Intermediate Certificate Authorities > Certificates

To:

Trusted Root Certificate Authorities > Certificates

Now that you’ve done this, export each SSL certificate out from the Personal > Certificates folder as PFX files.

  • Right-click on each one, All Tasks > Export…
  • Yes to exporting the private key…
  • Export with all extended properties
  • Set a password and save the file.

Repeat for each of the certificates you generated.

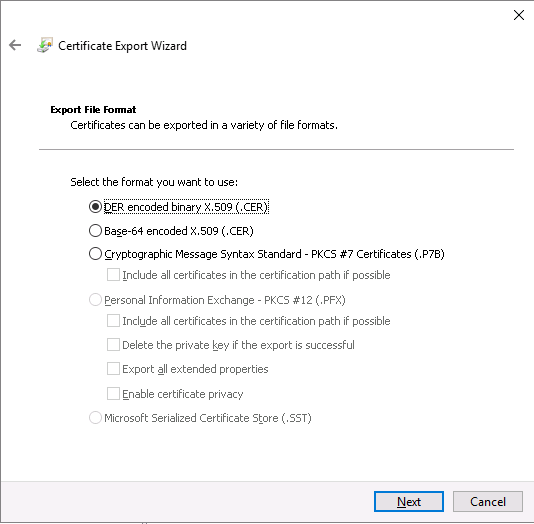
Export the CertReq Test Root CA certificate as well – selecing the DER encoded binary X.509 format

  • Copy these files to each of the other Hyper-V hosts
  • Import the CA into the same Trusted Root Certification Authorities > Certificates folder on each host
  • Import the SSL certificates into the Personal > Certificates folder on each server.

Remember, done from the Computer account, not service or personal accounts.

Opening the self-signed certificates on each host should show up as a valid SSL certificate.

Registry Changes:

We need to tell Hyper-V not to do any revocation checks on the SSL certificates

In an elevated Command Prompt or PowerShell session, enter in:

reg add “HKLM\SOFTWARE\Microsoft\Windows NT\CurrentVersion\Virtualization\Replication” /v DisableCertRevocationCheck /d 1 /t REG_DWORD /f


Enable HTTPS Hyper-V Replication:

Now we can enable Hyper-V replication on each of the Hyper-V hosts.

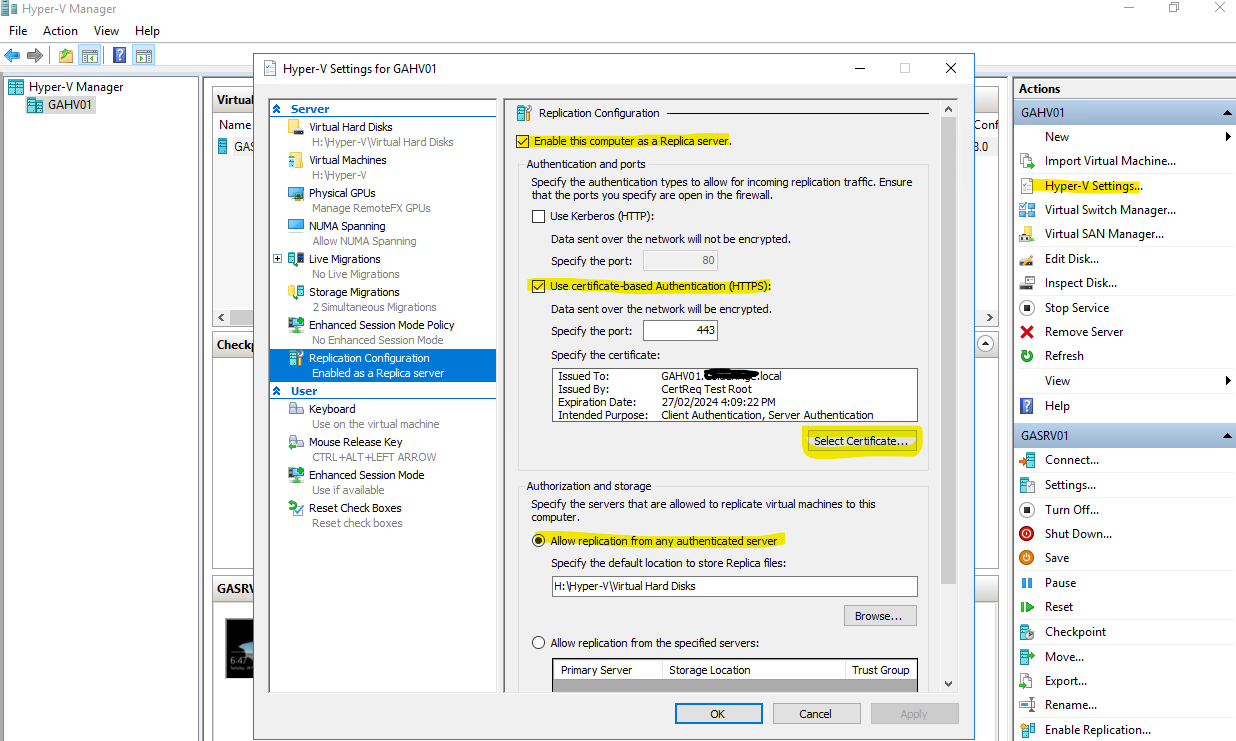
  • Open Hyper-V Manager, select the host, and click on Hyper-V Settings…
  • Select Replication Configuration
  • Tick to Enable this computer as a Replica server
  • Untick Use Kerberos
  • Tick Use certificate-based Authentication (HTTPS)
  • Click Select Certificate… and, if everything above was done correctly, the Specify certificate box will auto-populate with the details of the certificate of this server.
  • Click to allow replication from any authenticated server

Repeat these steps on the other Hyper-V hosts


Configure Hyper-V Replication:

Right-click on the VM you need to replicate

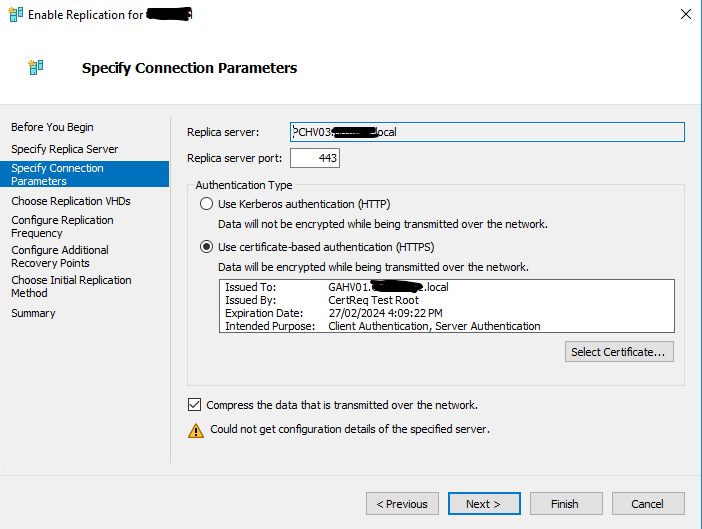
Specify the replica server with its FQDN (ensure that you can first ping the replica server with its FQDN eg: ping host1.domain.local)

Next, choose certificate based authentication

Select the certificate and it should prompt to auto fill this data

From here, the rest should be pretty straight forward – options such as choosing how often, how many versions to retain, etc.


Exchange Server 2019 Unattended Setup Switches

Primary command line switches for unattended mode

The primary (top-level, scenario-defining) command line switches that are available in unattended Setup mode in Exchange 2016 or Exchange 2019 are described in the following table:

SwitchDescription
/IAcceptExchangeServerLicenseTermsNote: Beginning with the September 2021 Cumulative Updates, this switch is no longer available in Exchange Server 2016 or Exchange Server 2019.

This switch is required in all unattended setup commands (whenever you run Setup.exe with any additional switches). If you don't use this switch, you'll get an error.
/IAcceptExchangeServerLicenseTerms_DiagnosticDataON

/IAcceptExchangeServerLicenseTerms_DiagnosticDataOFF
Note: These switches are available beginning with the September 2021 Cumulative Updates for Exchange Server 2016 and Exchange Server 2019.

One of these switches is required in all unattended setup commands (whenever you run Setup.exe with any additional switches). If you don't use one of these switches, you'll get an error.

To accept the license terms and send diagnostic data to Microsoft use the switch with suffix DiagnosticDataON.

To accept the license terms but not send diagnostic data to Microsoft use the switch with suffix DiagnosticDataOFF.
/Mode:
(or /m:)
Valid values are:
> Install: Installs Exchange on a new server using the Exchange server roles specified by the /Roles switch. This is the default value if the command doesn't use the /Mode switch.
> Uninstall: Uninstalls Exchange from a working server.
> Upgrade: Installs a Cumulative Update (CU) on an Exchange server.
> RecoverServer: Recovers an Exchange server using the existing Exchange server object in Active Directory after a catastrophic hardware or software failure on the server. For instructions, see Recover Exchange servers.
/Roles:
(or /Role: or /r:)
This switch is required in /Mode:Install commands. Valid values are:
> Mailbox (or mb): Installs the Mailbox server role and the Exchange management tools on the local server. This is the default value. You can't use this value with EdgeTransport.
> EdgeTransport (or et): Installs the Edge Transport server role and the Exchange management tools on the local server. You can't use this value with Mailbox.
> ManagementTools (or mt or t): Installs the Exchange management tools on clients or other Windows servers that aren't running Exchange.
/PrepareAD (or /p)
/PrepareSchema (or /ps)
/PrepareDomain: (or /pd:)
/PrepareAllDomains (or /pad)
Use these switches to extend the Active Directory schema for Exchange, prepare Active Directory for Exchange, and prepare some or all Active Directory domains for Exchange.
/NewProvisionedServer[:] (or /nprs[:]
/RemoveProvisionedServer: (or /rprs:)
The /NewProvisionedServer switch creates the Exchange server object in Active Directory. After that, a member of the Delegated Setup role group can install Exchange on the server.
The /RemoveProvisionedServer switch removes a provisioned Exchange server object from Active Directory before Exchange is installed on the server.
/AddUmLanguagePack:,...
/RemoveUmLanguagePack:,...
Note: These switches aren't available in Exchange 2019. They're only available in Exchange 2016.

Adds or removes Unified Messaging (UM) language packs from existing Exchange 2016 Mailbox servers. UM language packs enable callers and Outlook Voice Access users to interact with the UM system in those languages. You can't add or remove the en-US language pack.
You can install language packs on existing Mailbox servers by using the /AddUmLanguagePack switch or by running the UMLanguagePack..exe file directly. You can only remove installed language packs by using the /RemoveUmLanguagePack switch.


Optional command line switches for unattended mode

The optional (supporting) command line switches that are available in unattended Setup mode in Exchange 2016 or Exchange 2019 are described in the following table:

SwitchValid ValuesDefault ValuesAvailable With
/ActiveDirectorySplitPermissions:True or FalseFalse/Mode:Install /Roles:Mailbox or /PrepareAD commands for the first Exchange server in the organization.
/AdamLdapPort:A valid TCP port number50389/Mode:Install /Roles:EdgeTransport commands
/AdamSslPort:A valid TCP port number50636/Mode:Install /Roles:EdgeTransport commands
/AnswerFile:""
(or af:"")
The name and location of a text file (for example,"D:\Server data\answer.txt").n/a/Mode:Install /Roles:Mailbox or /Mode:Install /Roles:EdgeTransport commands
/CustomerFeedbackEnabled:True or FalseFalse/Mode:Install and /PrepareAD commands
/DbFilePath:"\.edb"A folder path and an .edb filename (for example, "D:\Exchange Database Files\DB01\db01.edb"). %ExchangeInstallPath%Mailbox\\.edb where:
is Mailbox Database <10DigitNumber> that matches the default name of the database or the value you specified with the /MdbName switch (without the .edb file name extension).
%ExchangeInstallPath% is %ProgramFiles%\Microsoft\Exchange Server\V15\ or the location you specified with the /TargetDir switch.
/Mode:Install /Roles:Mailbox commands
/DisableAMFilteringn/an/a/Mode:Install /Roles:Mailbox commands
/DomainController:
(or /dc:)
The server name (for example, DC01) or FQDN (for example, dc01.contoso.com) of the domain controller.A randomly-selected domain controller in the same Active Directory site as the target server where you're running Setup.All /Mode commands (except when you're installing an Edge Transport server) or /PrepareAD, /PrepareSchema, /PrepareDomain and /PrepareAllDomains commands
/DoNotStartTransportn/an/a/Mode:Install /Roles:Mailbox, /Mode:Install /Roles:EdgeTransport, and /Mode:RecoverServer commands.
/EnableErrorReportingn/aDisabled /Mode:Install, /Mode:Upgrade, and /Mode:RecoverServer commands
/InstallWindowsComponentsA folder path (for example, "E:\Exchange Database Logs").%ExchangeInstallPath%Mailbox\ where:
is Mailbox Database <10DigitNumber> that matches the default name of the database or the value you specified with the /MdbName switch (without the .edb file name extension).
%ExchangeInstallPath% is %ProgramFiles%\Microsoft\Exchange Server\V15\ or the location you specified with the /TargetDir switch.
/Mode:Install /Roles:Mailbox commands
/LogFolderPath:""A folder path (for example, "E:\Exchange Database Logs").%ExchangeInstallPath%Mailbox\ where:
is Mailbox Database <10DigitNumber> that matches the default name of the database or the value you specified with the /MdbName switch (without the .edb file name extension).
%ExchangeInstallPath% is %ProgramFiles%\Microsoft\Exchange Server\V15\ or the location you specified with the /TargetDir switch.
/Mode:Install /Roles:Mailbox commands
/MdbName:""A database filename without the .edb extension (for example, "db01")Mailbox Database <10DigitNumber> (for example, Mailbox Database 0139595516)./Mode:Install /Roles:Mailbox commands
/OrganizationName:""
(or /on:"")
A text string (for example, "Contoso Corporation").Blank in command line setup; First Organization in the Exchange Setup wizard./Roles:Mailbox or /PrepareAD commands for the first Exchange server in the organization.
/SourceDir:""
(or /s:"")
A folder path (for example, "Z:\Exchange).The ServerRoles\UnifiedMessaging folder on the Exchange installation media./AddUmLanguagePack commands in Exchange 2016 (not available in Exchange 2019)
/TargetDir:""
(or /t:"")
A folder path (for example, "D:\Program Files\Microsoft\Exchange").%ProgramFiles%\Microsoft\Exchange Server\V15\/Mode:Install and /Mode:RecoverServer commands
/TenantOrganizationConfig:""A folder path (for example "C:\Data")n/a/Mode:Install or /PrepareAD commands.
/UpdatesDir:""
(or /u:"")
A folder path (for example, "D:\Downloads\Exchange Updates").The Updates folder at the root of the Exchange installation media./Mode:Install, /Mode:Upgrade, /Mode:RecoverServer, and /AddUmLanguagePack commands.


Information source: https://learn.microsoft.com/en-us/exchange/plan-and-deploy/deploy-new-installations/unattended-installs?view=exchserver-2019

Exchange On-Premise – Handy Commands

Some handy commands for Microsoft Exchange Server on-premise – a growing list…

List all mailboxes across all databases:

Get-Mailbox

This doens’t include system & arbitration mailboxes.


List all arbitration mailboxes across all databases:

Get-Mailbox -Arbitration

This doesn’t include user or resource mailboxes.


List all mailbox databases:

Get-MailboxDatabase


Move a single mailbox to another mailbox database:

New-MoveRequest -TargetDatabase <databaseName> -Identity <mailboxID>

Notes:

  • The mailbox identity can be in quote marks
  • The mailbox identity can be one of the following:
    • GUID
    • Distinguished name (DN)
    • Domain\Account
    • User principal name (UPN)
    • LegacyExchangeDN
    • SMTP address
    • Alias


Get the current status of all mailbox move requests:

Get-MoveRequest -ResultSize Unlimited | Get-MoveRequestStatistics


Get the current status of a single mailbox move request:

Get-MoveRequest -Identity "john.doe@example.com" | Get-MoveRequestStatistics


Remove completed mailbox move requests:

Get-MoveRequest -MoveStatus Completed | Remove-MoveRequest -Confirm:$false


Resume all suspended mailbox move requests:

Get-MoveRequest -MoveStatus Suspended | Resume-MoveRequest


DCDIAG Result – Warning: Attribute userAccountControl of DC is: 0x82020

Issue:

When performing a DCDIAG, you get a warning with output:

Warning: Attribute userAccountControl of DC is: 0x82020 = ( UF_PASSWD_NOTREQD | UF_SERVER_TRUST_ACCOUNT | UF_TRUSTED_FOR_DELEGATION )
Typical setting for a DC is 0x82000 = ( UF_SERVER_TRUST_ACCOUNT | UF_TRUSTED_FOR_DELEGATION )
This may be affecting replication?

Cause:

The computer account was pre-created in Active Directory Users and Computers (ADUC) before being added to the domain and promoted as a domain controller.

Fix 1:

  • Launch ADSI Edit and connect to the Default Naming Context
  • Drill down into the Domain Controllers OU
  • Double-click the domain controller and in the Attribute Editor tab, scroll down to userAccountControl
  • You will likely see the value set to something like:
0x82020 = (PASSWD_NOTREQD...
  • Highlight the value and click Edit
  • Change the value in the edit box from 532512 to 532480
  • Click OK and OK again to save the changes

Now running DCDIAG should show this error to have been cleared.

Fix 2:

You can use an elevated PowerShell session to automate the process of the above steps in Fix 1 to all domain controllers in the Domain Controllers OU.

Change the -searchbase criteria in the below and execute:

get-adobject -filter "objectcategory -eq 'computer'" -searchbase "ou=Domain Controllers,dc=domain,dc=tld" -searchscope subtree -properties distinguishedname,useraccountcontrol | select distinguishedname, name, useraccountcontrol | where {$_.useraccountcontrol -ne 532480} | %{set-adobject -identity $_.distinguishedname -replace @{useraccountcontrol=532480} -whatif}

Even if the above command fails to fix the values, it will at least list servers with the incorrect values – handy where there are numerous domain controllers present.

Extra Information:

Some typical values:

  • Standard user: 0x200 (512)
  • Domain controller: 0x82000 (532480)
  • Workstation / member server (non-DC): 0x1000 (4096)


Can’t activate Exchange Server – Use this Exchange Powershell command to activate your Exchange Server

I recently had an issue where through ECP I was unable to activate a new Exchange server 2019 I was building. I believe my issue may have been I was logged into the ECP of an older Exchange (2016) server as the 2019 server’s ECP wasn’t yet accessible.

In any case, you can use this command to activate Exchange servers from the Exchange Powershell:

Set-ExchangeServer -Identity MyNewExchangeServer -ProductKey 12345-12345-12345-12345-12345

Once this has been successfully issued, you will need to restart the Microsoft Exchange Information Store service.


Change the default OU’s in AD for new Users and Computers

By default, when new users & computers are created in active directory where the OU hasn’t been specified at creation, AD defaults to the following OU’s:

  • Users go into: DC=domain,DC=tld\Users
  • Computers go into: DC=domain,DC=tld\Computers

These can be changed to go into OU’s that you choose by issuing the following commands in an elevated PowerShell session / command prompt and change directory to:

cd C:\Windows\System32\

Users:

redirusr “OU=<newuserou>,DC=<domainname>,DC=com”

Computers:

redircmp “OU=<newcomputerou>,DC=<domainname>,DC=com”

Hint: Obtain the OU distinguish name from the advanced properties of the OU itself.

Restrict High Memory Usage by Information Store on Exchange 2007 / 2010 (also SBS 2008 / 2011)

Scope:

Microsoft Exchange Server 2007 and Microsoft Exchange Server 2010 (in conjuncion with Active Directory), or Microsoft Small Business Server 2008 / 2011.

Issue:

Microsoft Exchange Information Store (store.exe) consuming excessive amounts of system memory, often causing the server performance to take a significant hit.

Solution:

On the domain controller, open ADSI Edit (adsiedit.msc)

Connect to Well Known Name Context: Configuration

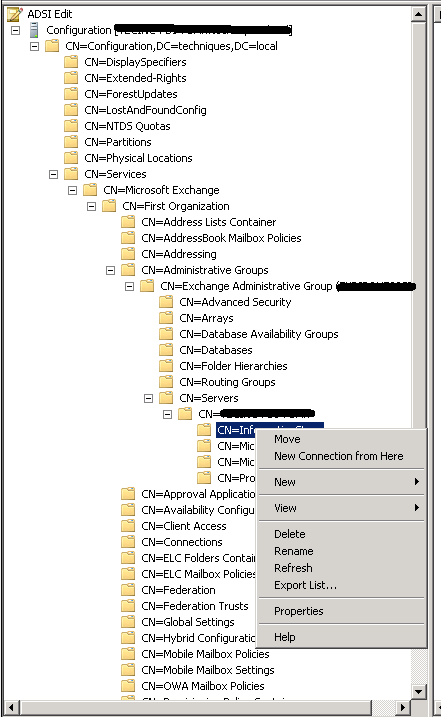
Drill into: Configuration > Services > Microsoft Exchange > [domainName] > Administrative Groups > Exchange Administrative Group > Servers > [serverName]

Right click on the server name and right click Information Store, then go to Properties

In the properties window, scroll down to the two attributes:

  • msExchESEParamCacheSizeMax
  • msExchESEParamCacheSizeMin

By default, the values of both are <not set>

We need to set values for both, if you only set values for the Max, then without the Min, the setting will not take place.

For Exchange 2007 (SBS 2008):

  • 1GB – 131072
  • 2Gb – 262144
  • 4Gb – 524288
  • 6Gb – 786432
  • 8Gb – 1048576

For Exchange 2010 (SBS 2011):

  • 1Gb – 32768
  • 4Gb – 131072
  • 6Gb – 196608
  • 8Gb – 262144
  • 12Gb – 393216

Note that Exchange 2007 uses a page size of 8KB and Exchange 2010 uses a page size of 32KB (hence the differing values).

Restart (or schedule restart) the Exchange server once the values have been applied.

Notes:

Although this solution is documented by Microsoft its not a supported configuration.

Don’t set the Max values too small otherwise your mailbox store may run into other issues and if too small, will cause more disk paging instead.