Tasks to be performed post SSL Certificate renewal on Hybrid Exchange server environments

Forward:

This guide is for environments where Exchange On-Premise 2013/2016/2019 is configured as a hybrid deployment with Microsoft 365 Exchange Online.

Requirements:

It assumes you have an administrator mailbox account that can login to both Exchange On-Premise as an Exchange Administrator and login to Microsoft Exchange 365 Online as a Global Admin.

You will also require an active, functional mailbox sitting in the mailbox database located in the Exchange On-Premise. This mailbox does not need to have any administrative rights, it doesn’t even have to be in use actively by a user, it just needs to exist for testing purposes.

The Exchange On-Premise needs to be externally accessible on ports: 25, 80, and 443.

Prerequisite Checks:

First, we need to check the health of the AD-Sync deployment. In the Microsoft 365 Admin Center, head to Health > Directory sync status

Check that Directory sync is on & healthy, no errors, and make sure password sync is also working.
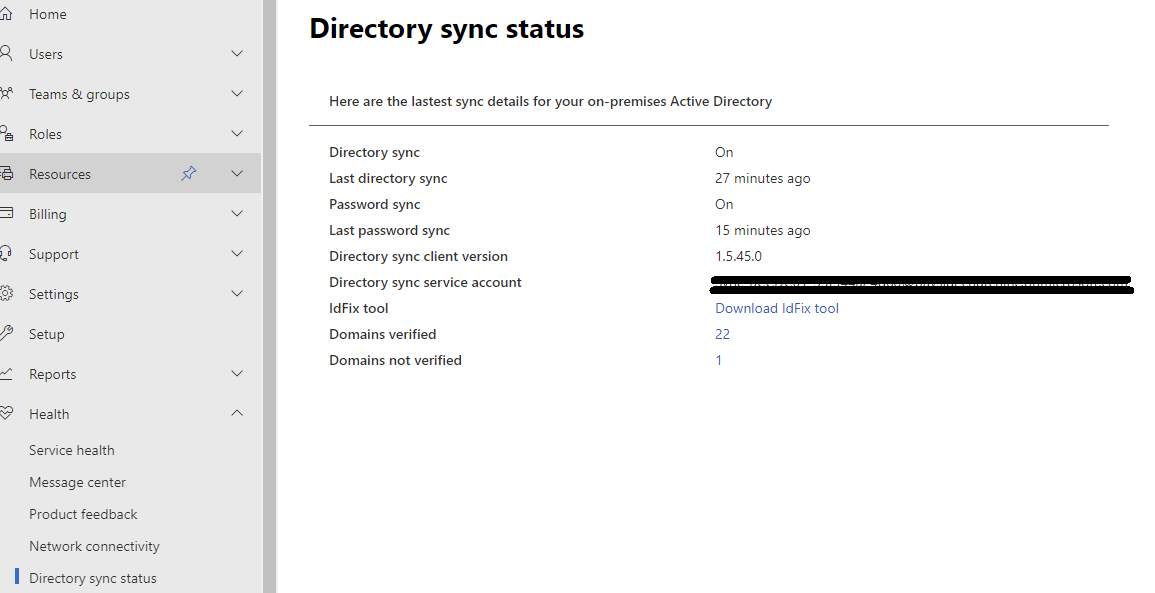
Ideally, recent syncs should be less that 40 minutes.

If AD Sync isn’t working properly, address this problem before continuing any further.

Microsoft has recently split off support for Microsoft Windows Server 2012 R2, so this version of Windows is less likely to receive any updates. If you’re in this situation, you may need to download Azure AD Connect version 1.6.16.0. More on the Azure AD Connect version history here. Please note, that as of August 2022, all Azure AD Connect versions 1.x.x.x will be retired as they use Microsoft SQL Server 2012 which will no longer be supported.

If you’re in an environment still operating on Windows Server 2012 R2, now is the time to start planning an upgrade – even if that upgrade means deploying a more modern version of Windows Server (2016/2019/2022) as a domain member or secondary domain controller, and configuring Azure AD Sync on this newer server instead.

Certificate Installation on On-Premise Exchange server:

You will need to already have your new certificate file(s) – ideally, you want the full stack certificate file in pfx format.

Login to your Exchange server’s desktop environment as a domain admin, copy the P12 PFX file to somewhere local on the Exchange Server.

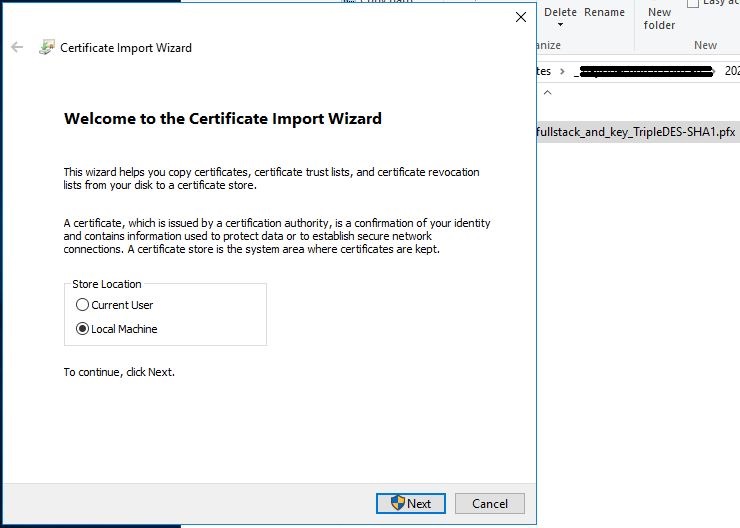
Double-click the certificate file to launch the certificate installation wizard

Select Local Machine and click Next
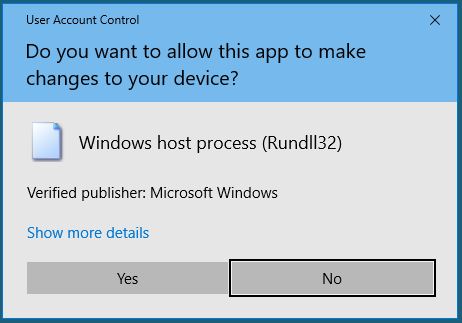
Confirm by clicking Yes if you are prompted with the UAC elevation prompt
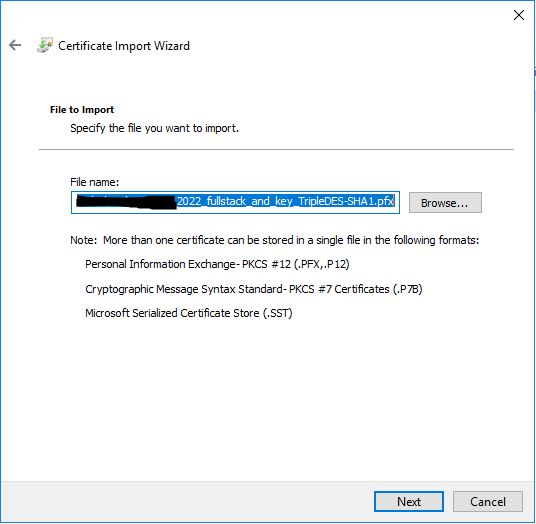
On the next screen, just click next
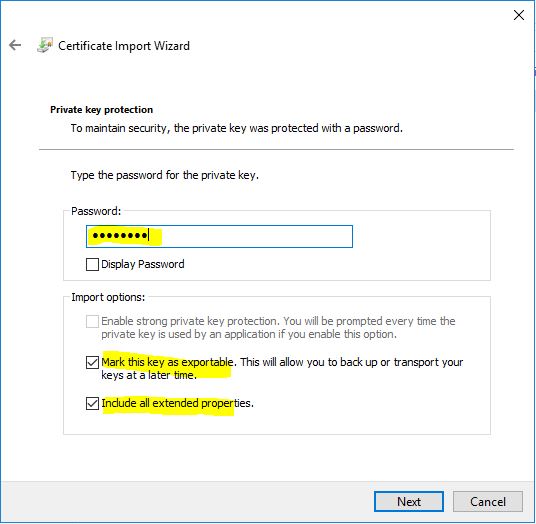
This next step is pretty crucial especially, if later you need to export the certificate for use elsewhere…

Enter in the password for the PFX file.

Ensure that both options are ticked for:

  • Mark this key as exportable
  • Include all extended properties

Now, if the certificate is properly formatted, the Automatic store selection should just work fine here. If not, select the Personal certificate store.
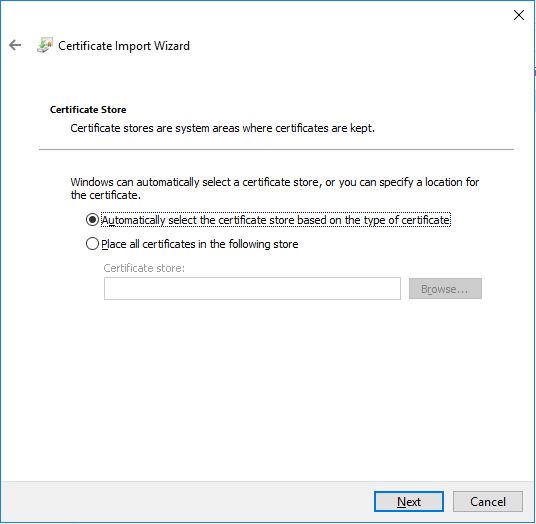
Now we need to check the certificate in the Certificates snap in for the local machine and ensure we give it a meaningful name

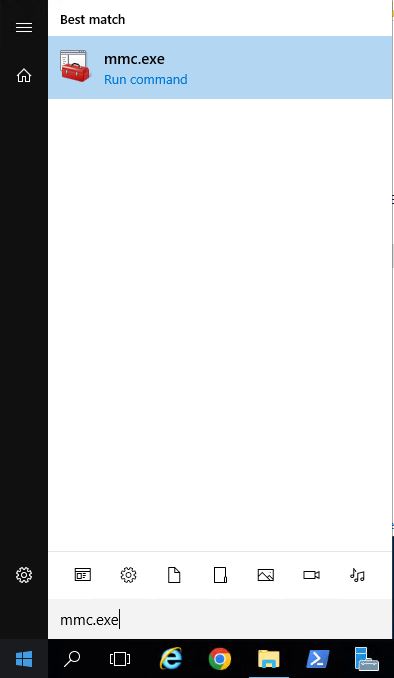
Click start, type in mmc.exe – once its listed, press enter (note: if UAC is on, you will be prompted to click Yes again).
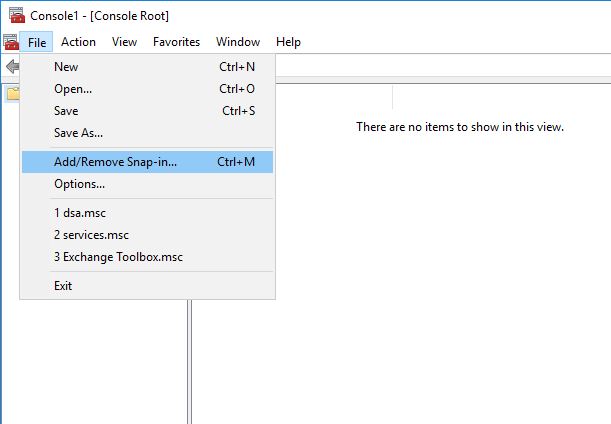
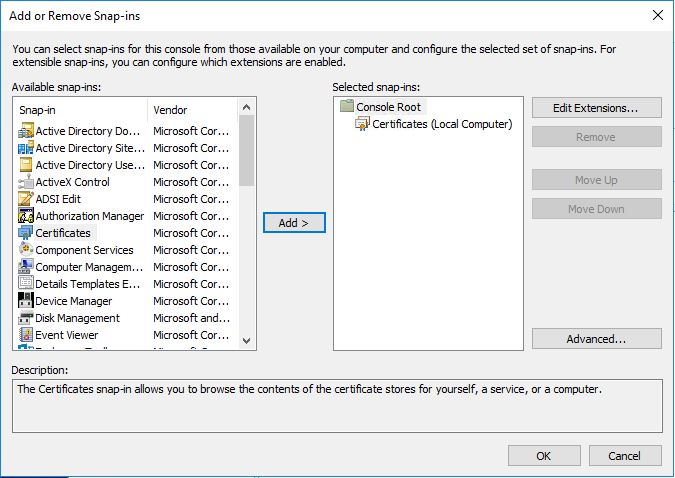
Click File > Add/Remove Snap-in…
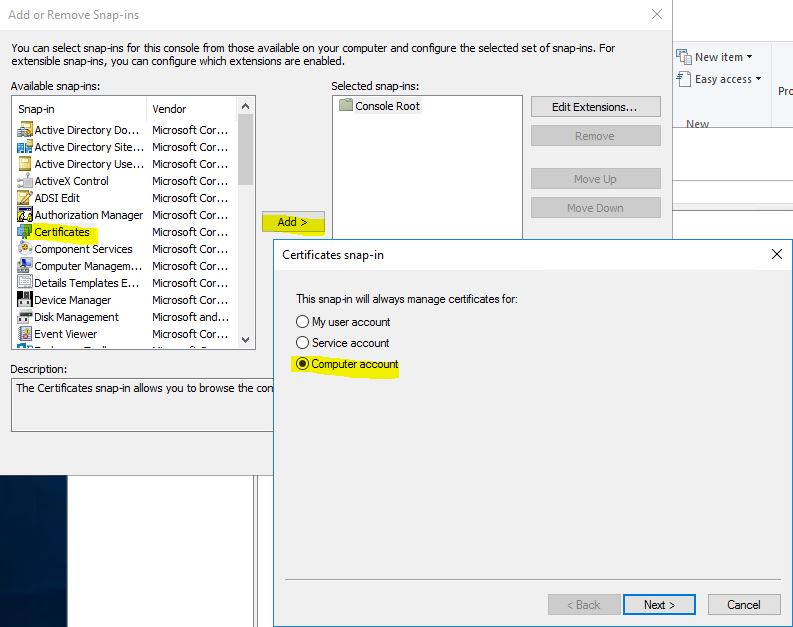
In the left box, choose Certificates, click the Add button

It will prompt you to select what certificates to manage – select Computer account and click Next
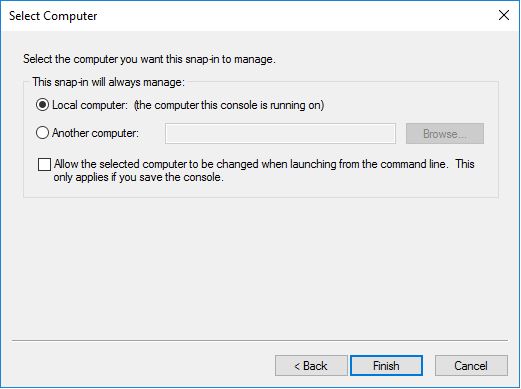
Select Local computer and click Finish
Click OK
Expand out Certificates > Personal > Certificates
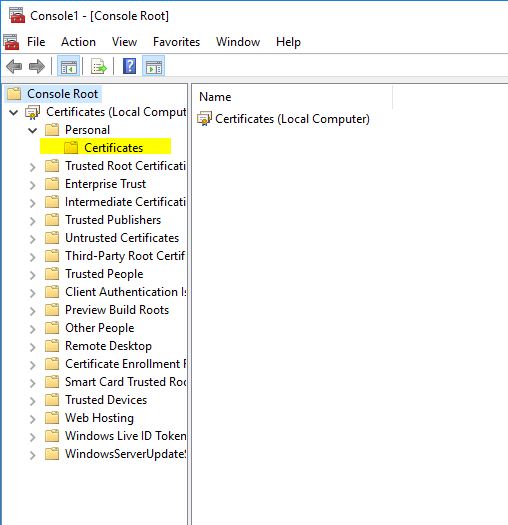
Click on the Certificates folder you revealed under Personal

You will be presented with all the certificates

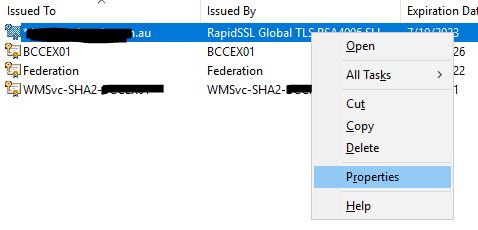
You will see both the expiring / expired certificate and the newly installed certificate. Note, neither of these have a ‘friedly name’ – we’re going to fix this now.

Right-click on the newly installed certificate and click Properties
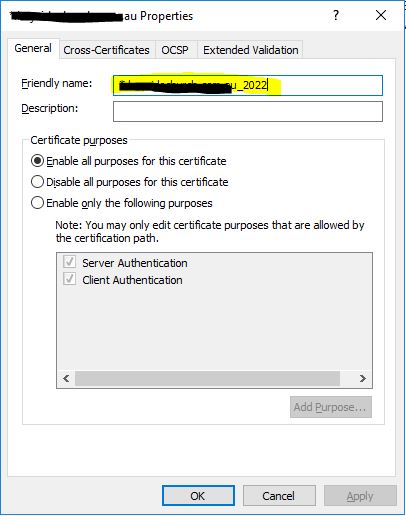
In the properties window, give the certificate a friendly name – this is very helpful to identify this certificate when there are several with the same SAN. Ideally, I like to use the FQDN_YYYY at the very least which indicates the fully qualified domain name, and underscore, and the year the certificate was installed. Some techs will use the installation date or the expiry date. If you do this, maybe also add in the words installed or expires so the next time this is revisited, the date is more meaningful.

Once you have the name, click OK.
Update Bindings in IIS:

Now the friendly name filed in the certificates list will have the name you entered against that certificate. Go ahead and close the MMC certificates console.

Next we need to launch the IIS interface and expand out all the sites.

First click on the Default Web Site and expand it – this will likely have all the front end facing sites & services.
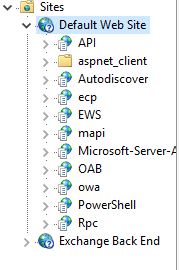
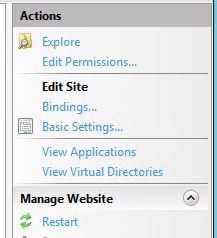
Now on the right side under the Actions menu, click Bindings…
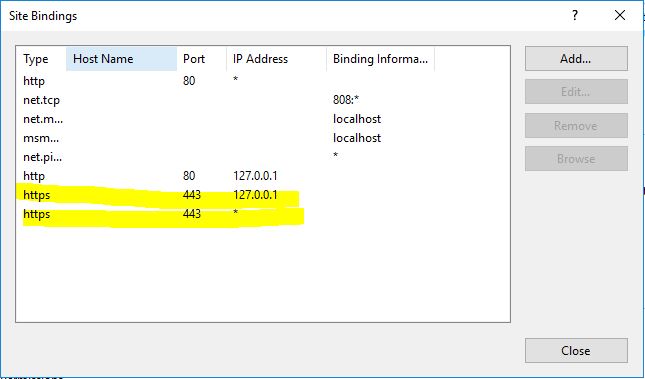
Any of the bindings in here that are on https need to have the new certificate applied
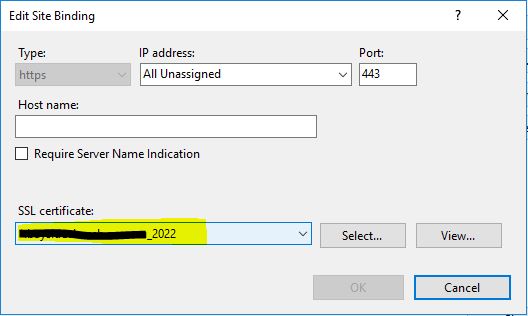
Double-click and set the new certificate for each one
Once these are done, move onto the Exchange Back End pool
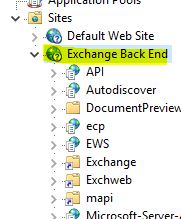
Again, on the right, click to edit the Bindings in the Actions menu

There’s usually only a single binding on https and uses port 444.

Note: This is almost always meant to use the default “Microsoft Exchange” certificate issued by the Exchange server, so don’t change this unless it for some reason already has the expiring signed SSL certificate or is required to have a 3rd party certificate!
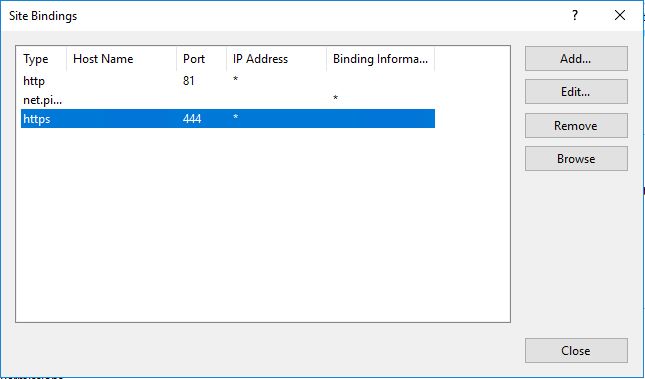
Again, edit this binding to use the new certificate
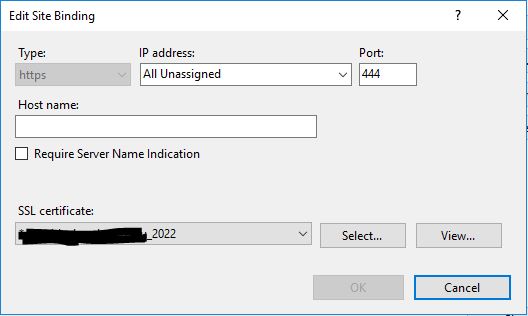
Once the bindings have all been updated, you may need to restart IIS – note this will disconnect any connected clients.

In the tree on the left, click on the server, then on the right under the Actions menu, click Restart – this may take a minute

Update Connectors in Exchange:

Login to the Exchange ECP Web UI with the administrator account.

While you’re at it, open another tab in the same browser and use this other tab to login to the Microsoft 365 Admin Center – using the same account credentials.

In the On-Premise Exchange ECP, head to Servers > Certificates
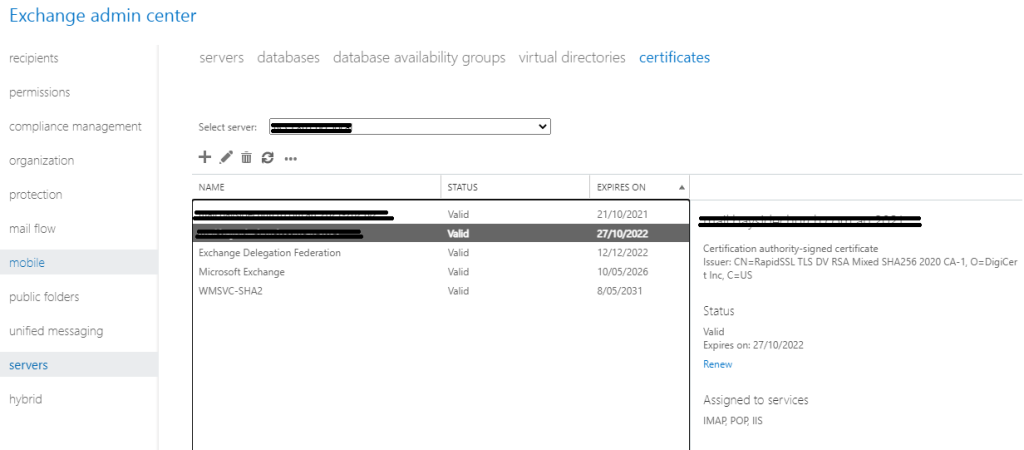
Double-click the new certificate

Locate the Thumbprint, copy and paste this into a notepad session (you’ll need this shortly)

You will need to select Services and then tick box:

  • SMTP
  • IMAP (optional, but not available for wildcard certificates)
  • POP (optional, but not available for wildcard certificates)
  • IIS

(Note that IMAP and POP are optional, but recommended to choose them if clients are connecting using these protocols)

Click Save

You may receive a Warning prompt about overwriting the existing default SMTP certificate, Choose Yes.


Update Default Send and Receive Connectors in Exchange On-Premise PowerShell:

Launch an Exchange PowerShell for the On-Premise Exchange server

Issue the command:

Get-ExchangeCertificate

This will list all of the installed SSL Certificates on the Exchange server

Note, the Thumbprints for each will be listed – confirm your new SSL Certificate’s Thumbprint should be listed there as well.

Let’s place the Thumbprint into the PowerShell session’s environment variables

$cert = Get-ExchangeCertificate -Thumbprint XXXXXX
$tlscertificatename = "<i>$($cert.Issuer)<s>$($cert.Subject)"

(The second line will be used a little further down)

Let’s enable secure SMTP using the new certificate:

Enable-ExchangeCertificate $cert -services SMTP

Note: Due to recent Exchange updates, if you get an error similar to the below running this, change the command to:

 Enable-ExchangeCertificate <thumbprint> -services SMTP

and it should work

Now let’s get the Send Connectors list and update the connector with the new certificate

Get-SendConnector

This will list all the send connectors, locate the connector used to connect with Office 365 – it will look something like:

"Outbound to Office 365"

Let’s set this connector to use the new certificate:

Set-SendConnector "Outbound to Office 365" -TlsCertificateName $tlscertificatename

Repeat for any other send connectors that are in use

Next, we need to do the same for the Receive Connector(s)

Issue the command:

Get-ReceiveConnector

to get the list of all the receive connectors

Identify which connector(s) are using secure protocols for incoming connection (incl. from Office 365). Eg:

<ExchServer>\Default Frontend <ExchServer>
<ExchServer>\Client Frontend <ExchServer>
<ExchServer>\Client Proxy <ExchServer>

Where <ExchServer> is the local host name of the Exchange server.

You may have multiple receive connectors that require updating, so the below will need to apply to these as well.

Set-ReceiveConnector "<ExchServer>\Default Frontend <ExchServer>" -TlsCertificateName $tlscertificatename

Update the Office 365 receove connector as well.

You can now delete the expiring SSL certificate from the Exchange server (via IIS or Certificate manager).

Head back to Exchange ECP > Mail Flow > Send Connectors
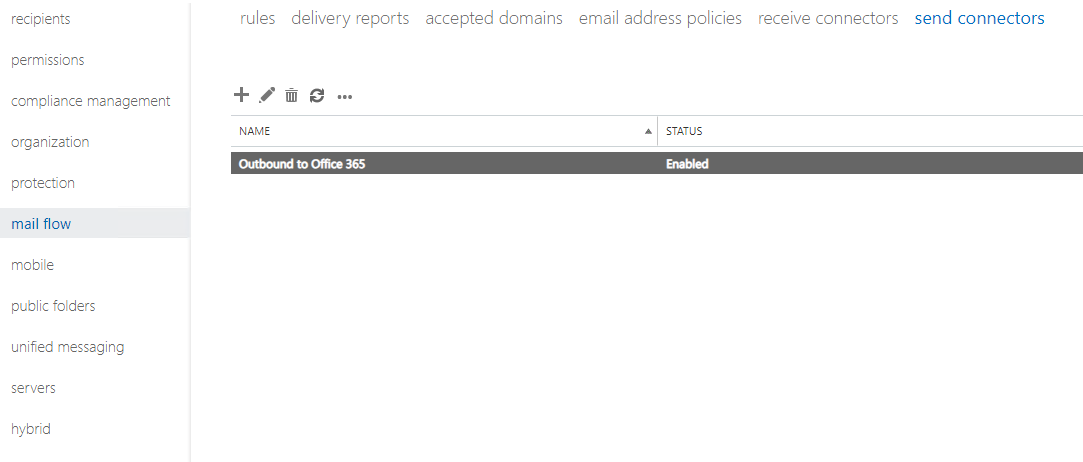
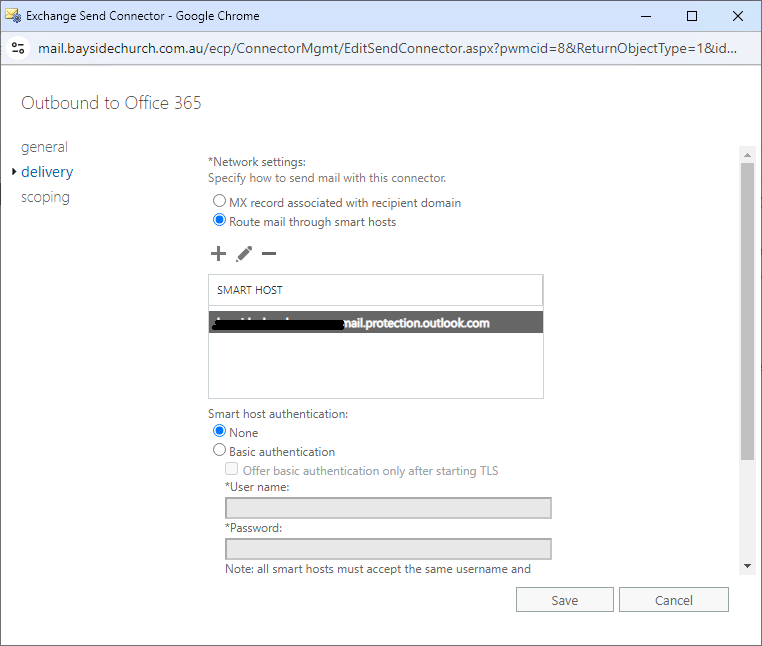
Edit the Send Connector used by Office 365 to note down the following settings:

Delivery > mail routing (MX or Smart Host)
Scoping > Address Space
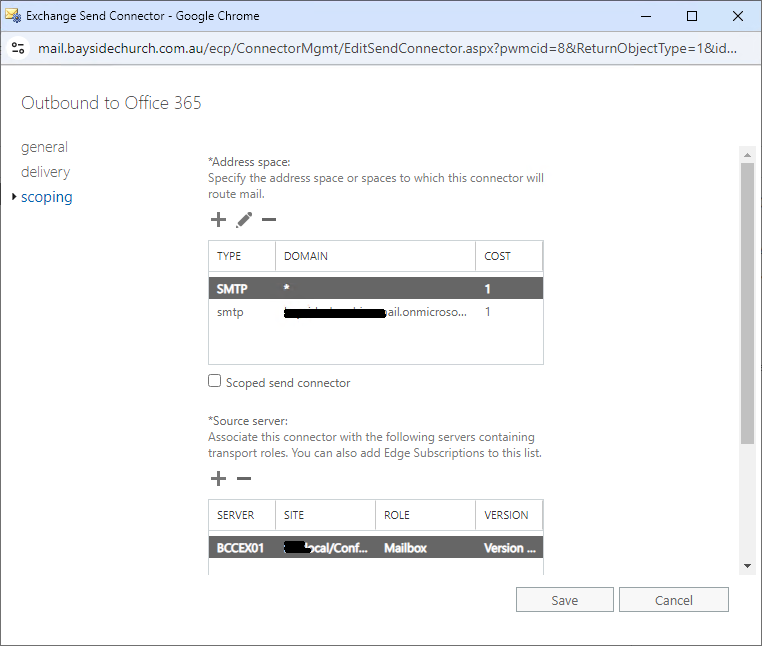
Again, note these settings down as the Hybrid Configuration Wizard will overwrite them and mail break some mail flow.


Re-Validate the Hybrid Configuration:

The below process has been completely re-written as the process has changed extensively. Migrations are no longer performed on the on-premise Exchange server.

From the desktop of the Exchange server launch the Microsoft Office 365 Hybrid Configuration Wizard:

Its likely an update will be offered, so please proceed with the update installation

Once all updated and installed, click Next at the Welcome screen

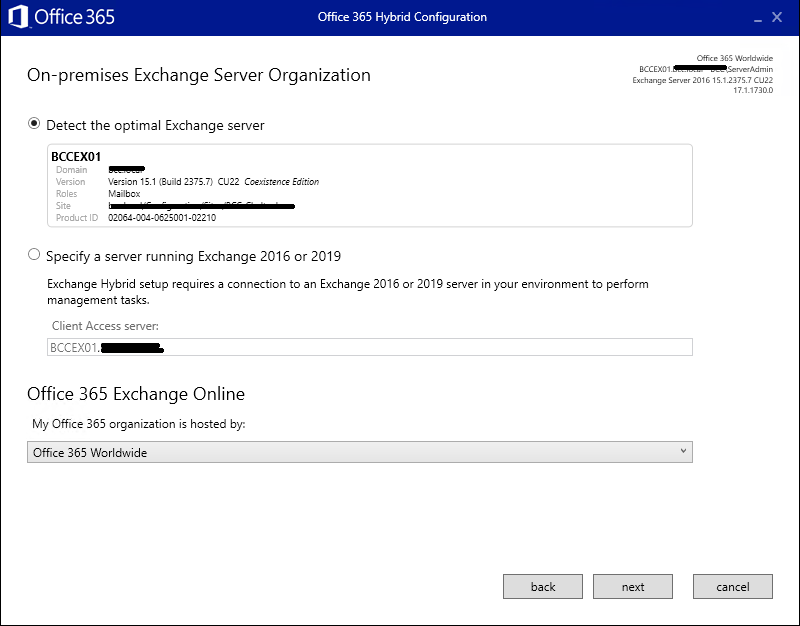
Wait for the wizard to perform its initial detection task – once done, it should show the correct Exchange server and have Office 365 Worldwide selected. Click Next

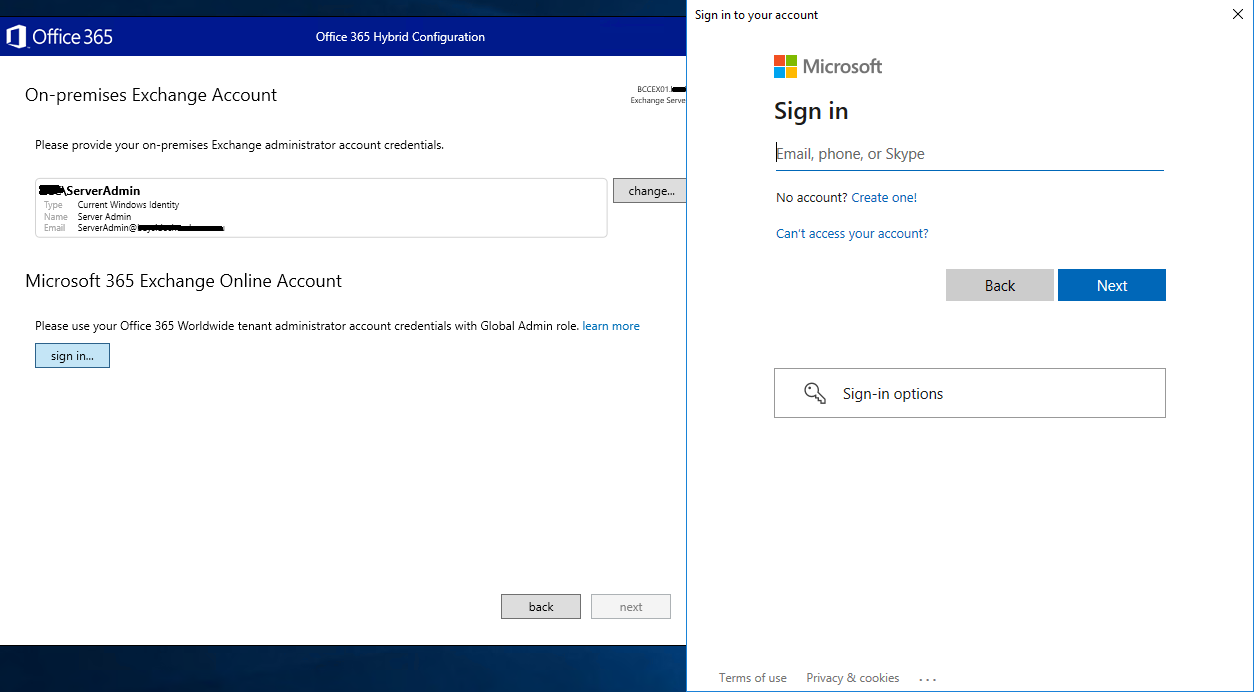
Ensure a domain admin account has been auto selected for the on-premise Exchange server.

Click Sign in for the 365 tenant admin account and authenticate as usual

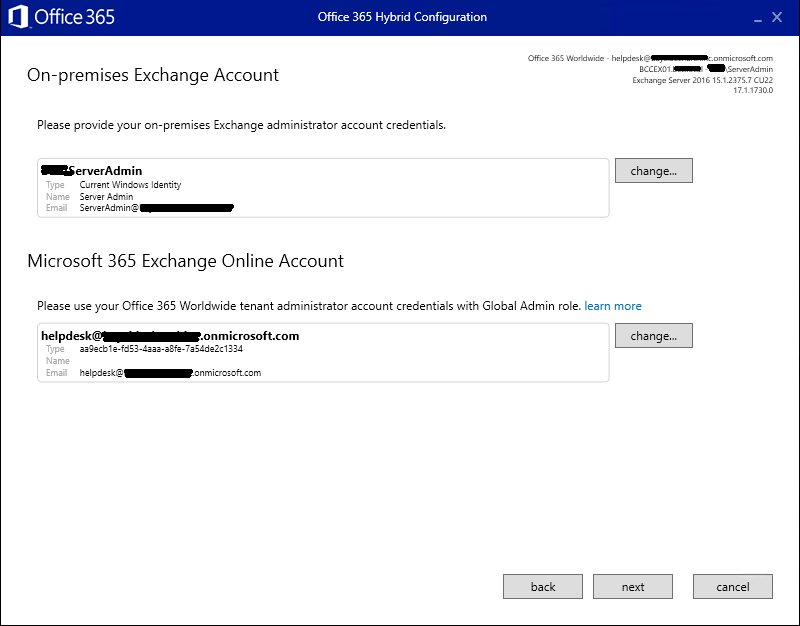
Once signed in for on-prem and 365, it should look like the below – click Next

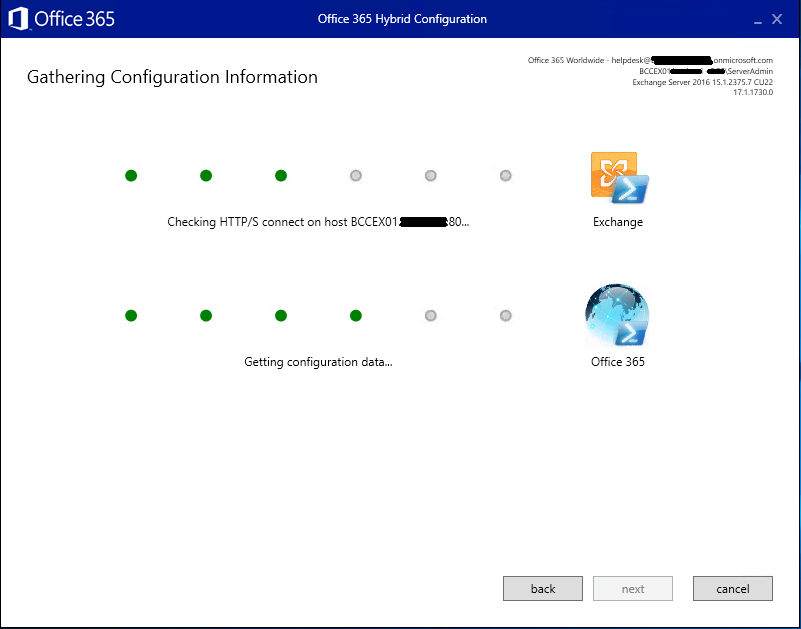
The wizard will spend some time ‘gathering information’

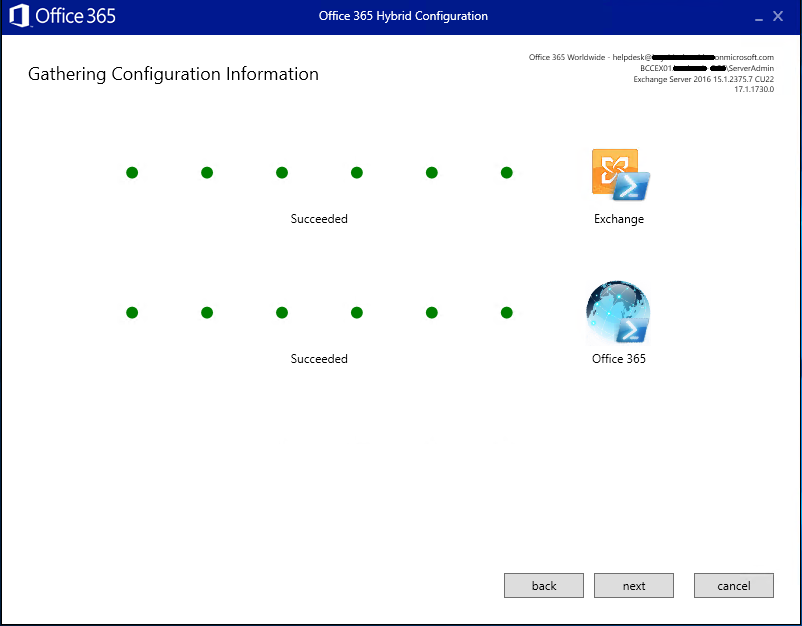
Sometimes issues do crop up here, usually if the configuration is broken of very old, or if certain parts of Exchange aren’t working properly.

You’ll need to spend some time addressing the concerns raised before you get a successful result on both on-prem and 365:

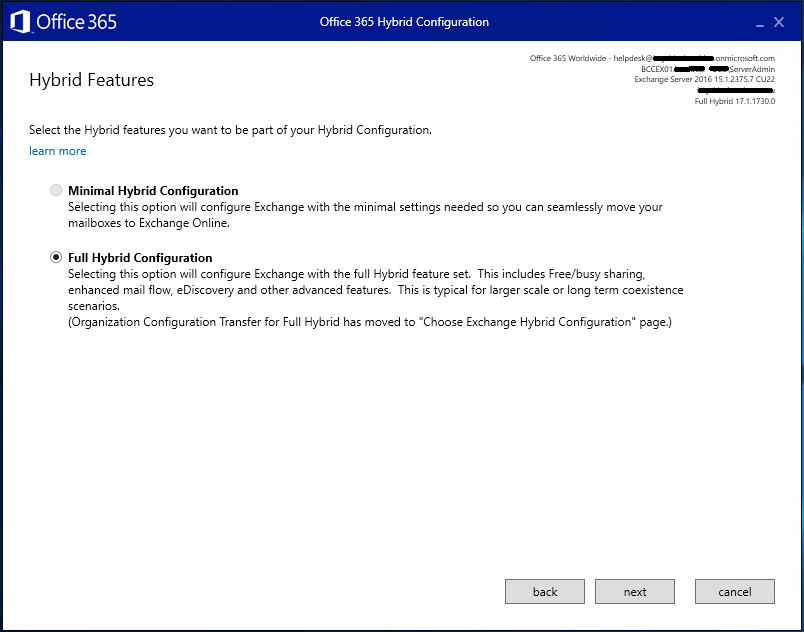
Its likely that Full Hybrid Configuration will be selected, and Minimal Hybrid is greyed out – this is fine

In the event that Minimal is selected, discuss with the lead tech for this client to clarify this is correct as usually we setup Full Hybrid Configuration.

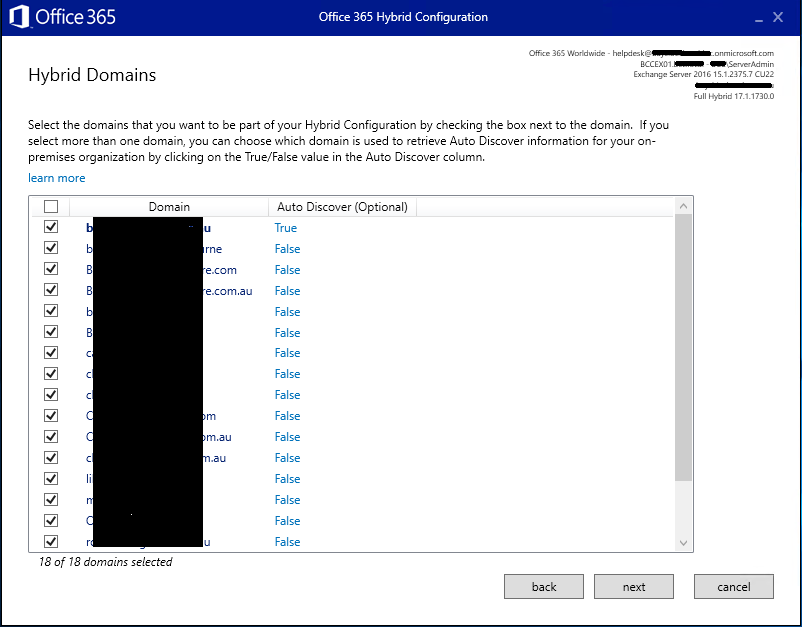
The next screen will present the domain names present and selected.

If unsure, discuss with the lead tech, but in most cases, all domains will be selected

(some clients have way too many domain names)

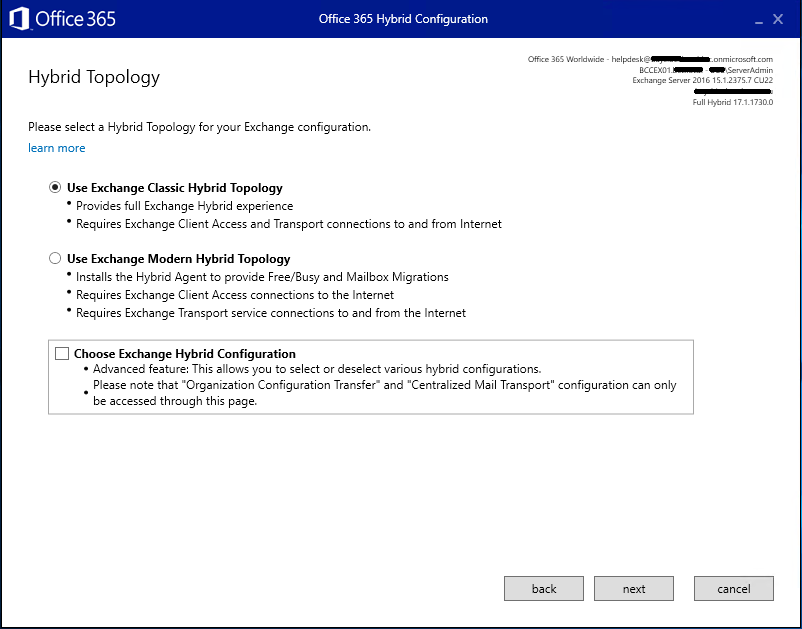
At this time, where Hybrid Sync is configured with Class Hybrid Technology we’re still using this, but in the future we’ll likely migrate to Modern Hybrid Technology (likely when pushed by Microsoft to do so)

Click Next

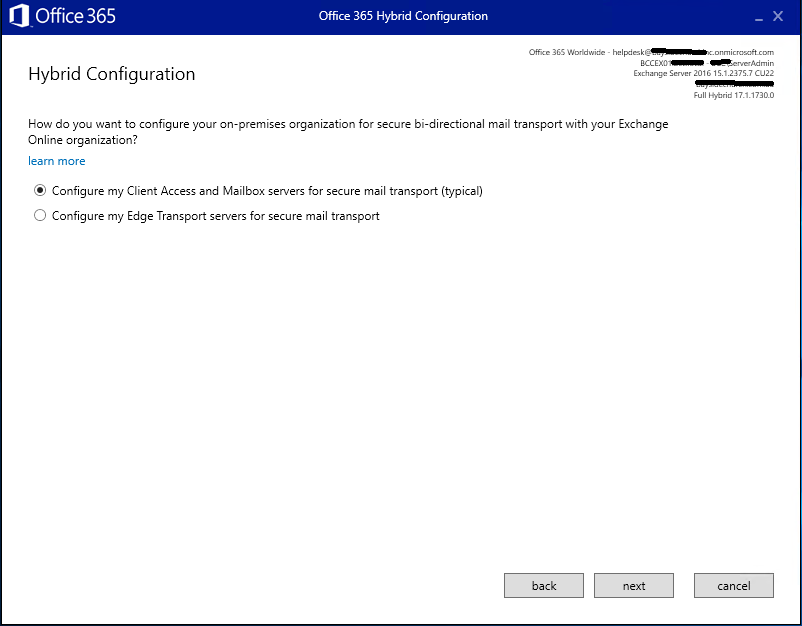
This next screen will usually be smart enough to figure out if the on-premise Exchange server is using CAS/MBX or EDGE connector roles – but be sure to double check – especially with larger Exchange deployments

The next two screens just asks you to confirm which Exchange server to use for hosting Receive Connectors and Send Connectors – 99.99% of the time, same on-premise Exchange server, so click Next for each

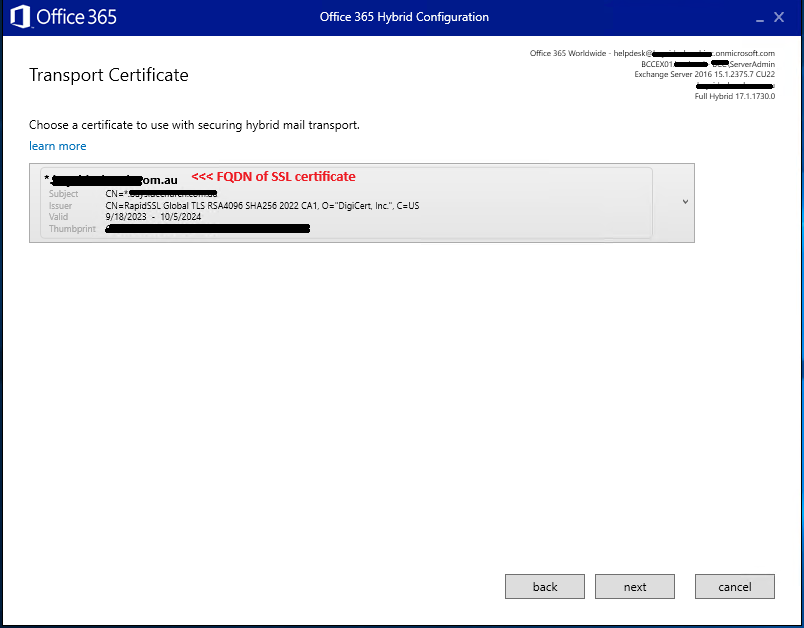
After this you will be asked to choose and confirm the correct SSL certificate to be used for communication between Exchange on-prem and Office 365 – ideally, this is the same SSL certificate used on the Exchange for the Send & Receive connectors and Web Front Ends as installed earlier in the guide. Ensure the current SSL has been auto selected and no old / expired signed certificates exist – if they do, you need to stop and fix this up before re-running the Hybrid Configuration Wizard!

The next screen just confirms the public FQDN on the on-premise Exchange server as configured on the connectors – click Next if correct (365 will connect using this)
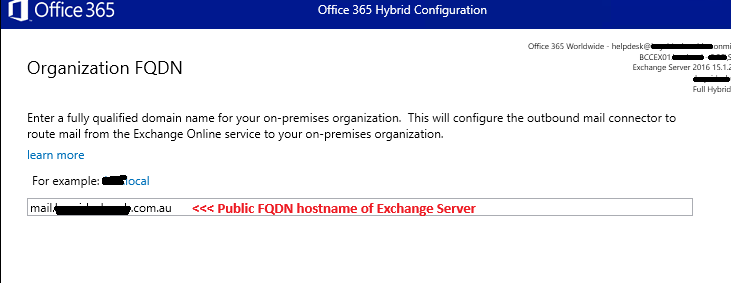
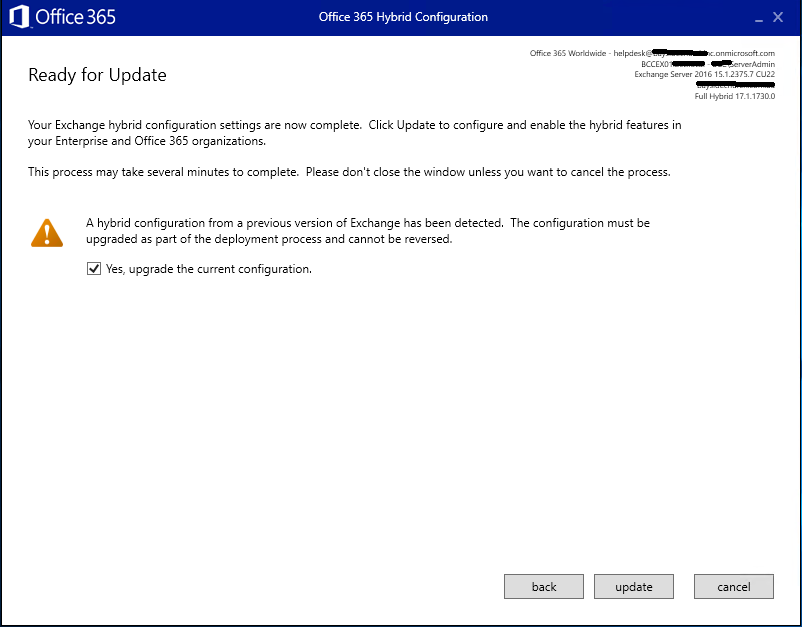
The wizard is now at the final stage and is ready to update the configuration, so tick Yes to upgrade and click Next

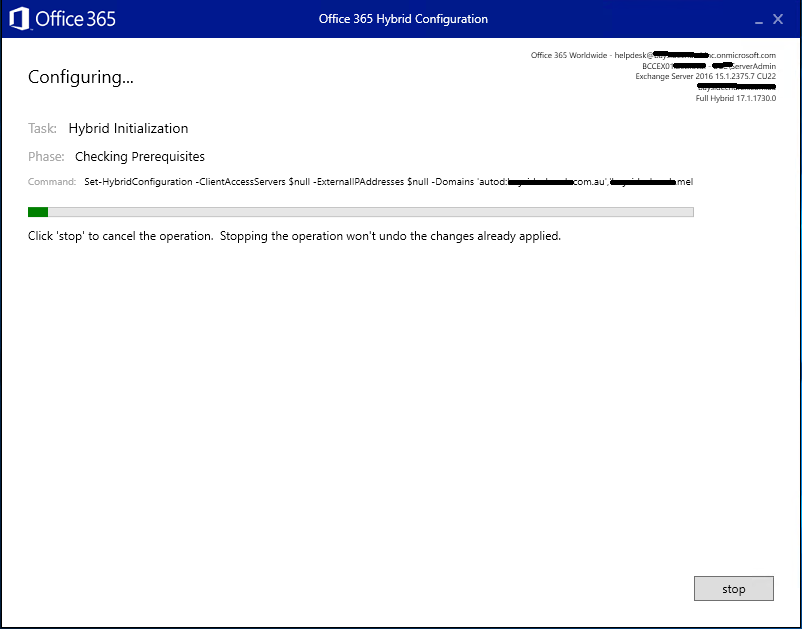
The process should only take up to 5 mins on a relatively standard & healthy environment (running Exchange 2016 or 2019)

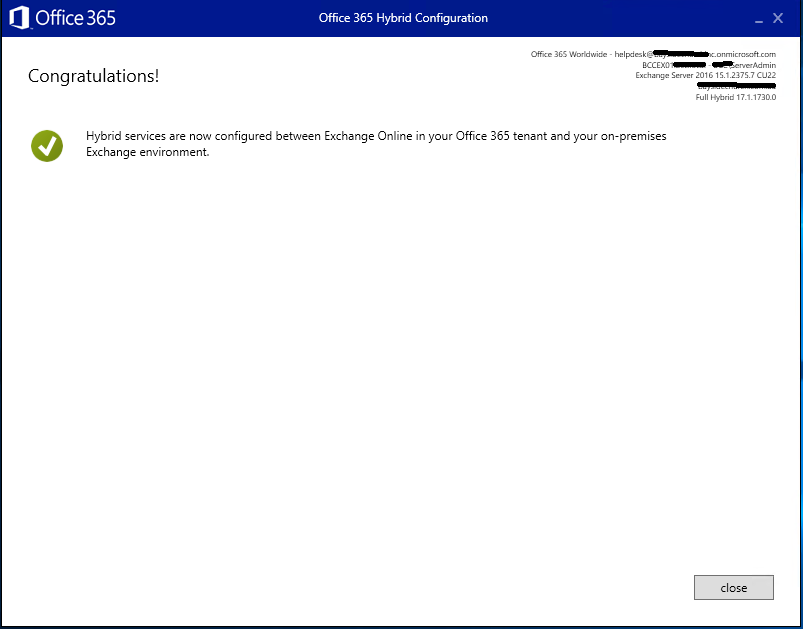
At the end of the wizard, you should be presented with a Congratulations screen with the welcoming green tick, click Close.

Now return to Exchange ECP > Mail Flow > Send Connectors

Edit the send connector for Office 365

Using the settings you noted down earlier, adjust the connector back to what you have noted down.

Don’t go away, we’re almost done, but not yet… Now we need to test & confirm its working properly…

Test Hybrid Exchange Configuration

To test we need two things – an on-premise Exchange mailbox and to be logged into the admin as the tenant admin

The on-premise mailbox needs to be fully generated – one that has been logged into and has at least one mail item in its mailbox

In the Admin Center, head to Exchange > Migration https://admin.exchange.microsoft.com/#/migrationbatch

In the upper right corner, click on Endpoints and ensure the on-premise Exchange server is present and looks correct. If not, delete it – we can re-add it during the next steps below…

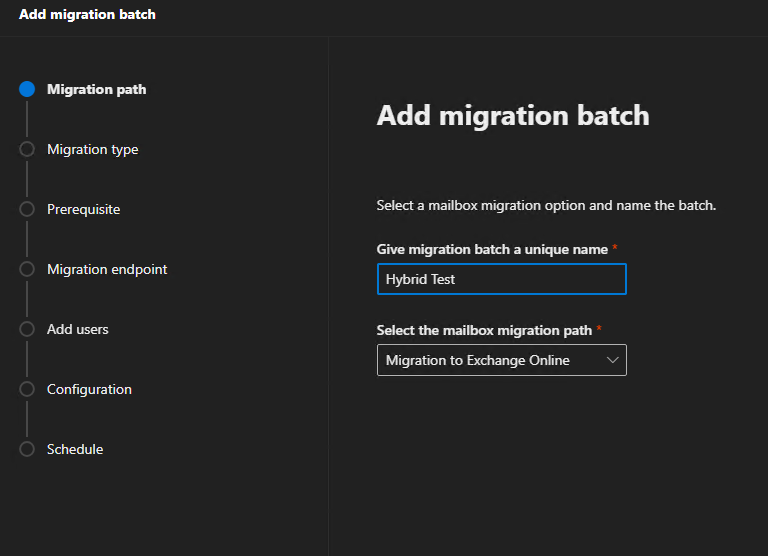
Click to Add Migration Batch and follow the wizard steps:

Name: Hybrid Test

Path: Migration to Exchange Online

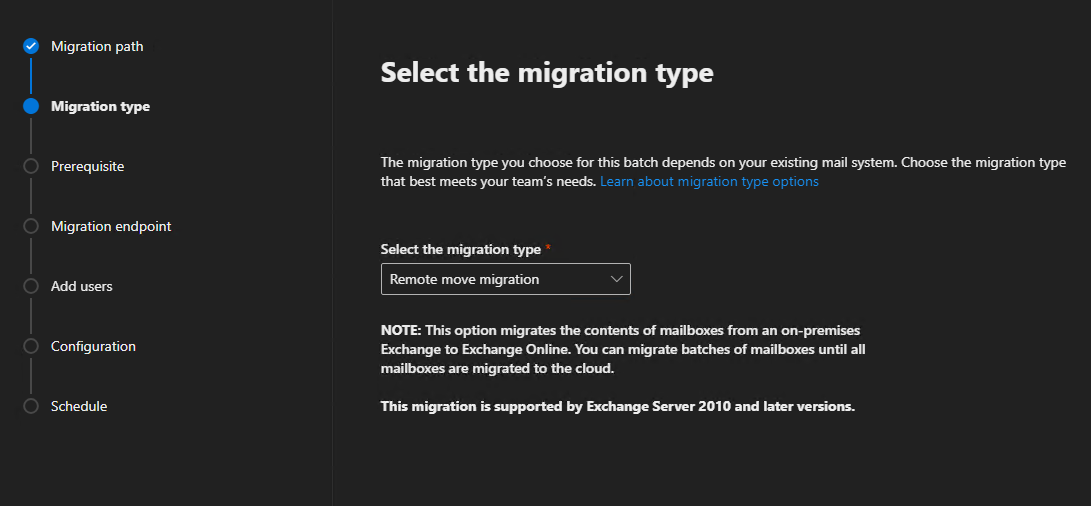
Type: Remote move migration

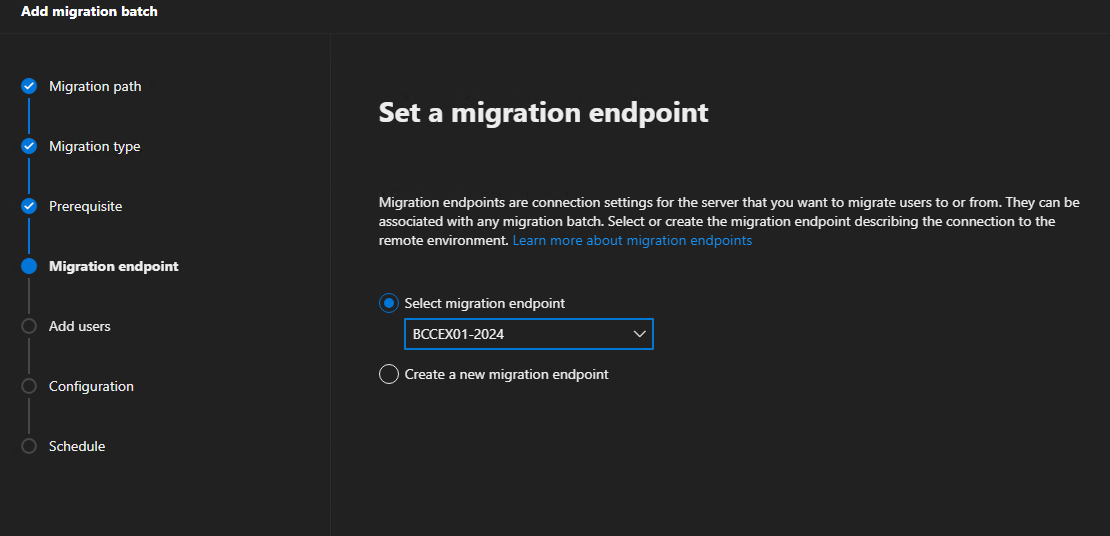
Select or add the on-premise Exchange server as your endpoint

(note: if needing to re-add, please see the appendix at end of this guide on what that looks like, but it should be pretty straight forward)

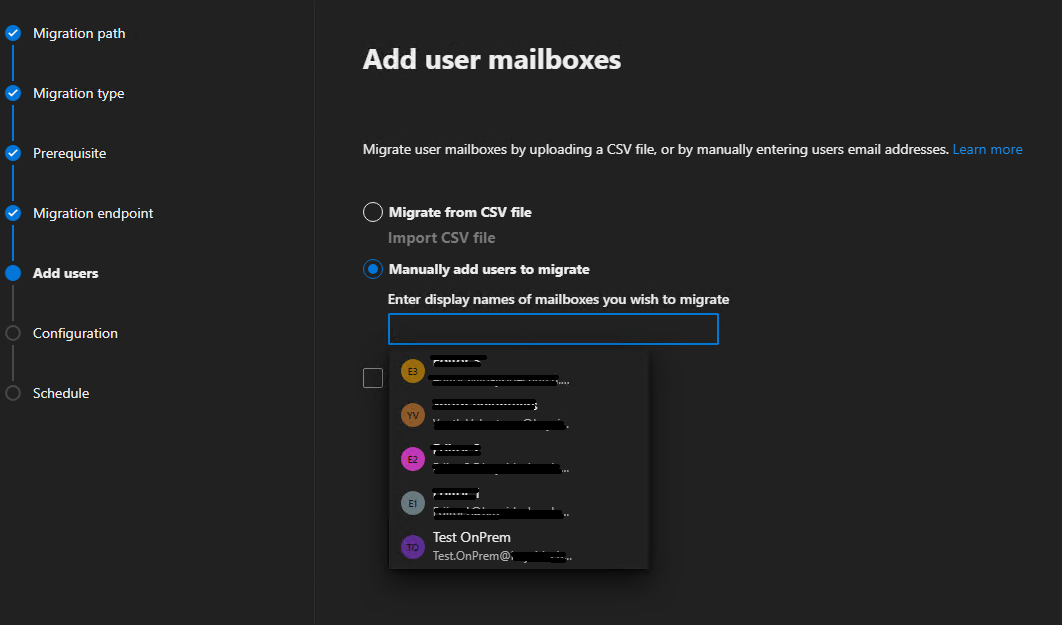
Select to Manually add users to migrate and select the test on-prem mailbox from the list when you click in the text entry field

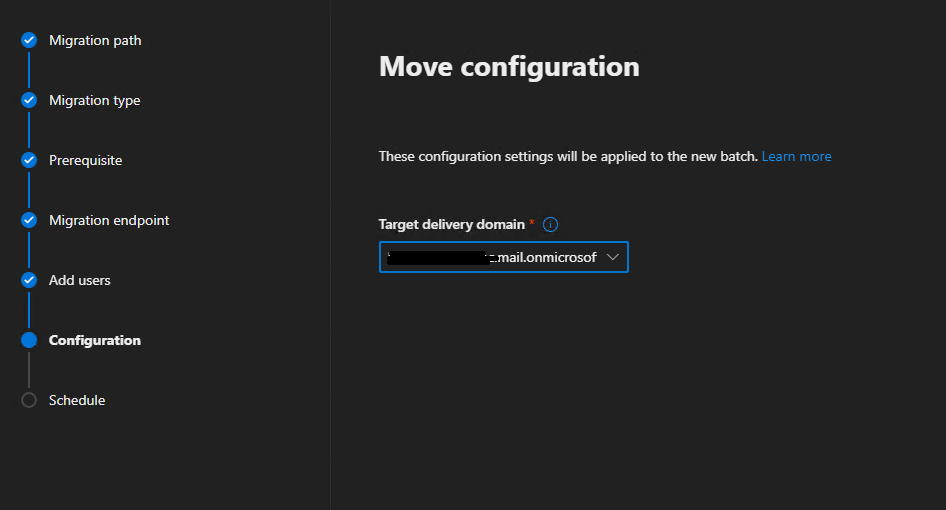
Select the target delivery domain (note: the test account must have this same domain as an alias address in its AD proxyAddresses attribute / as a mail alias)

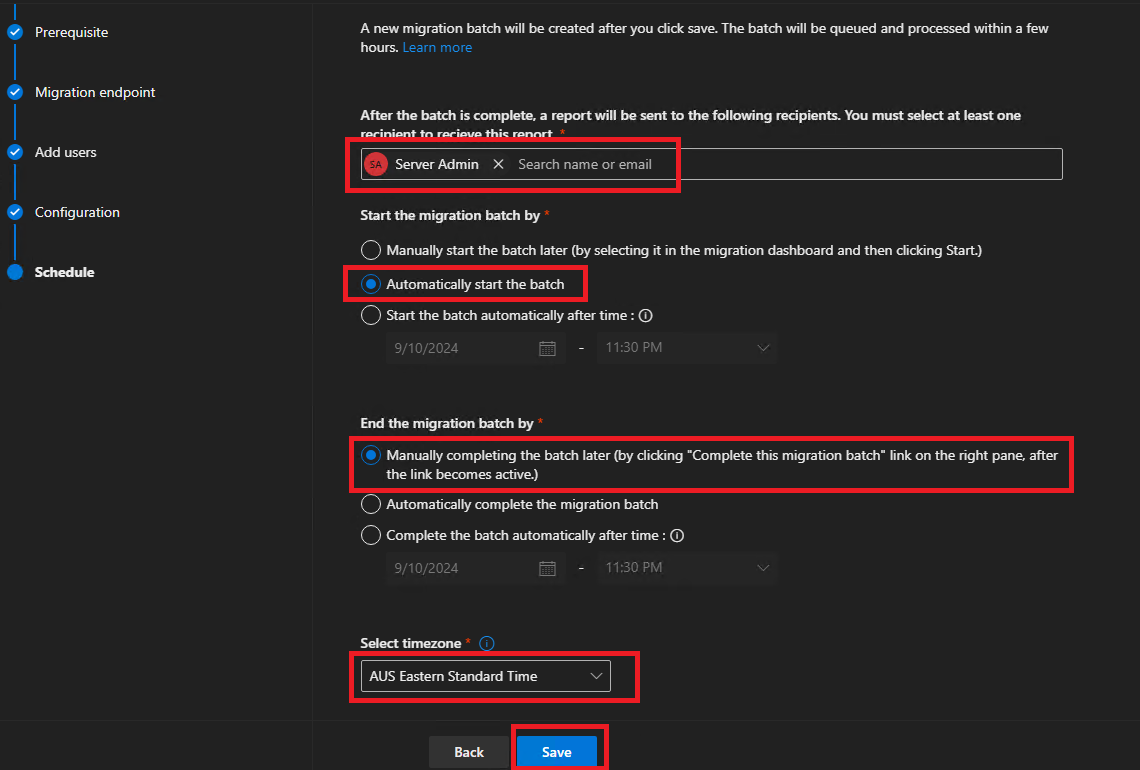
The final screen here will need to be set to:

Auto start the batch

Manually complete the batch (as we don’t actually intend on completing the batch)

Send email to the admin mailbox or a mailbox you have access to if you need to review the alerts

Click Save

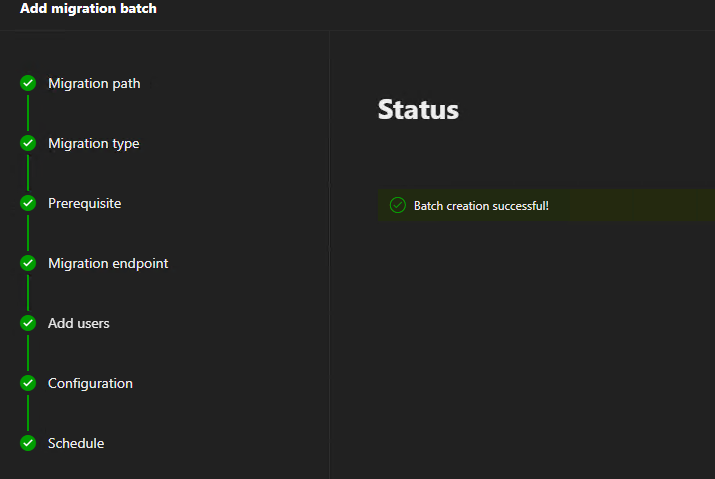
Click Done

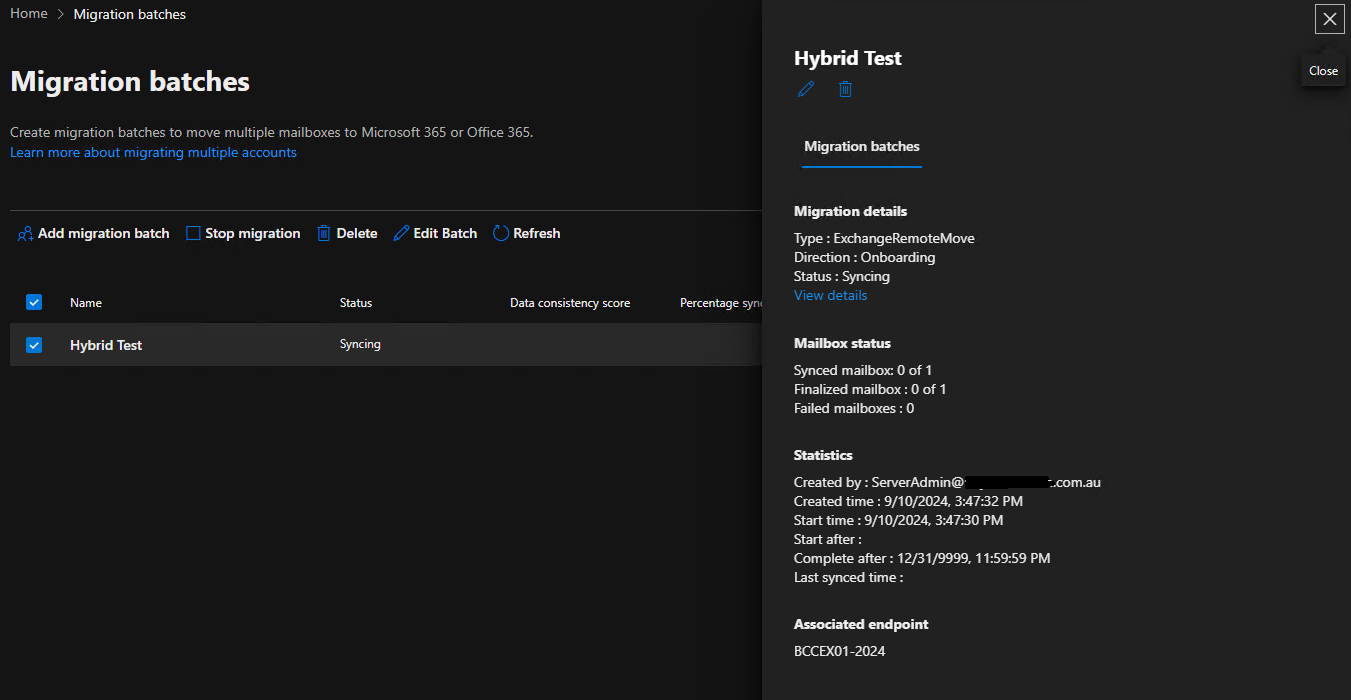
Now sit pretty and monitor the migration batch

Once the Syncing status has changed to Synced we know its working. A small mailbox should be done within 15 mins. Once its synced, you can simply stop and delete the batch – job done – close ticket!

If there are errors, you’ll need to troubleshoot and fix – we can’t leave it in a broken state as the Hybrid Exchange is used for creating new user accounts.

This is what a synced batch job looks like:

Synced, 100% not finalized and not failed.

Select, stop, wait until stopped, then delete once at this stage.

Appendix:

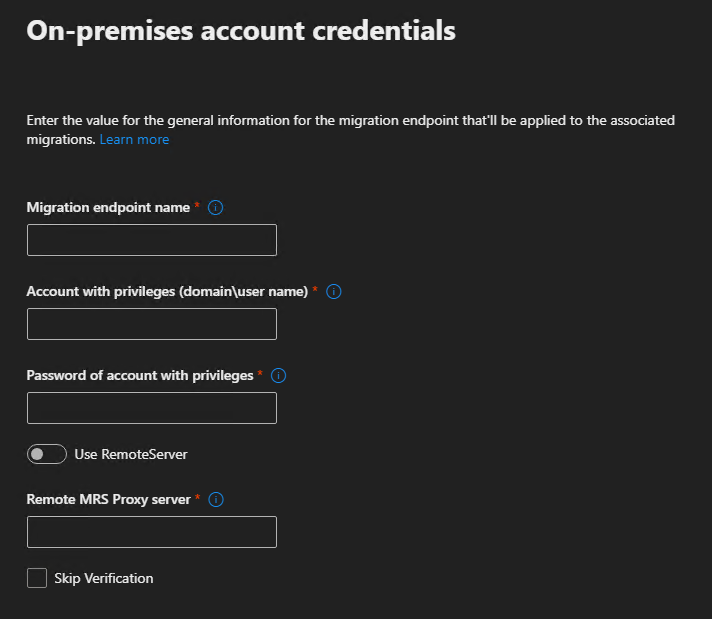
Creating a new Exchange Endpoint:

Give the endpoint a meaningful, short name, ending in the year – if its old, likely we’ll see that and need to recreate it anyway.

The account name ideally will be a domain admin account that also has an on-premise mailbox, but the mailbox isn’t mandatory.

Remote MRS proxy server is the public FQDN of the Exchange server, eg: mail.domain.com

Don’t skip verification – we need confirmation that 365 can communicate with the on-premise server with the specified account

Once validated, continue on with the batch job creation as per above steps.

Firewall:

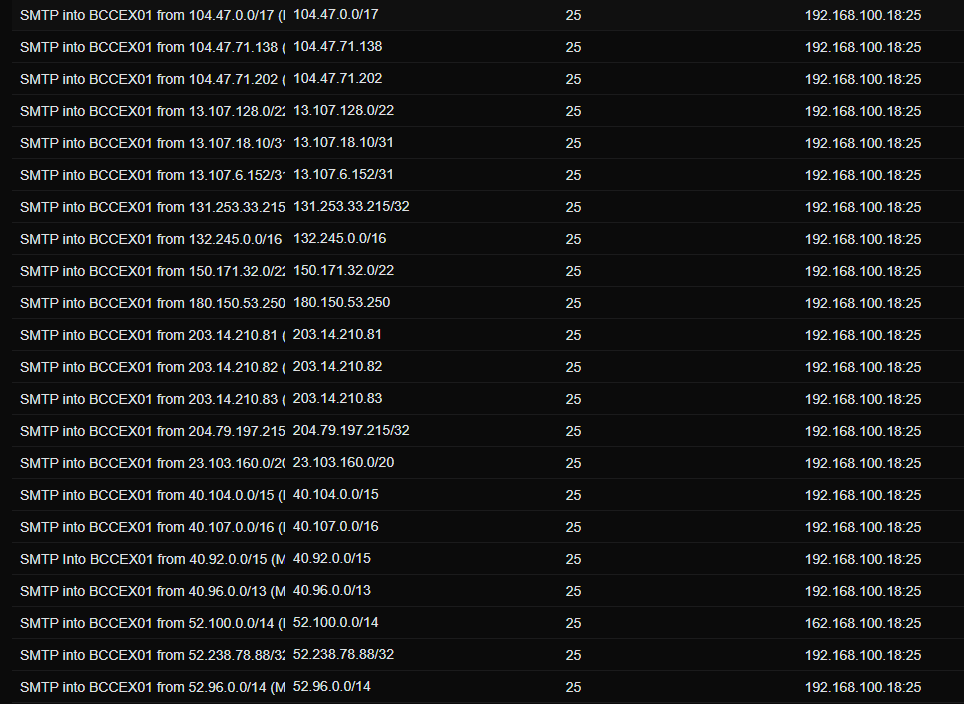
If the on-premise Exchange server isn’t being accessed by general users externally, as all mailboxes are in 365, then its best to restrict access to the Exchange on-prem HTTP, HTTPS and SMTP traffic to only IP addresses that require access (such as us, customer website if using SMTP) and to Microsoft 365.

This is the link for the IP addresses / network addresses that Microsoft has published for creating an ACL / whitelist on the customer firewall: https://learn.microsoft.com/en-us/microsoft-365/enterprise/urls-and-ip-address-ranges?view=o365-worldwide

Below is a sample firewall port forward / ACL for SMTP traffic allow list (using IPv4 IP/Networks):

 

blk_update_request: I/O error, dev fd0, sector 0

Getting this message in the console of a Linux VM?

blk_update_request: I/O error, dev fd0, sector 0

This is because the Linux VM is trying to access the floppy drive, and can’t.

Issue these commands to block the system from trying to access the floppy disk:

sudo rmmod floppy
echo "blacklist floppy" | sudo tee /etc/modprobe.d/blacklist-floppy.conf
sudo dpkg-reconfigure initramfs-tools

From here you should be fine, a reboot may or may not be required.

An alternative if you have Hyper-V, is to shut the VM down, remove the floppy from the VM config and boot it up.

Hyper-V 2019 only using every second CPU Core or Thread

Issue: Hyper-V on Windows Server 2019 only using half the available CPU threads, and VM’s with larger CPU core counts often perform very poorly

image

Windows Server 2019, Hyper-V now defaults to a more secure “core scheduler” where previous versions used “classic scheduler” for CPU scheduling and isolation. What this means, is that when you migrate a VM over to Hyper-V on WS2019, you need to update the VM configuration and change some settings, or it will only use a single hardware thread per core, exhibiting the behavior you see above.

In Hyper-V on WS2016, the default setting for number of Hardware Threads per Core is “1”. What we want is to set this to “0” which will inherit the Host’s default configuration for this.

The below PowerShell commands will list all VM’s on the host, list their configuration versions, list the threads count per core, then set the new defaults to inherit settings from Hyper-V

Note: For the last command to work – setting the new defaults, affected VM’s need to be powered off.

#Get your Host supported VM guest configuration versions
Get-VMHostSupportedVersion
#Get your VM guest configuration versions
Get-VM | FT Name, Version
#Update all VMs configuration versions
Get-VM | Update-VMVersion
#Get the VM thread count per core setting
Get-VM | Get-VMProcessor | FT VMName,HwThreadCountPerCore
#Set the VM thread count per core setting
Get-VM | Set-VMProcessor -HwThreadCountPerCore 0

Now that the changes have been applied, here’s the task manager screen shot:

image

Note – this only impacts migrated VM’s. When a VM is created on Windows Server 2019 Hyper-V, this is not an issue as the VM’s inherits the default setting of the Host.

Join Mac to Active Directory – the Right way!

This guide will assist you to joining a Mac to AD. There are plenty of guides online, but many of them leave out certain key aspects that lead to issues when not performed properly.

First step, check AD for the next available computer name and create the computer AD entity in the correct OU.

Document the AD computer description field with useful information such as ticket number, model, user, serial number, etc

Identify & note down any users / groups that should have local administrative rights on the Mac

Setting the local workstation host name:

Apple Menu > System Preferences > Sharing > Computer Name

Now let’s get get domain joined:

System Preferences > Users & Groups > Login Options

Click the  to gain admin access using the local administrator account

Change Display login window as: Name and password

Change Show fast user switching menu as: Full Name

Click the Join… button

Click Open Directory Utility…

Click the  and authenticate to unlock

Highlight Active Directory

Click the pencil  button to edit

Populate the Active Directory Domain field with the AD name

Click the  icon to expand the options

Place a tick next to Create mobile account at login – this tells the Mac to create a local user profile for the AD account so a) the user has somewhere to store data, and b) the user can login when away from the AD network.

Click the Administrative Button

Place a tick next to: Allow administration by:

By default, it will have domain admins and enterprise admins pre-populated.

Use the + button to add in the additional resource users & groups noted earlier that will require local admin rights

Click Bind…

This will first prompt for the local admin password

Then it will prompt for the domain administrator username & password.

If all details are correct and DNS is working, the Mac will be joined to the directory.

If you followed the earlier instructions to pre-create the computer in AD, it will advise you that the computer account exists, and ask you if you want to use the existing computer account – say Yes.

Domain Join over a VPN:

If you need to join over a VPN connection, but the VPN connection is disconnected when switching user accounts, you can cache an AD account from the local admin account when still connected to the VPN post domain join using the below terminal commands:

sudo /System/Library/CoreServices/ManagedClient.app/Contents/Resources/createmobileaccount -n [AD_username]

Once this passes, you will need to cache the login credentials

login

When prompted, login using the user’s username and password.

Note: the password entering will not provide any feedback on-screen.

Ideally, if the Mac is being domain joined over the VPN, you would also cache the domain admin account using this method also.

A Mac already directory bound that isn’t configured to create mobile account at login:

Using terminal, issue the below commands:

sudo dsconfigad -mobile enable

sudo dsconfigad -mobileconfirm disable

The first command forces the system to create mobile (cached) accounts when the user logs in, the second command suppresses the confirmation prompt when creating the account.

A little Terminal bonus:

You can do a quick & dirty AD join from the terminal using the below command:

dsconfigad -prefered yourserver.YOURDOMAIN.SOMETHING -a nameOfYourDevice -domain YOURDOMAIN.SOMETHING -u DomainAdministratorAccount -p 'DomainAdministratorPassword'

Of course doing this, will not set the Mac to create a mobile account at login, won’t configure local admin users…

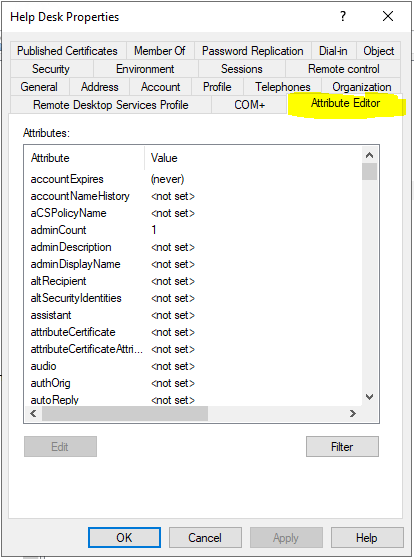
Active Directory – Missing Attribute Editor in User editor

Issue:

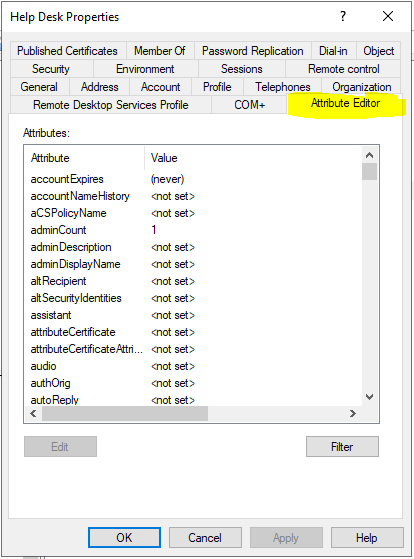
Can’t access the Attribute Editor tab in users and groups


Scope:

Active Directory in Windows Server versions: 2008 R2, 2012, 2012 R2, 2016, 2019, and 2022.


Solutions:

First and foremost, ensure in AD Users and Computers, you have enabled the Advanced Features in the View menu:

For 99% of the issue occurances, this will fix the issue. You may need to close and re-launch the ADUC console.

If the above has been done and you still don’t see the Attribute Editor tab after enabling Advanced Features, first off, log out of the DC or management system from the account you are logged in with. Log back in and try again.

If after logging out and back in the issue persists, then there are some changes that may need to be made by performing the following steps:

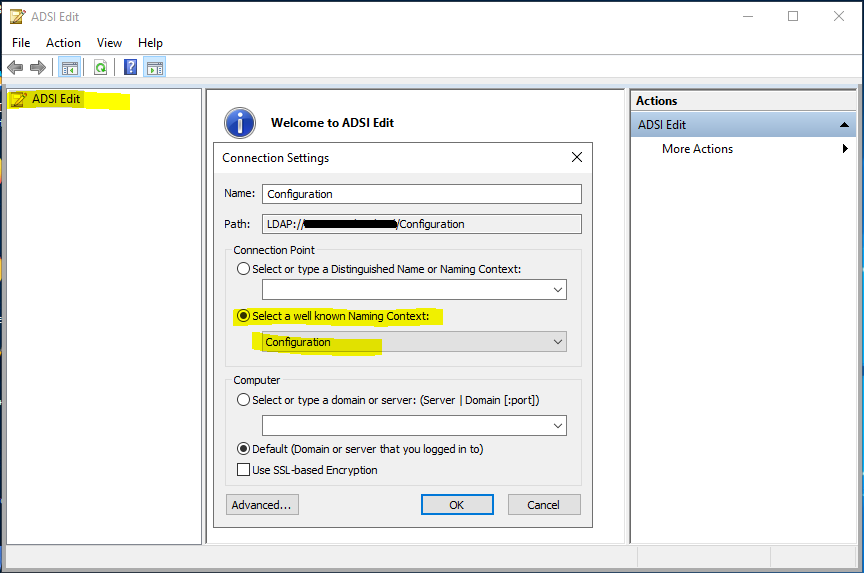
Open ADSIedit.msc

Right-click the upper left most item in the left tree pane and click Connect to

Click the radio button in the Connection point for Select a well known Naming Context, and select Configuration from the drop down list

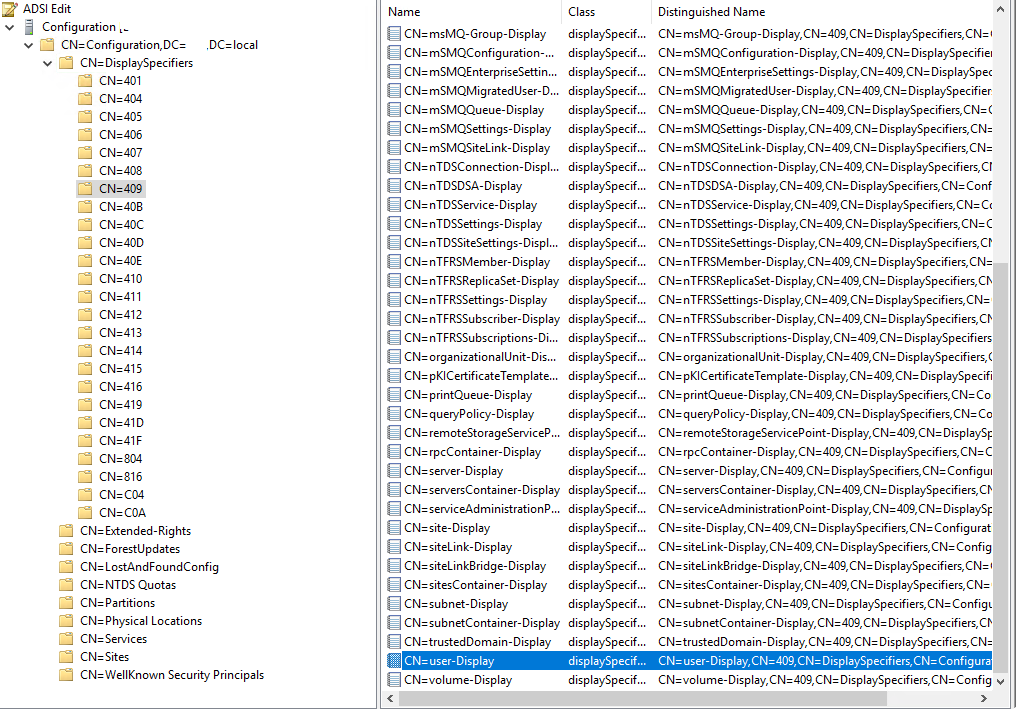
Now drill down through: CN=Configuration > CN=DisplaySpecifiers > CN=409 (409 is for US English, pick the language appropriate to your profile)

Double-click on CN=user-Display

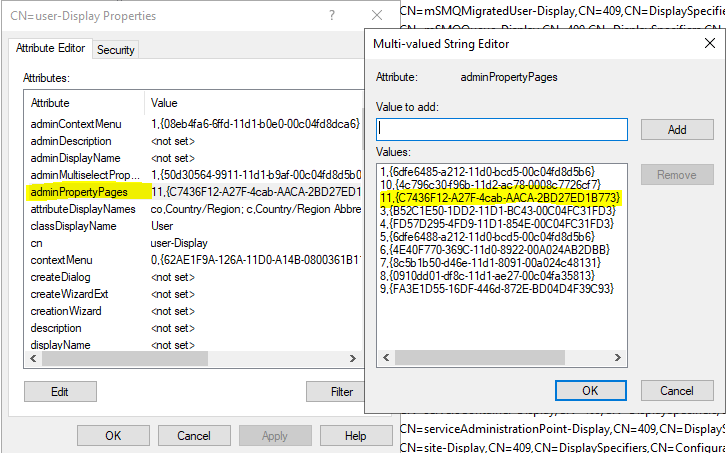
Double-click on adminPropertyPages

Add in the missing value:

11,{c7436f12-a27f-4cab-aaca-2bd27ed1b773}


Once done, OK twice out and re-launch ADUC.

Now the Attribute Editor tab should be availble.


Extra Notes:

This is a common occurence for AD Domains that have been previously migrated from Windows Server 2003 (or older) into newer Windows server versions, and the functional levels raised. Unfortunately raising the domain functional levels doesn’t seem to add in these missing values.

If this is the case for your environment, you may also need to add in other missing values such as:

In the CN=computer-Display > adminPropertyPages

12,{c7436f12-a27f-4cab-aaca-2bd27ed1b773}

In the CN=default-Display > adminPropertyPages

4,{c7436f12-a27f-4cab-aaca-2bd27ed1b773}


Installing & Configuring IP Networked Printers in Windows

Update History:

  • 2017-Feb-09: Initial publication
  • 2019-Mar-12: Include mentions for coverage of Windows Server 2019 and ARM64 architectures
  • 2022-Feb-09: Include mentions for coverage of Windows Server 2022 and Windows 11

This guide applies to:

  • Windows Desktop / Workstation Editions 7, 8, 81, 10, and 11
  • Windows Server Editions 2008 R2, 2012, 2012 R2, 2016, 2019, and 2022

It is intended for environments where the printer is connected to the network, has either a fixed LAN IP address or a DHCP reservation, and is accessible by the target Windows systems. It is assumed that the printer has been freshly setup on the network but not yet installed or configured on any target workstation or servers.

Download and install drivers:

Identify and download the correct drivers for your make & model of printer. Ideally, you want to download the basic / standard drivers and not the full driver package installers. The ideal drivers may be identified as PCL, PS (PostScript), or WHQL drivers.

Typically, there will be multiple drivers – a listed set of drivers for multiple versions of Windows. Typically, most manufacturers will have the exact same driver files that cover many generations of Windows – eg: a driver written for Windows 7 will almost always work on Windows 10, or Server 2019, and Server 2008 R2.

Typically, the only differences in the drivers are:

  • Architecture (as in Windows 32-bit, Windows 64-bit, Windows Itanium, and more recently, ARM64.
  • The drivers communication protocol when communicating with the printer – this is how the computer talks to the printer, so PCL, PS, KX, etc…

You need to be aware of what communication protocol is supported by the printer. By default, FujiXerox DocuCentre machines don’t support PostScript (PS) out of the box, and require installation of additional optional hardware. If you’re looking to set one of these machines up on any Macs, get the PostScript card when ordering (cheaper at time of order than it is after the fact). Most printers will happily work using standard PCL drivers. Note: If you’re deploying Kyocera ECOSYS machines, aim for their KX drivers.

When downloading the drivers for deployment on a Windows server for sharing out to the networked Windows clients, opt to download both the 64bit and 32bit drivers of the same version number or release date, and if available, also the ARM64 drivers. When they are installed and made available to client systems using these different architectures, the user won’t have to go hunting to find drivers, as Windows will supply them to the connecting client during the printer installation.

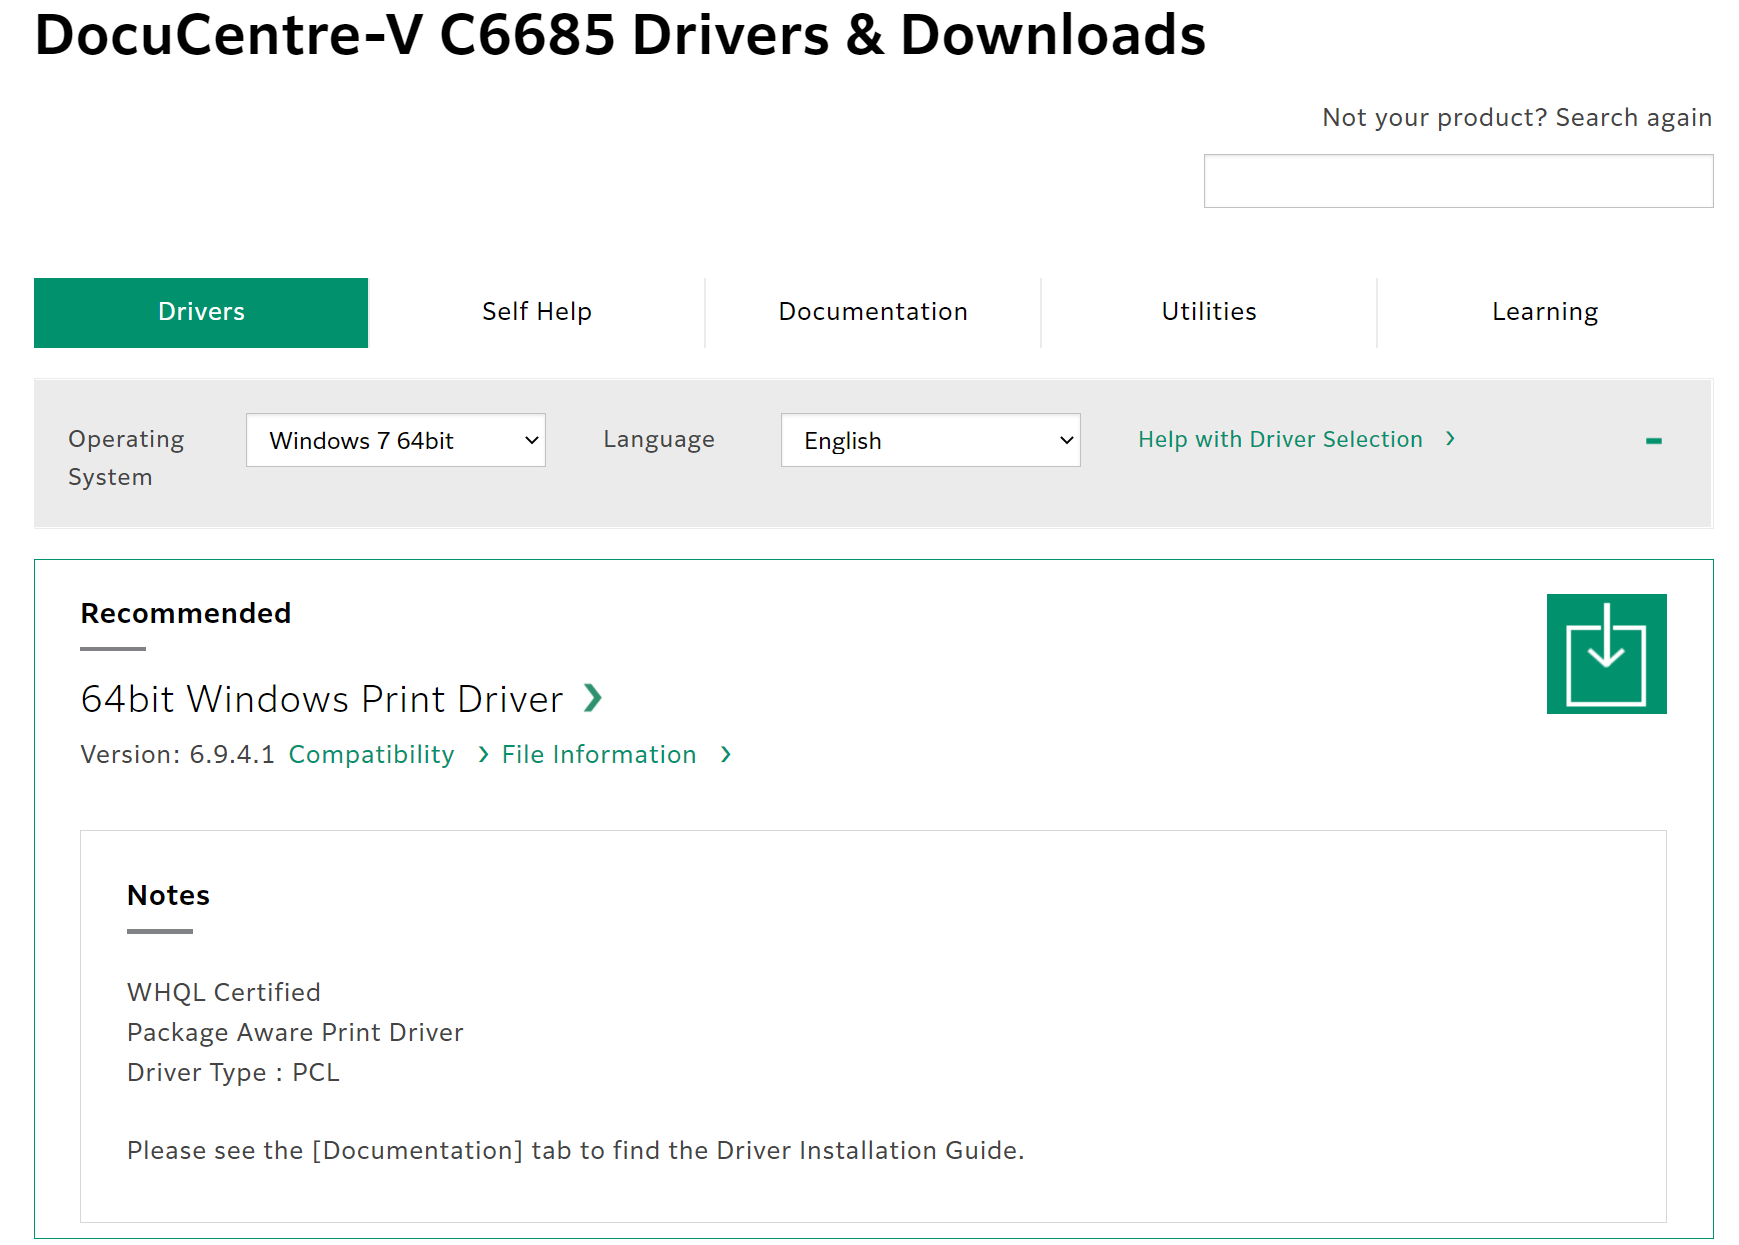
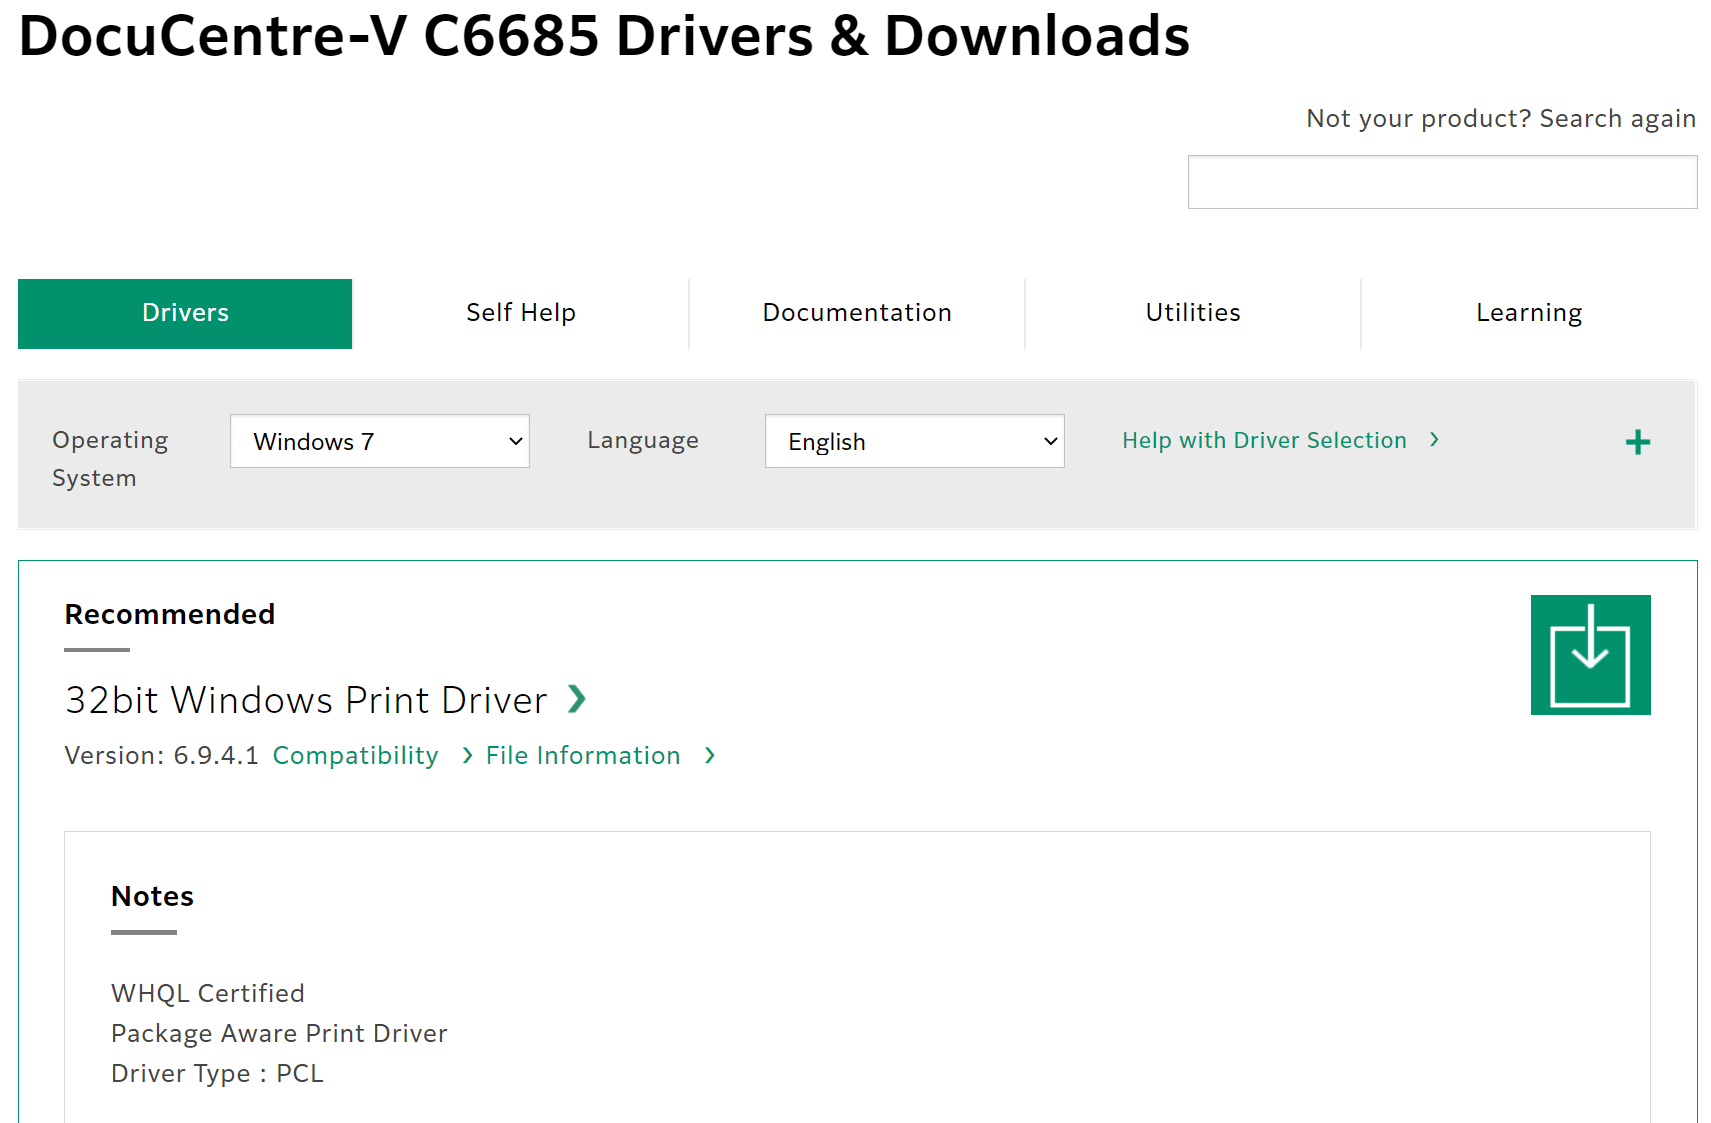
Note here, we are downloading both the Windows 7 64 bit and Windows 7 (aka 32 bit) drivers for deployment:

Windows 7 (32 bit):
Once the drivers have been downloaded, extract them into their own sub folders. The may come as a ZIP file or as a self-extracting application. If the latter, when prompted to commence installation, cancel these operations – you just want the extracted driver files. Take note of where you have extracted them to. Pro-tip: place them in a ClientApps share so they can be accessed over the network at a later date it required.

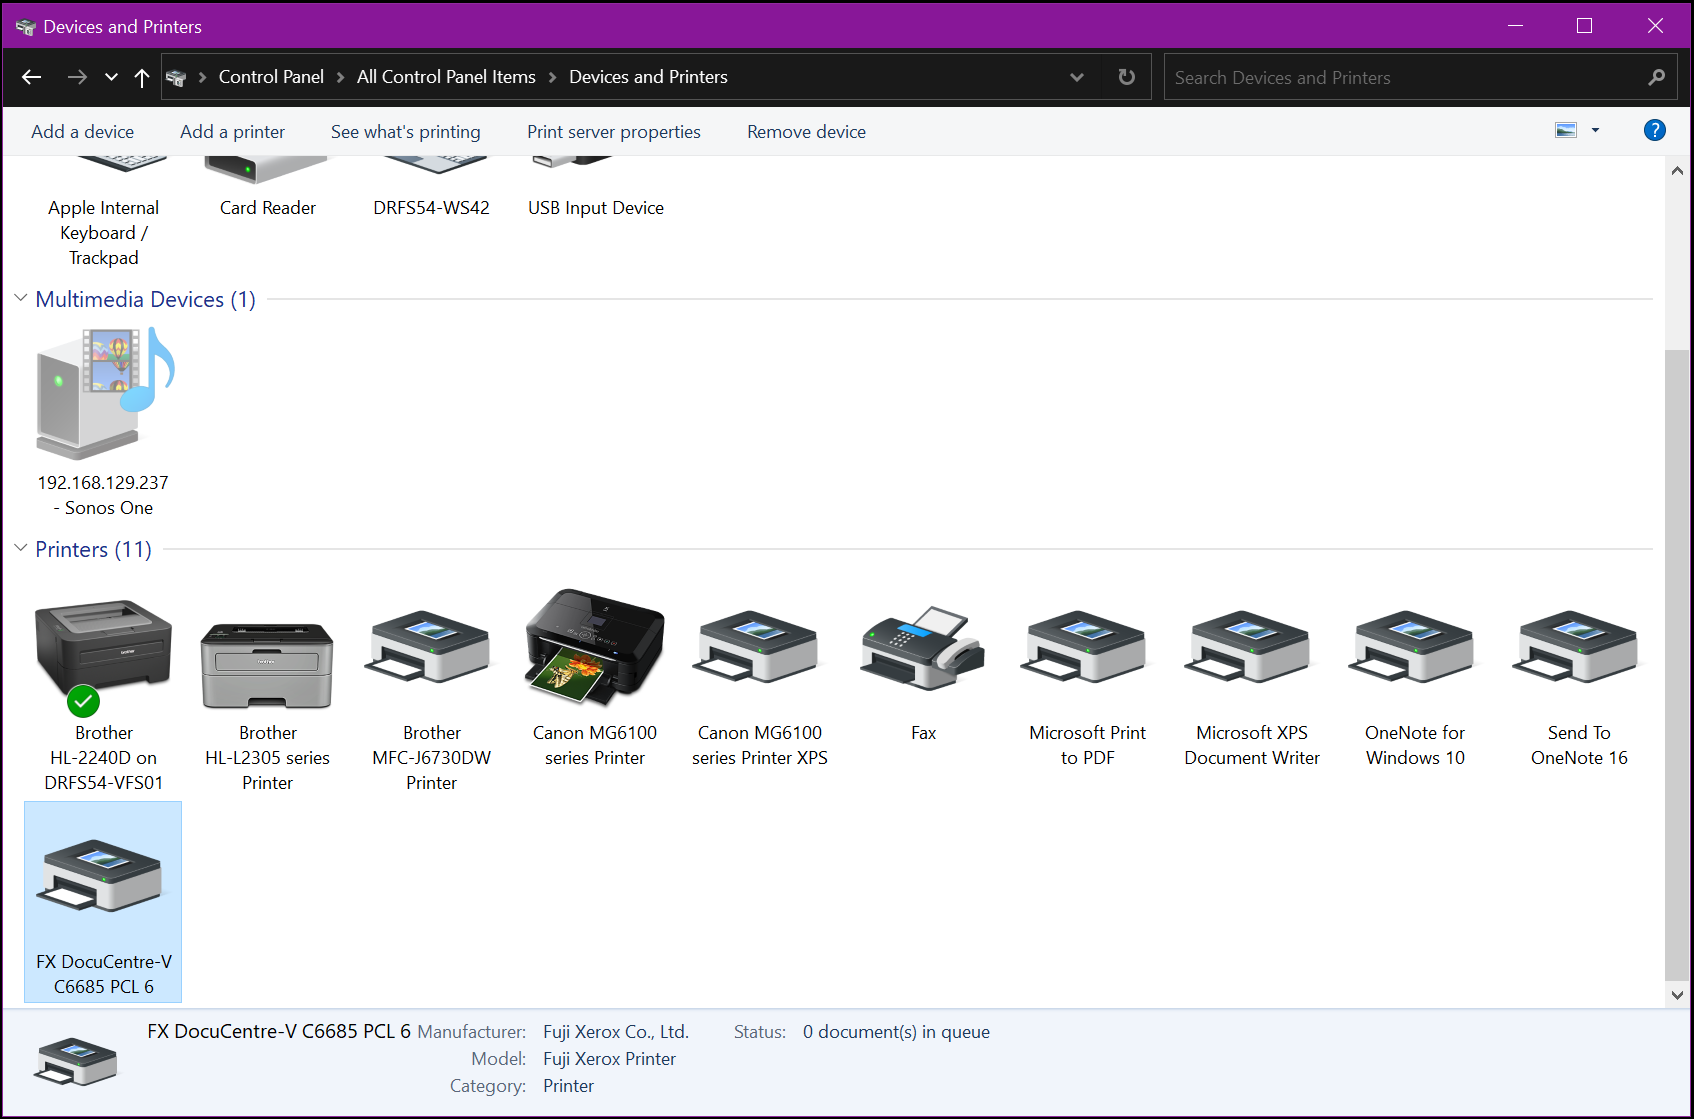
Open the Control Panel (not Settings) and change the view mode from Category to Small Icons (or Large Icons if your eyes don’t work).

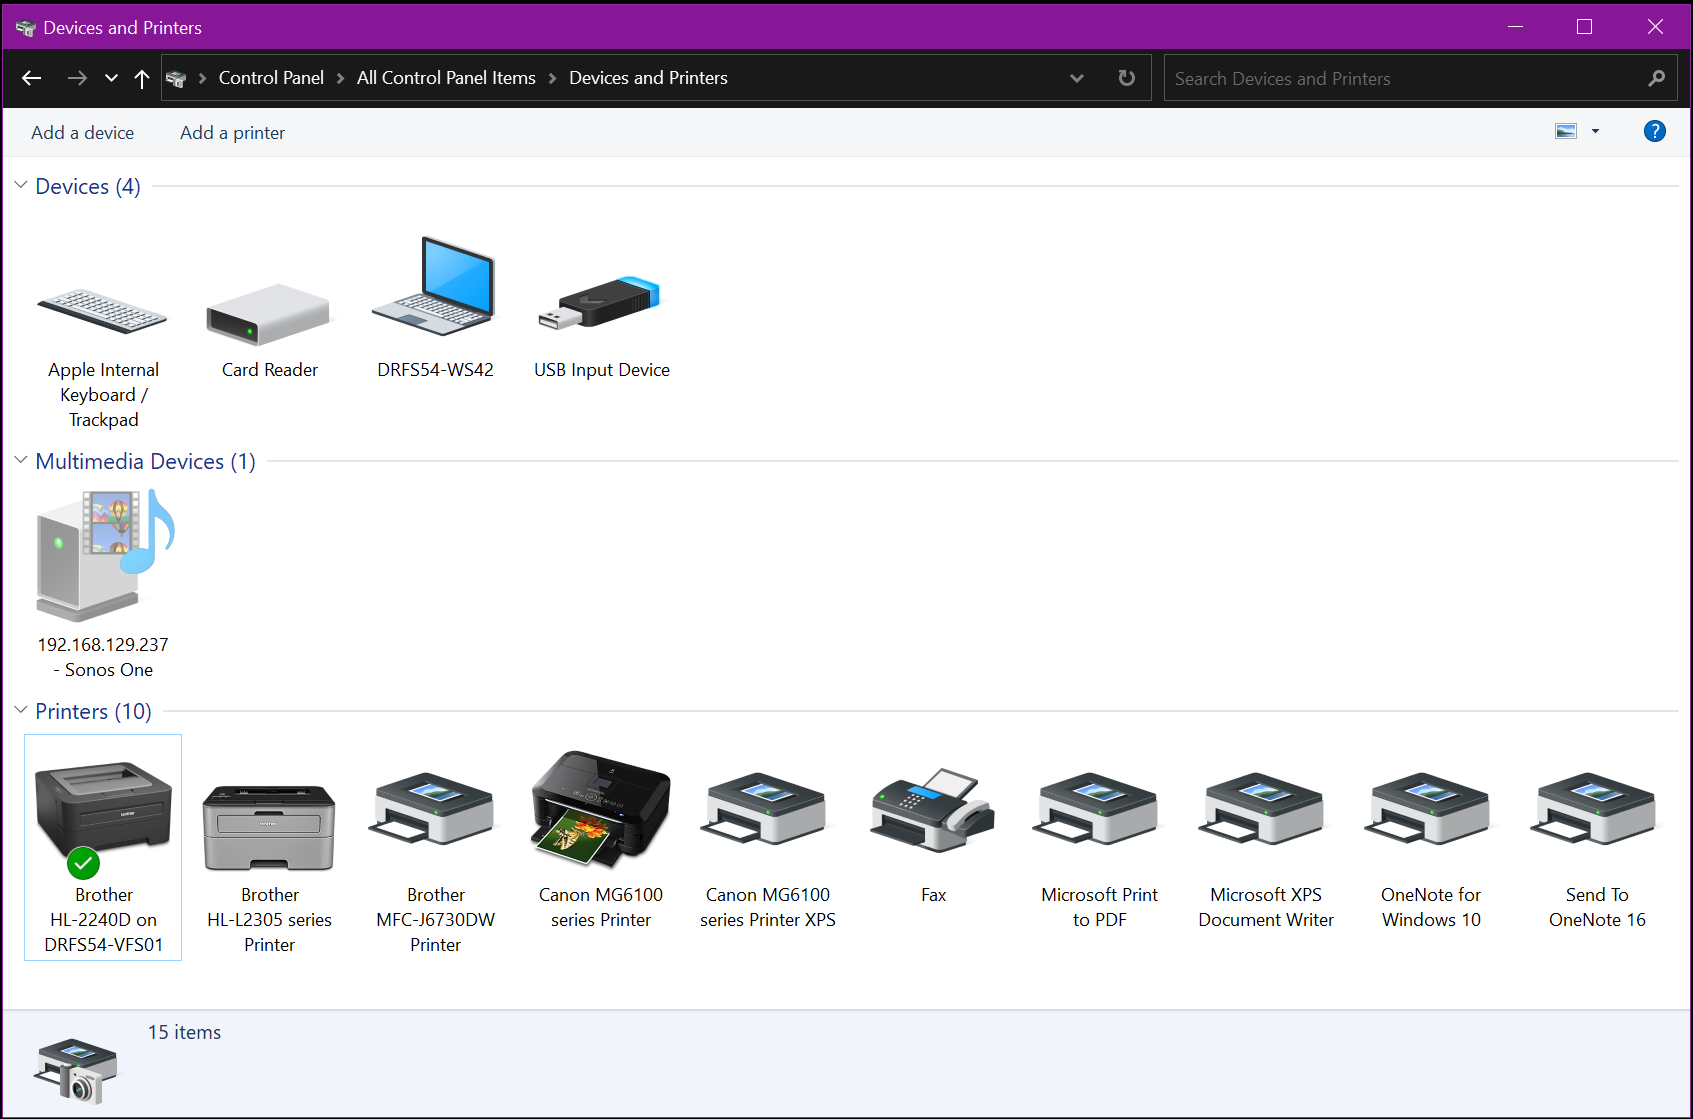
Click on Devices and Printers

Click on Add Printer in the toolbar

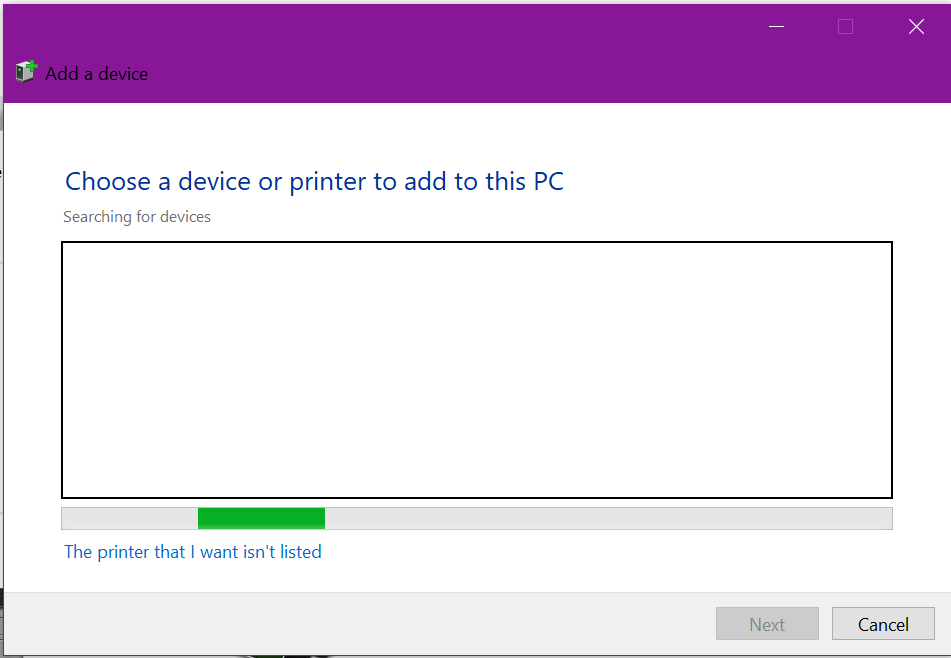
When Windows is scanning for printers, click on “The printer that I want isn’t listed

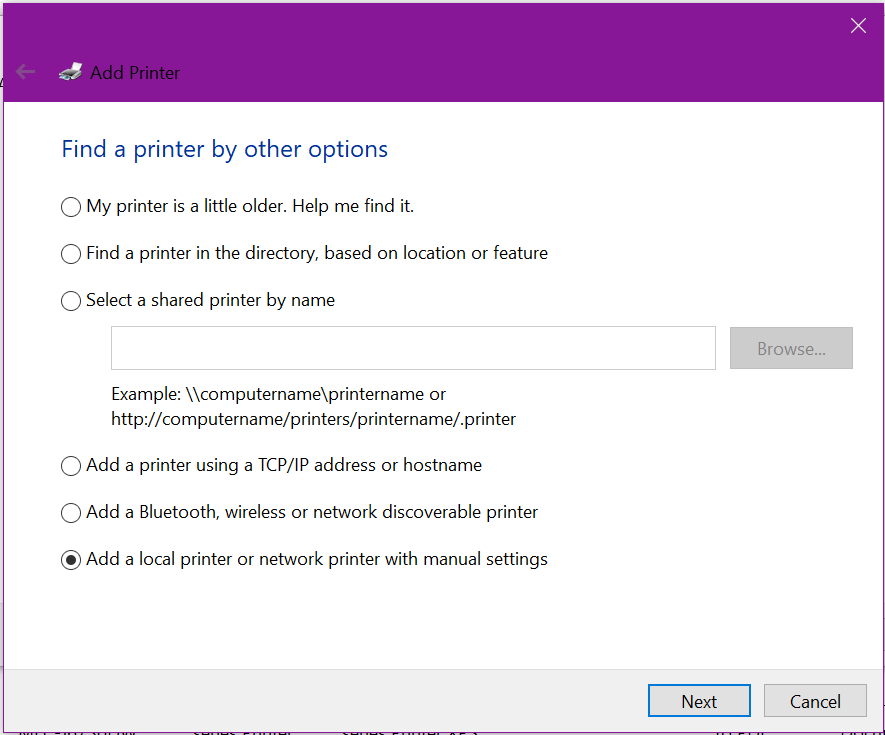
When prompted, select the option to Add a local or network printer with manual settings:

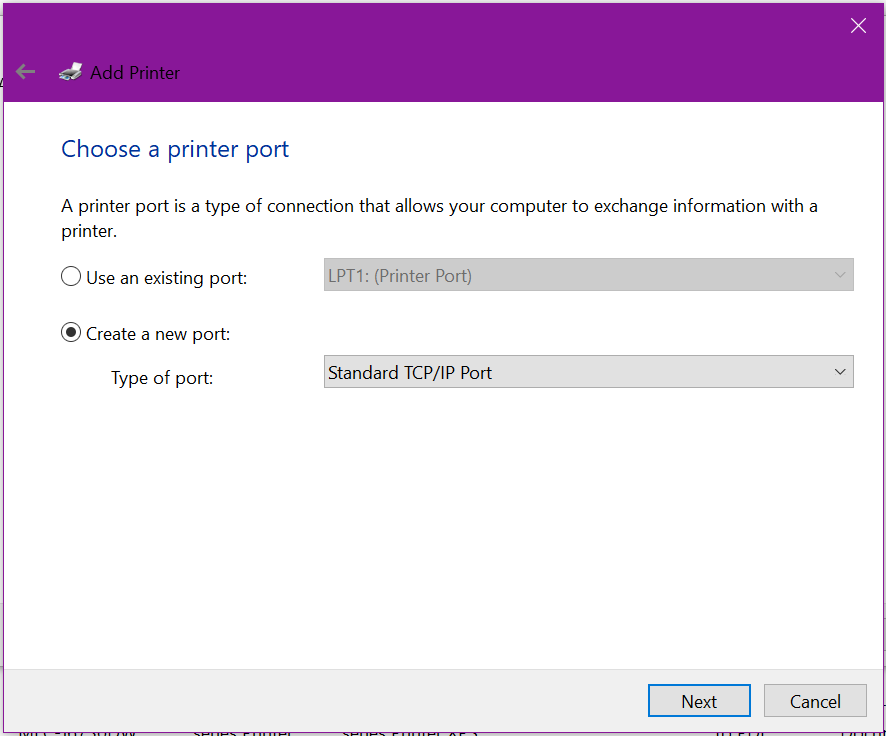
When choosing a printer port, select Create a new port and change the drop down list to Standard TCP/IP Port, click Next

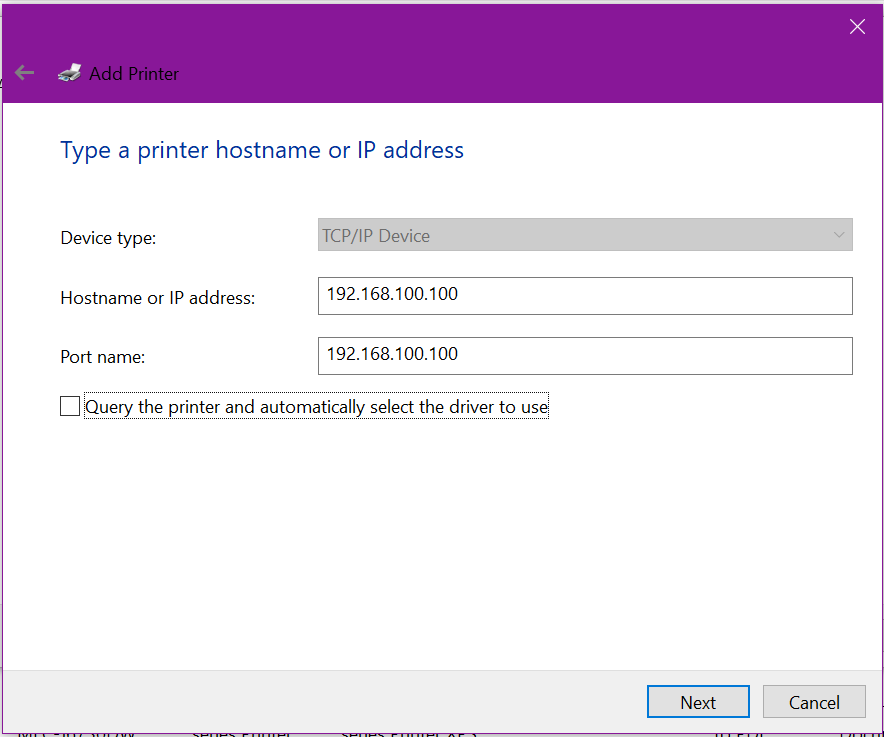
Enter in the fixed or reserved IP address of the printer, and un-tick the Query the printer for automatic installation

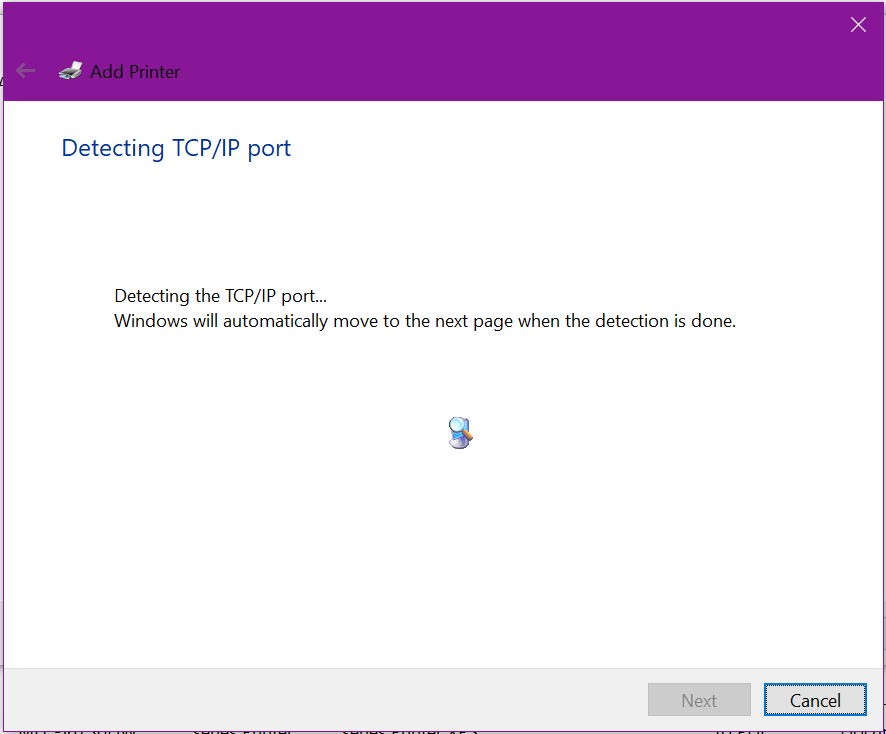
Windows will now check to see if it can communicate with the printer’s network stack and determine the available network protocols (SNMP, HP Discovery, etc).

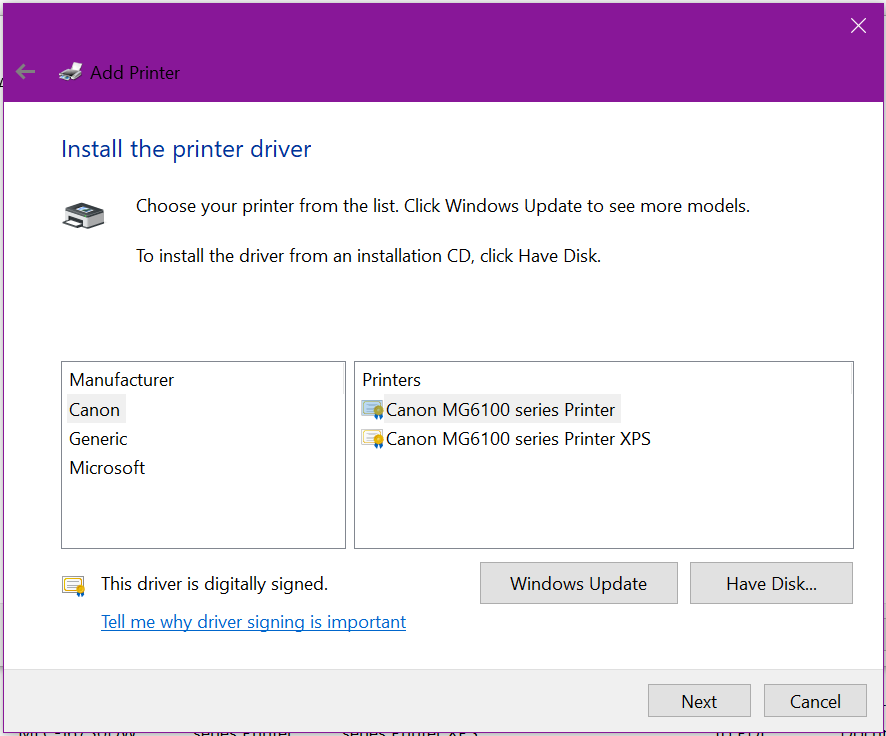
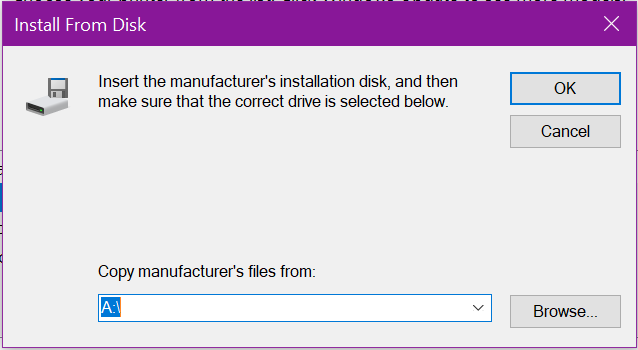
Now we need to install the actual drivers, click Have Disk

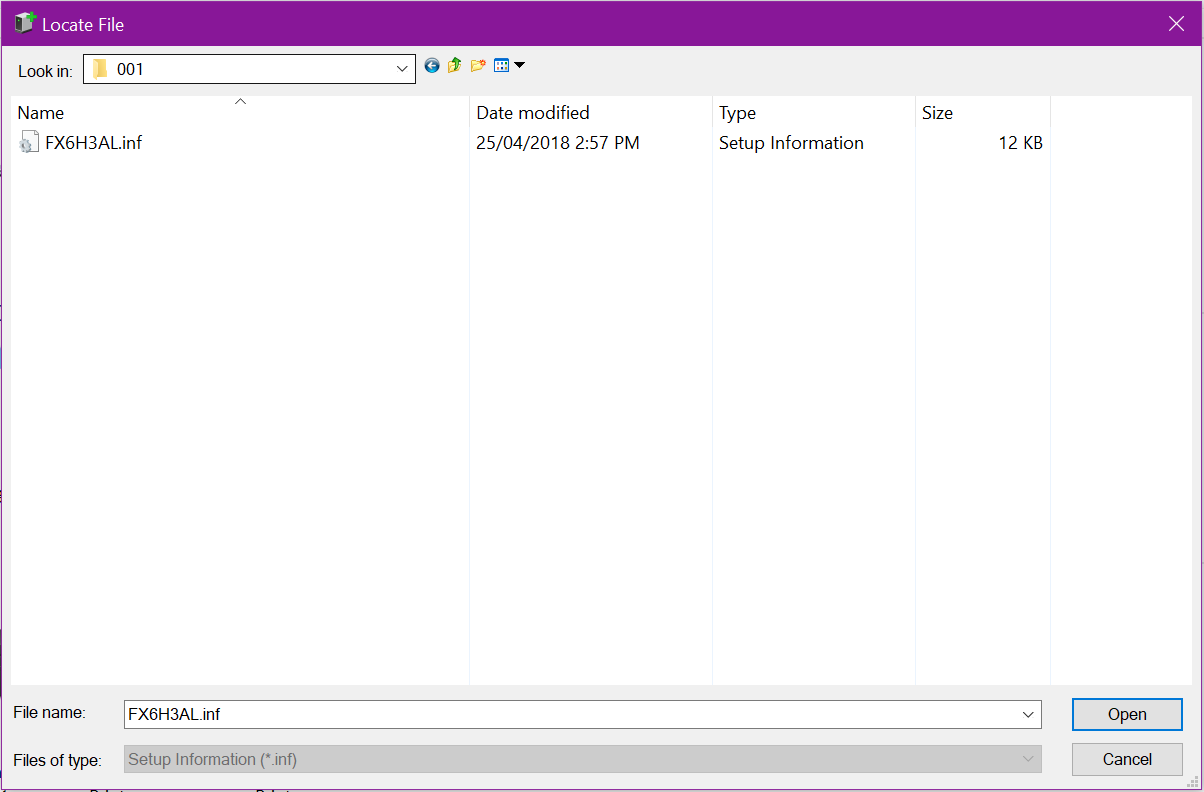
Click Browse and locate the folder where the 64 bit drivers were extracted to

You may need to drill down into a fairly deep folder structure, like in this example to locate the valid driver information (INF) file. Click Open

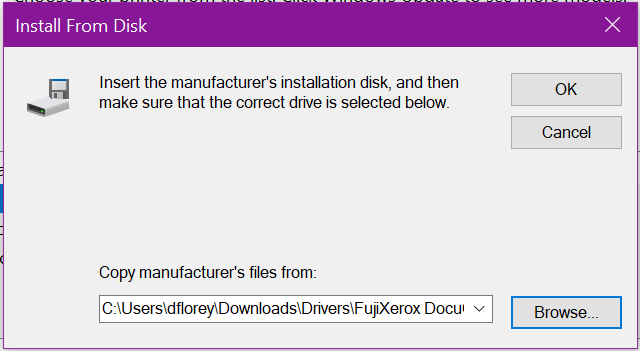
You will return here, where you can see the file path. Click OK

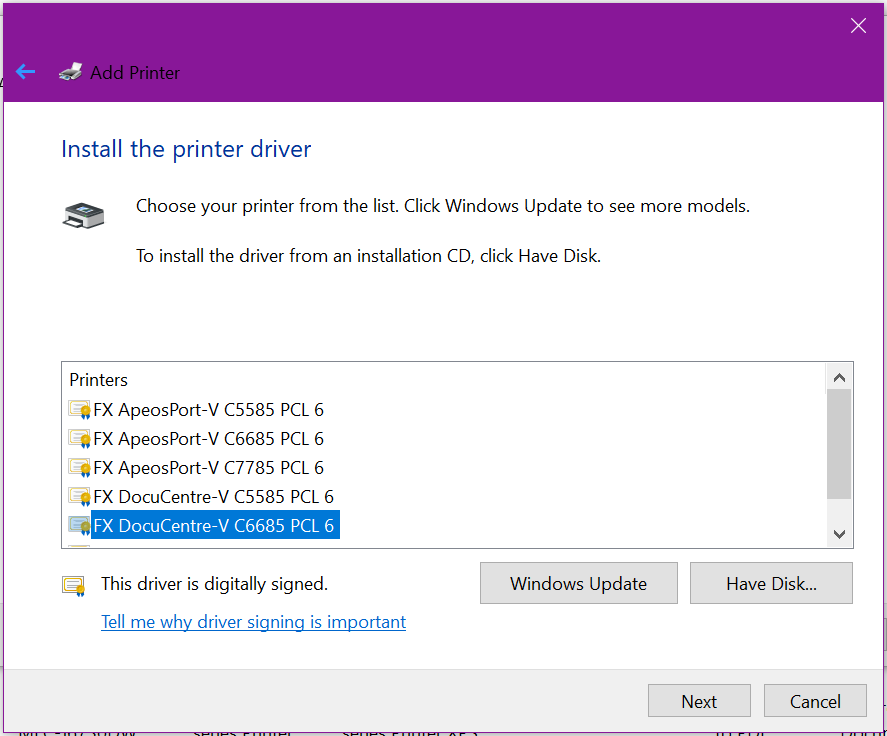
Typically, manufacturers will bundle drivers & support for multiple models of their printer for ease of production, so you will need to select the correct model & revision from the list to ensure you get all the correct features & settings available to your printer. Once selected, click Next

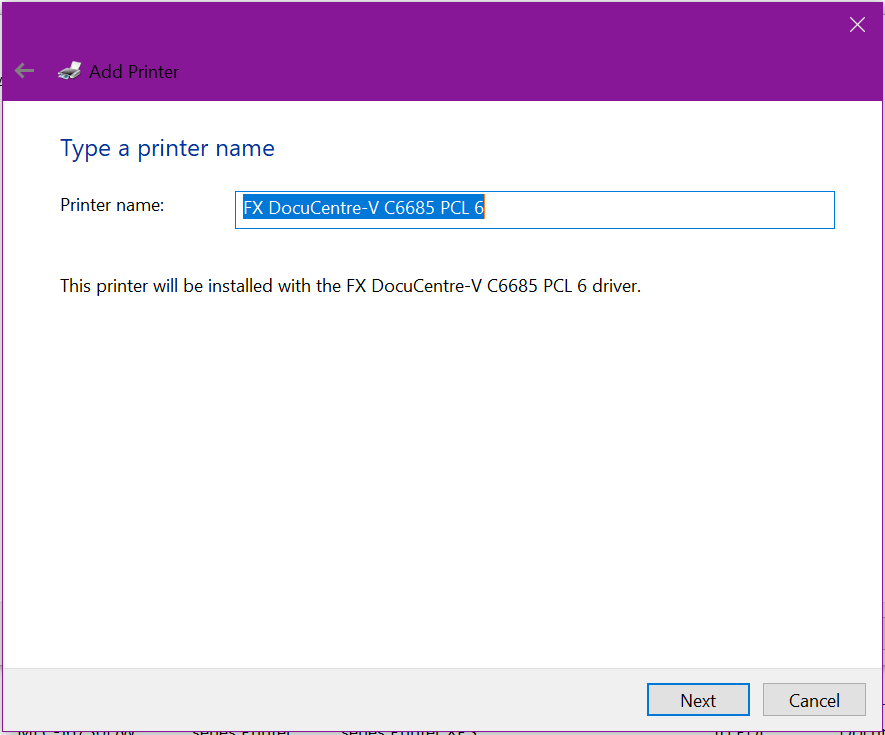
Give the printer a valid & meaningful name. If prompted to Share the printer to the network, un-tick this option as we’re not yet ready for this

Windows will now install the drivers and add the new printer

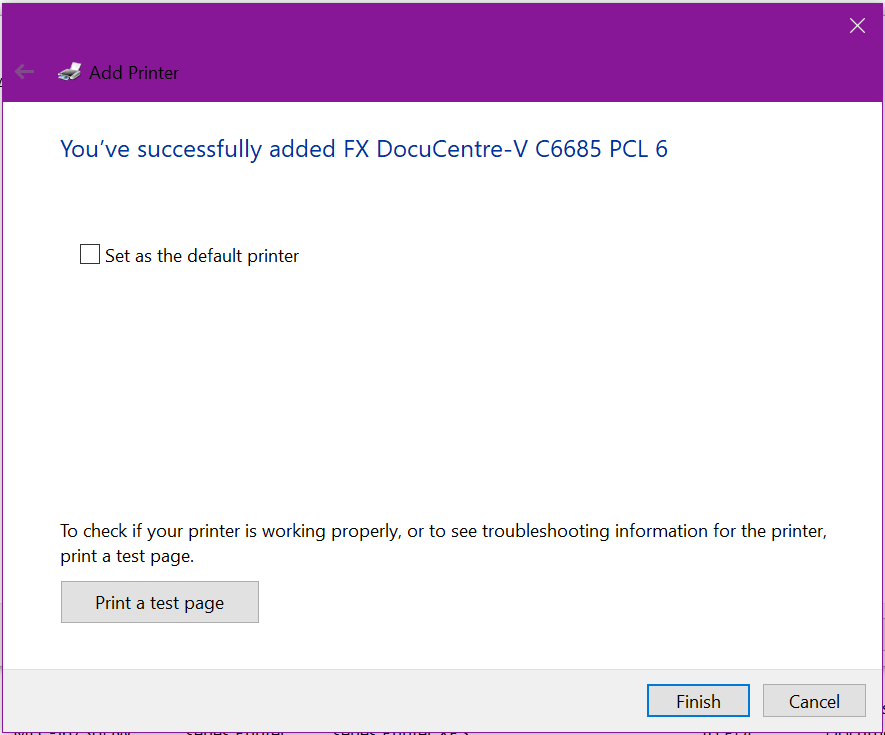
From here, click to Print a test page if there’s not many options on the printer, otherwise, click Finish.


Returning to the Control Panel > Devices and Printers, you will now see the newly installed printer.


Now we want to install support for 32 bit Windows (and ARM64 if applicable / available). This is to ensure Windows 32 bit systems connecting to our server to access the printer will also receive automatic driver installation. Although 32 bit Windows is becoming far less common these days, doing this ensures in the long term, there’s little or no poor user experience or frustration when adding shared printers to their systems. It also helps when deploying printers via Group Policy that 32 bit Windows users don’t get prompted to install drivers on every logon until installed.

Right-click on the newly installed printer

Select Printer Properties from the contextual menu.

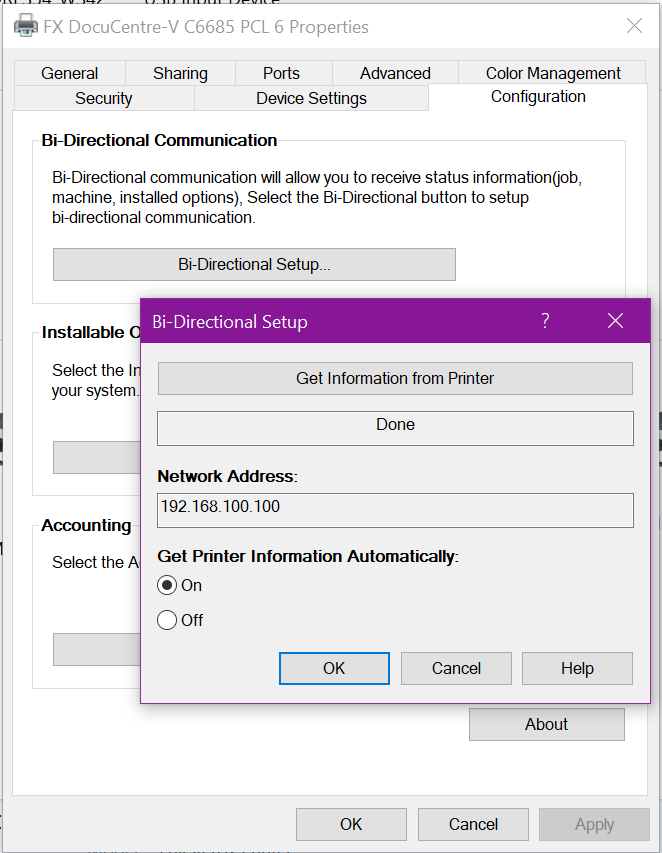
Many networked printers offer automatic device configuration in the form of two-way communication between the printer driver and the printer’s network stack. If this is an option, enable it and click the button appropriate to update the printer options.

In our FujiXerox example, this is called Bi-Directional setup – which is off by default, so turn this on, then click Get Information from Printer.

What this does: Tells the driver to communicate with the printer, requesting information such as: how many trays, what paper is in each tray, are their side car options or ‘finishers’, staplers, binders, folders, etc. The printer will respond to the driver and tell it what options are installed & available, and also consumable information such as paper & toner levels, etc. Once done, click Apply to save changes and update the configuration.

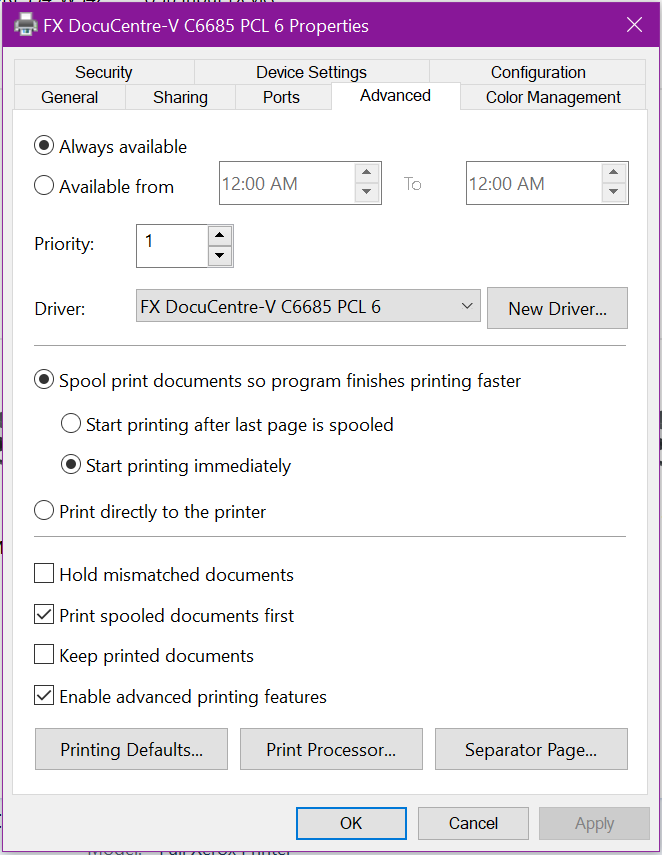
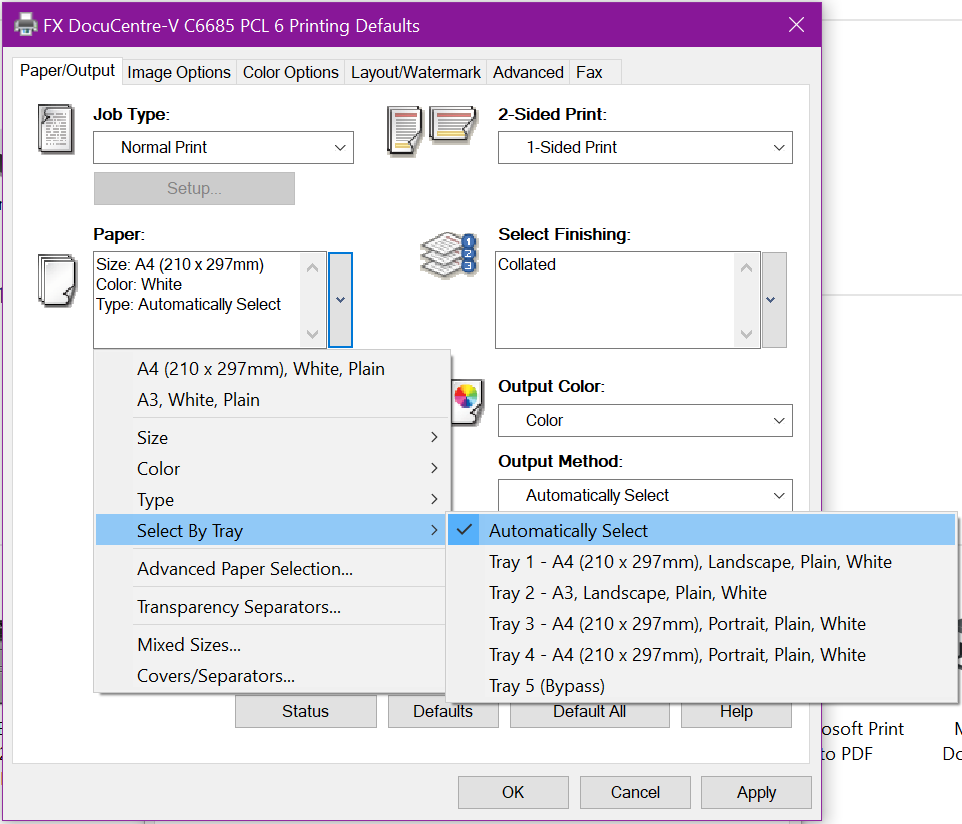
You can verify this worked by clicking Advanced, and Printing Defaults

You’ll see tray options, paper sizes, color options, output options, etc.

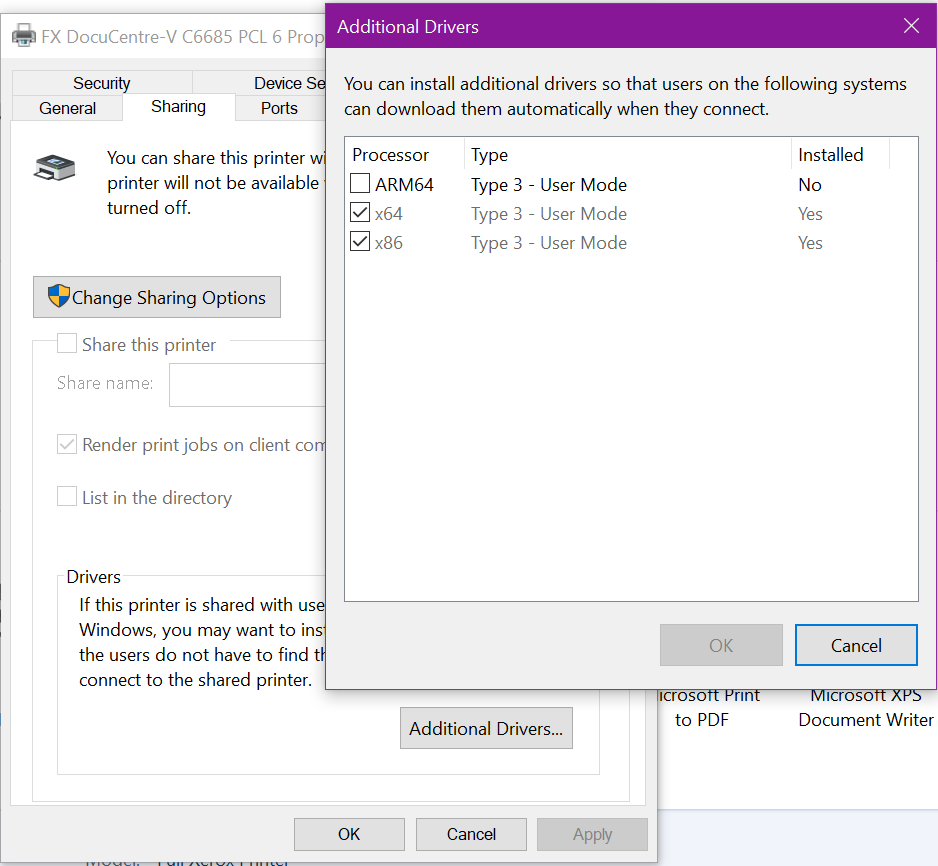
Now, head to the Sharing tab, click Additional Drivers.

Place a tick next to the additional drivers that you have downloaded (such as 32 bit) and click OK

This will prompt you to install them, like at the beginning, click browse to locate and install the appropriate drivers

Once located and selected, click OK

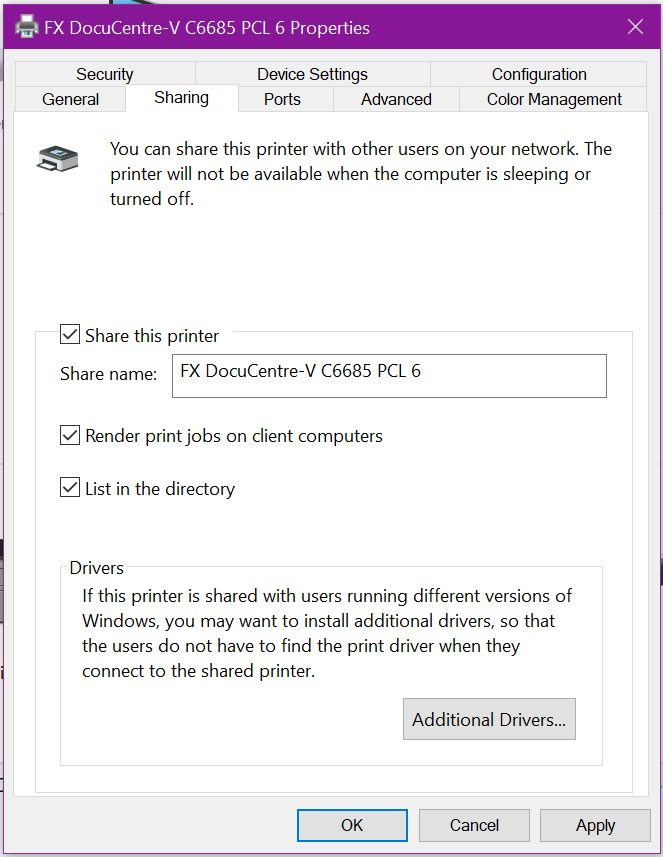
Finally, now you can Share out the printer. If the Windows PC or server sharing the printer is a member of Active Directory (or is the domain controller), tick the option to List in the directory – this will make is easier later in Group Policy to deploy.

Windows PC’s on the network (either AD authenticated, or pre-authenticated locally) can now browse the network share of this Windows Server and install the shared printer by simply double-clicking on it.


Windows 10 Start Menu Not Working

Forward:

Initial releases of Windows 10 seems to be plagued with an issue where the start menu and / or the search box fail to function. Users cannot click on the start menu, and the search box disappears or becomes unusable. Seems that a couple of build releases re-introduced this issue for many users.

Fix the issues using PowerShell:

Ensure the Windows Firewall Service is running – there are numerous instances where the Firewall service being stopped or disabled has prevented the Start menu from working. Use the services.msc admin tool to achieve this.

Right-click on the Start menu and select Powershell (admin) – if this isn’t present, choose Command Prompt (admin), then in the CMD window, enter in powershell – which will bring up an admin level Powershell window.

In the admin Powershell window, enter in the command:

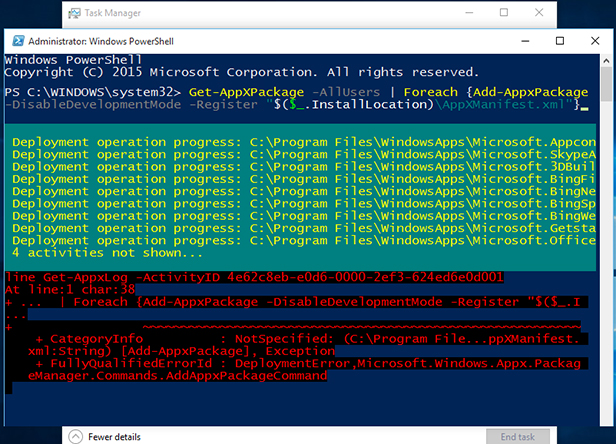
Get-AppXPackage -AllUsers | Foreach {Add-AppxPackage -DisableDevelopmentMode -Register "$($_.InstallLocation)\AppXManifest.xml"}

Wait until the processing has competed. Now try to access the start menu. If it still isn’t working, you may have to reboot. Also, if the search box is still missing, but the start menu is working, right click on an empty part of the task bar and in the context menu, select Search, and add it to the task bar.

In some instances, a reboot was necessary after this was completed.