Microsoft Windows

Raise Forest and Domain Functional levels

Domain and forest functional levels in Active Directory define the available features and supported operating systems for domain controllers within a domain or forest. They essentially act as flags that indicate the minimum operating system version required for all domain controllers in a specific scope (domain or forest). This ensures compatibility and enables new features that require a certain level of infrastructure.

The Domain and Forest functional levels are named the same a Windows server operating systems, such as:

  • Windows Server 2008
  • Windows Server 2003
  • Windows Server 2012 R2
  • Windows Server 2016

The maximum level that the forest and domain can be raised to is the same as the oldest version of Windows server hosting AD services. For example, if you have three domain controllers one running Windows Server 2012 R2, one running Windows Server 2016 and one running Windows Server 2019, the domain and forest levels can only be raised to Windows Server 2012 R2 as this matches the OS of the oldest domain controller on the network.

Typically, we raise the levels after demoting old domain controllers, in some cases, raising these levels is required to support newer Exchange server platforms or newer versions of EntraID Connect.

Once either a forest or domain level has been raised, it cannot be downgraded – preventing you from promoting domain controllers running older OS versions that the current functional levels. This means that once the Server 2012 R2 DC has been demoted and the AD functional levels have been raised (to say 2016), you can no longer promote Server 2012 R2 (or older versions) to a DC. Only Windows Server 2016 and newer can be domain controllers going forward.

Ideally, the functional levels should be raised on writable domain controllers that also host a copy of the global catalog – not on a read only DC, or a DC that doesn’t store a copy of the GC. (Generally speaking, the guides on our Intranet walk you through deploying RW DCs with GC).

All domain controllers should be online and connected / contactable from all other DC’s before making changes.

There are multiple methods to raise these levels, we’ll focus on just two methods in this guide.

Raise Forest and Domain Functional Levels via GUI:


On any writable domain controller launch the following server applets:

  • Active Directory Domains and Trusts
  • Active Directory Users and Computers

Starting in AD Domains and Trusts, on the left tree, right click the first item in the top of the tree labelled Active Directory Domains and Trusts

Select Raise Forest Functional Level from the context menu

In the popup, you’ll see the current forest level and a dropdown list where you can choose the available functional levels you can upgrade to

Select and click Raise.

It will take about one second and then will tell you its been completed.

Close this window

Switch over to Active Directory Users and Computers

Right click in the top most left tree item

Select All Tasks > Raise domain functional level from the context menu

Just like the forest functional level screen earlier, you’ll see the current level and a dropdown list to select the available domain functional levels you can raise to.

Select the new level and click Raise

Again, this should take up to a second and inform you that the domain level has been raised.

And that’s it – job done!

Raise Forest and Domain Functional Levels via PowerShell:

On a writable DC with a local GC store, launch an elevated PowerShell session

Use the Set-ADForestMode cmdlet to raise the forest functional level

Set-ADForestMode -Identity <domain> -DomainMode <level>

Example:

Set-ADForestMode -Identity drfs.local -DomainMode Windows2016Forest

You will be prompted to confirm, type Y and press enter

You will be returned to prompt almost immediately with no output, to confirm the upgrade was successful, execute:

Get-ADForest | fl Name, ForestMode

You should see output like this:

Now we can upgrade the domain functiona level using:

Set-ADDomainMode -Identity <domain> -DomainMode <level>

Example:

Set-ADDomainMode -Identity drfs.local -DomainMode Windows2016Domain

Again, you’ll be prompted to confirm, type Y and press Enter

You will be returned to prompt almost immediately with no output, to confirm the upgrade was successful, execute:

Get-ADDomain | fl Name, DomainMode

That’s it – job done!

Demote old domain controller and post demotion clean up

In this guide we’ll cover off the process to demote a domain controller that is being replaced and the replacement DC has already been made the authoritive global catalog server while also holding the roles of FSMO, PDC, RID, etc.

When demoting a domain controller a reboot WILL be required for the process to complete.

The old DC will remain as a member server joined to AD, so any shares & services still hosted on it will continue to remain functional & accessible to the AD environment.

This guide assumes that all the relevant steps required have been followed & completed in herehere, and here.

Test Demote DC:

On the DC being demoted, launch an elevated PowerShell session

We’ll do a test to see what dependancies might be configured that would prevent a succssful demotion

Test-ADDSDomainControllerUninstallation -DemoteOperationMasterRole -RemoveApplicationpartitions

Explanation of Command:

Test-ADDSDomainControllerUninstallation: This command is to run the uninstallation test. It is like a simulation to check any issues or dependencies while uninstalling.

DemoteOperationMasterRole: This command is to demote all the Operations master roles i.e. FSMO (Flexible Single Master Operations role). We’ll talk in detail about FSMO roles in future articles.

LastDomainControllerInDomain: This switch is compulsary if this is the last DC in domain. If you have multiple DCs then do not use this.

RemoveApplicationPartitions: This switch is required to remove application partitions.

The first prompt will request you to enter in a new password to set for the built-in Administrator account.

This will output either a success or error result:

If you have a success result, you can proceed with domain controller demotion.

If you’ve received an error, you’ll need to address any and all errors before you can demote the domain controller.

Note: the above example mentions Certificate Server is installed. Although certificate services can be installed on non-DC member servers (and is generally best practice to not install it on a DC), if it IS installed on a DC, it MUST be migrated away from the DC before you can demote.

Other services can also inhibit demotion such as the presence of BitLocker tools, AD Federation Services, ADLDS, AD Rights Management Services, etc. – these would all need to be migrated & removed first.

Updates to Network Interfaces:

All domain controllers now need to have their primary DNS server IP configured to point to the current PDC.

Every other DC then needs to be listed as an additional DNS server

Finally, at the bottom of the DNS IP list should have the localhost IP of: 127.0.0.1

DC Demotion:

In our example, we will remove Domain Controller DC01-2019.

Open Server Manager

Click on Manage and select Remove Roles and Features

Select Next

Select the server from the pool and click Next

Clear the checkbox Active Directory Domain Services

Click Remove Features

Click on Demote this domain controller

Supply the admin credentials if needed and click Next

Note: Do NOT select the option Force the removal of this domain controller and leave it unchecked.


Check Proceed with removal and click Next

Enter a new administrator password for the local administrator account after the Domain Controller is demoted

Click on Demote

The server will go through the demotion process

Once the demote is done, the Windows Server will restart automatically

Step 4. Remove Active Directory Domain Services role

After the restart, you need to remove the ADDS role with the steps below:

Open Server Manager

Click on Manage and select Remove Roles and Features

Select the server from the pool and click Next

Clear the checkbox Active Directory Domain Services

Click Remove Features

Click Next

Click Next

Check the checkbox Restart the destination server automatically if required.

The removal is in progress

The Windows Server will restart and proceed further with the removal and finishes. Click Close.

The server will reboot and be a member server – like a standard server joined to AD – no longer a domain controller.

Now we need to clean up AD

Post DC Demotion AD Clean Up:

Removal of old DC from Sites and Services:

On a domain controller, launch AD Sites and Services

Expand Sites > Default-Fist-Site-Name > Servers

Right-click the old DC server and select Delete from the context menu

DNS Cleanup:

After you demote a domain controller, often there are pieces of information left over in DNS that still references it either as a zone server and or an MSDCS – even if you have configured DNS Aging and Scavenging in AD as this will only clean up dynamic DNS records, where DCs are usually static DNS records.

There are two options.

Option 1: Use the DNS Server Manager to manually clean up entries. While this takes longer, it allows you to manually check every record before deleting, ensuring the NEW DC is referenced in place as a zone master and msdcs pdc – also useful if the old DC is still serving network tasks such as a file server, print server, DHCP server, etc and you’re not yet ready to completely kill it.

Option 2: Use a PowerShell script to very quickly go through DNS and remove any references to of the old DC from all zones. This is quicker, but relies on the DNS to already be pretty healthy before we began, AND the old DC server has been completely removed & shutdown (no longer in use)

Option 1:

Launch DNS Manager

Expand absolutely every zone and remove any entry where the old DC is referenced as a name server (NS) record – also ensuring all other (relevant) DCs are listed as name servers

In the zone that begins with _mscds.domain.tld ensure that:

  • the old DC is no longer referenced at all in any of the entries and subfolders
  • in the pdc > _tcp folder the current PDC is noted

Option 2:

Use the below PowerShell script to remove the old DC from DNS:

$ServerFQDN = "dc01-2019.exoip.local." #Keep the dot (.) at the end
$ServerHostname = "dc01-2019"
$IPAddress = "192.168.1.51"

$Zones = Get-DnsServerZone | Where-Object { $_.ZoneType -eq "Primary" } |
Select-Object -ExpandProperty ZoneName

foreach ($Zone in $Zones) {
    Get-DnsServerResourceRecord -ZoneName $Zone | Where-Object { 
        $_.RecordData.IPv4Address -eq $IPAddress -or
        $_.RecordData.NameServer -eq $ServerFQDN -or
        $_.RecordData.DomainName -eq $ServerFQDN -or
        $_.RecordData.HostnameAlias -eq $ServerFQDN -or
        $_.RecordData.MailExchange -eq $ServerFQDN -or
        $_.HostName -eq $ServerHostname
    } | Remove-DnsServerResourceRecord -ZoneName $Zone -Force -WhatIf
}

Conclusion:

You’ve successfully demoted a domain controllers and performed the steps required in AD to clean up post demotion.

Now you should consider raising the domain and forest functional levels.

Migrate AD Certificate Services

This guide assumes the server(s) are running Windows Server 2008 R2 / SBS 2011 or newer and the overall steps in this sections will consist of the following:

  1. Back up the current AD CS server CA database and configuration.
  2. Back up the current AD CS server registry key.
  3. Remove the AD CS role from the current Windows Server.
  4. Install the AD CS role on your new Windows Server.
  5. Restore the backup configuration and registry key on the new AD CS server.

1. Back up the current AD CS database and configuration:


The process to back up your current AD CS server CA database and configuration is straightforward. It can be accomplished using the AD CS management console or the certutil command-line utility in Windows Server 2008 R2.. In the console, under Administrative Tools > Certification Authority, right-click the server name and select All Tasks > Back up CA.

Select this option to start the Certification Authority Backup Wizard. Click Next

On the next screen, select the items to back up. Select the Private key and CA certificate and the Certificate database and certificate database log options. Finally, enter a path in the Back up to this location box.

You will see a dialog box asking to create the directory. Click OK. Note, if the directory already exists it must be an empty location.

Enter a password to secure the private key and the CA certificate file.

The AD CS backup wizard is completed successfully.

Note: if for some reason, the old server is having issues running through this process using the GUI, you can also use the command prompt to achieve the same steps using:

certutil -backup c:\<pathToBackup>

2. Back up the AD CS server registry key:


The next step is to back up the CertSvc key located at:

HKEY_LOCAL_MACHINE\SYSTEM\CurrentControlSet\services\CertSvc

Why is this necessary if we have backed up the private key and the certification authority database? The registry key contains the Certification Authority configuration settings, such as the CRL and AIA locations. To back up the registry key, open regedit and perform the following steps:

Navigate to the key HKEY_LOCAL_MACHINE\SYSTEM\CurrentControlSet\services\CertSvc.

Right-click CertSvc and select Export.

3. Remove the AD CS role from the current Windows Server


This step is pretty self-explanatory:

4. Install the AD CS role on your new Windows Server:


Add the role called Active Directory Certificate Services

Add the role features Certificate Authority and Certificate Authority Web Enrollment

You’ll then be prompted to select roles for IIS – just run with the defaults that are already selected

Once installed, you’ll need to perform the required post-deployment configuration

You won’t be able to configure services other than the Certification Authority. So you must first configure the Certification Authority and then go back and configure the Web Service

On the next couple of screens choose:

Enterprise CA:

Root CA:

Here, select Use existing private key

Select your existing private key created in your legacy AD CS server backup. Copy this to your server beforehand so you have access to the key. Click Import.

Browse to the key. Enter the password used to back up the key and AD CS configuration.

Click the certificate name. You can also select the “Allow administrator interaction when the private key is accessed by the CA” option as a security enhancement. This checkbox enables strong private key protection. With this selected, you will have to enter administrator credentials each time a private key is used, when a new certificate or CRL is issued, or when the service starts.

Choose the location for the CA database.

Next, review & complete the configuration.

You will be prompted to finish an additional post-deployment configuration. You can go back into the post-configuration wizard and configure the web services portion of the new server.

5. Restore the backup configuration and registry key on the new AD CS server:


Now, let’s restore the backup taken from the Windows Server 2008 R2 server. Stop the AD CS service to restore the AD CS backup.

Choose Restore CA.

This begins the Restore Wizard.

Select the checkboxes for Private key and CA certificate and Certificate database and certificate database log. In addition, choose the folder from which to restore.

Provide the password used during backup. On the summary screen click Finish

Back at the main CA screen, click No to the prompt that will come up asking to start the service as we need to restore the registry key first.

Browse to the registry key backup you created from the original AD CS server. Right-click and select Merge.

After the registry merge is successful, start the AD CS service.

At this point, you should be able to see the new Active Directory Certificate Services server running without issue, as well as your issued certificates and other information as it was before the server migration. Due to the restore, the CA configuration will retain the CA name of the former server.

Ideally, we should allow incoming traffic through to the new server via Windows Firewall:

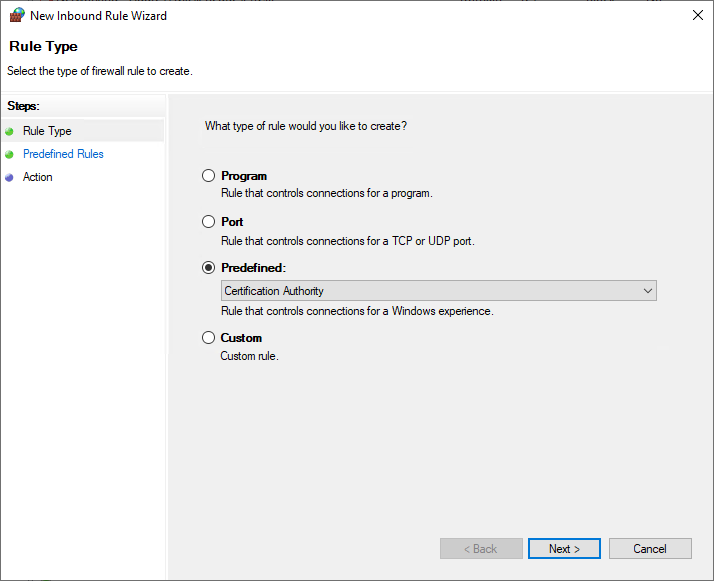
Create a new Inbound rule and select Predefined > Certificate Authority

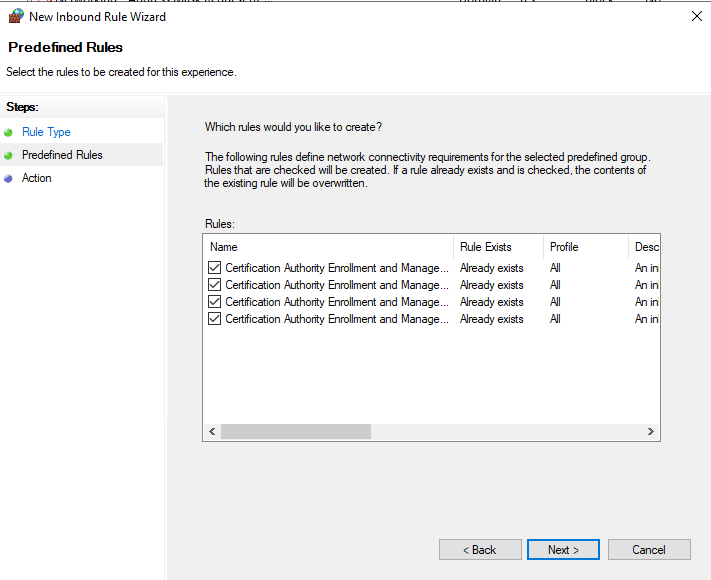
Select all options for the new rule

Complete the new rule and you’re done!

Migrating NPS Services to a New Server

Migrating NPS is generally a very straigh forward process – just a couple of PowerShell commands and change the RADIUS IP address of connecting devices (APs and switches)…


On the NPS server being decommissioned / replaced, open an elevated PowerShell session and execute:

Export-NpsConfiguration -Path <filename>

An example would be:

Export-NpsConfiguration -Path "C:\Temp\NPS-Export.xml"

NOTE: Exports and the subsequent imports CAN fail if the backup is saved in any format other than .xml

Copy the file to the new NPS server

On the new server, launch Server Manager, click Add roles and features, and in Server Roles, add Network Policy and Access Services

Now launch an elevated PowerShell session on the new NPS server, and import the copied config file:

Import-NpsConfiguration -Path <filename>

Example:

Import-NpsConfiguration -Path "C:\Temp\NPS-Export.xml"

On the new NPS server, launch the Network Policy Server servelette from Administrative Tools

We first need to Authorise the new NPS server in Active Directory, in the NPS window, right-click the NPS (local) in the top left of the tree and in the context menu, select Register server in Active Directory

Now right-click again, Stop the NPS service, wait 30 seconds, right-click again and Start the NPS service

Check & compare the configuration between the old and new servers to ensure NPS looks like its all the same

Check Remote RADIUS Server for RADIUS servers and server groups

Add in the new server, ideally, using the same RADIUS password if you know what it is (if not known, and using UniFi – get it from the controller – see further down).

Check through all the active Connection Request Polices for Authentication servers in the Settings tab of each policy – what you’re looking to check is that each policy is set to authenticate to the new server or to the server group that the new server is a member of:

Now we need to ensure Windows Firewall will allow incoming requests to the NPS

Create a new Inbound rule and select Predefined > Network Policy Server

Check all the boxes:

Final page: Allow the connection and click Finish


Finally, now you can go through to all network devices using the NPS and update the server / IP to point to the new host.

In the case of the UniFi controller, click the Settings gear > Profiles > RADIUS

Click the EDIT link next to the Radius profile

Change the IP address for both authentication and accounting where applicable

Hint: you can click the  icon next to the password fields to reveal the password / shared secret in case this is required in earlier steps when adding in the new server to NPS.

Done!


More information can be found here: https://learn.microsoft.com/en-us/windows-server/networking/technologies/nps/nps-manage-export

Migrate Printers from old Domain Controller to a new one

When migrating printers (including printer shares, drivers, ports, queues, and printer settings) from one server to another, its pretty straight forward.

Ensure on the source server the Print Management Server role is installed. If not, install it now.

On the destination server, install the Print Management Server role.

On the source server, launch Print Management

Right-click on the Print Management and select Migrate Printers from the context menu

Choose to Export printer queues & printer drivers to a file

Follow the process to the end of the export

On the destination server, launch Printer Management

Right-click on Printer Management in the menu and select Migrate printers

Select to import printer queues and driver files from a file

Locate the source files

Choose whether to keep existing printers

After this is completed, the new server will have all the same printers, queues, drivers, ports, etc as the source server. You can now go through the process to update the various printer deployment scripts or GPOs.

Move the DHCP Server to a new DC Server

This is a quick guide for moving DHCP server roles to new DHCP servers

This requires access to elevated Powershell sessions on both the current DHCP server and the new DHCP server.

Export Full DHCP server config (all scopes) including the lease reservations:

Export-DhcpServer -ComputerName "dhcpserver.contoso.com" -File "C:\exportdir\dhcpexport.xml" -Leases

Export specific DHCP server scope(s) and the lease reservations:

Export-DhcpServer -ComputerName "dhcpserver.contoso.com" -File "C:\exportdir\dhcpexport.xml" -ScopeId 10.10.10.0,10.20.20.0 -Leases

Import Full DHCP server config (all scopes) and the lease reservations:

Import-DhcpServer -ComputerName "dhcpserver.contoso.com" -File "C:\exports\dhcpexport.xml" -BackupPath "C:\dhcpbackup\" -Leases

Need to overwite the existing scope with the imported scope? Add to the end:

-ScopeOverwrite

Import specific DHCP server scope(s) and the lease reservations:

Import-DhcpServer -ComputerName dhcpserver.contoso.com -File "C:\exports\dhcpexport.xml" -BackupPath "C:\dhcpbackup\" -ScopeId 10.10.10.0,10.20.20.0 -Leases

Need to overwite the existing scope with the imported scope? Add to the end:

-ScopeOverwrite


On the new DHCP server, you must Authorize it in AD

Launch DHCP and in the top of the tree, right-click DHCP and select Manage authorized servers

Select the new server and click Authorize – this will allow DHCP to start issuing DHCP leases

Next you can select the old DHCP server and click Unauthorize

Ensure the DHCP Server is now running on the new server

Head to the old server and stop the DHCP server

Wait 60 seconds, double check DHCP is still running on the new server without errors, and all leases / reservations are in place, then disable DHCP Server on the old server.


Move FSMO, Operations and Key DC Roles to a different Domain Controller

This guide will demonstrate a few methods that can be used to move the various AD roles from one domain controller to another. This guide assumes the domain controller currently holding the roles is still online, available, and in a relatively healthy or usable state. If not, a hostile takeover process will need to be followed instead.

The PowerShell method is generally the quickest / easiest method and probably the most supported / reliable when performed on the new DC, so probably just go straight there, but the other methods exists for older servers, or for users were PowerShell isn’t preferred.

Generally, the roles to be transferred are:

  • Operations Master
  • PDC Emulator
  • RID Master
  • Infrastructure Master
  • Schema Master
  • Domain Naming Master

Before we begin!

Before starting out, ensure that your new domain controller has been prompted to a Domain Controller.

Ensure that it has all relevant updates have been installed.

Ensure that both domain controllers’ NICs have both DC IP addresses as their DNS Servers.

Ensure that both domain controllers’ NICs have the AD domain name in the domain suffix

Active Directory Sites and Services – Setup

Launch Active Directory Sites and Services

Expand Sites > Inter-Site Transports > IP

Double-click on the site link listed

Usually the default replicate time is 180 mins, reduce this down to around 15 mins (15 mins is good as long as no DC’s will be offline for more than this)

Ensure that all relevant sites are listed in this site link (in most cases, there is a single site and a single link). In more complex sites, tread carefully, consult someone senior if in doubt!

Expand out Default-First-Site-Name -> Servers

Ensure that all domain controllers are listed that should be in this site, again, most environments are single site and single link. Tread carefully for more complex networks…

Your new domain controller should be listed

Setup ADSI Edit

Next, launch ADSI Edit

Right-click on the ADSI Edit in the top of the tree in the left pane, click Connect To

In the Connection Settings window, drop down the list under Select a well known Naming Context, and select Configuration

Click OK

Expand out CN=Configuration, CN=Sites, CN=<Site Name>, CN=Servers

Ensure there are no old, no longer existent domain controllers listed here, if there are, you’ll need to perform a clean up in both here and in DNS (ideally, you would have checked this and cleaned up BEFORE promoting your new DC)

Perform AD Health Check & Clean UP – Before Adding New DC

Dcdiag: How to Check Domain Controller Health

Using an elevated command prompt on each domain controller, issue the command:

dcdiag /e

Check the output for errors

If either DC has a VSS-level backup, or has been rebooted within the last 24 hours, you will get errors for DFRSEvent stating:

There are warning or error events within the last 24 hours after the SYSVOL has been shared.  Failing SYSVOL replication problems may cause Group Policy problems.

This is normal – often caused by backups, VSS tasks and reboots.

The rest of the output in a healthy AD environment will pass every check / test

FINALLY, once all the above checks have been performed and the transfer process (below) have been completed successfully, allow 24-48 hours to pass, perform a final DCDIAG check, then change the replication time back from 15 mins to at least 60 mins.

Transfer FSMO roles using PowerShell (Quickest / easiest method!)

Transferring FSMO roles through PowerShell is a much easier and faster process without unnecessary clicks.

You can transfer one or more FSMO roles to a DC using the following command. For example, to transfer the PDC Emulator.

Launch an elevated PowerShell session

Execute the following command – TargetDC = New DC Name:

Move-ADDirectoryServerOperationMasterRole -Identity <TargetDC> -OperationMasterRole pdcemulator, ridmaster, infrastructuremaster, schemamaster, domainnamingmaster

After pressing Enter, you will be prompted to confirm the transfer

Finally, using PowerShell, use the following to determine:

  • The forest-specific FSMO roles for a Forest:
Get-ADForest | Select-Object DomainNamingMaster, SchemaMaster
  • The domain-specific FSMO roles for a Domain:
Get-ADDomain | Select-Object InfrastructureMaster, RIDMaster, PDCEmulator
  • Finally, a list of all DC’s hosting FSMO roles:
Get-ADDomainController -Filter * | Select-Object Name, Domain, Forest, OperationMasterRoles | Where-Object {$_.OperationMasterRoles}

Transfer FSMO rules using the GUI

Open up the Active Directory Users and Computers console, right-click on the “Active Directory Users and Computers” at the very top of the tree in the left pane, select Change Domain Controller.

Select the domain controller you want to move the roles to

Click OK

Now right click the domain itself and then on Operations Masters…

In the Operations Masters window there are three tabs (RID, PDC, Infrastructure) – each one shows the current domain controller hosting the role and the domain controller you want to move the role to.

Click Change on each one of these roles, then Close the window.

Now right-click on the domain, select All Tasks > Operations Masters…

The three tabs here may also need to have the roles transfered, then click Close.

Now launch an administrative command prompt window

Execute the following command:

regsvr32 schmmgmt.dll

Now launch mmc.exe (can do this in the CMD window or Winkey+R run dialog)

Select Active Directory Schema and click Add, then click OK

Right-click on Active Directory Schema [<Domain Controller Name>] and click Change Active Domain Controller

Select the domain controller you’re migrating the role to and click OK

Now again, right-click on Active Directory Schema [<Domain Controller Name>] and click Operations Master

Click change to change from the old DC to the new DC and click Close.

Now in the administrative command prompt, execute:

netdom query fsmo

This should output the various roles and which domain controller is now hosting them.


Transfer FSMO roles using the NTDSUtil tool

Launch a command prompt with administrative privileges.

Launch the NTDSUtil in the command prompt by issuing:

ntdsutil.exe

Type roles and press Enter.
Type connections and press Enter.
Type connect to server DC01 and press Enter, (replace DC01 with the server name that you will transfer the FSMO roles to)
Type quit and press Enter.

Next, we will transfer FSMO roles one by one with the corresponding command, as the case may be. After each Enter appears a confirmation window. Just click Yes to continue.

For Schema Master, type transfer schema master and press Enter.
For RID Master, type transfer rid master and press Enter.
For Domain Naming Master, type transfer naming master and press Enter.
For PDC Emulator, type transfer pdc and press Enter.
For Infrastructure Master, type transfer infrastructure master and press Enter.

Finally, exit NTDSUtil by typing quit and pressing Enter

Now verify the transfers by issuing the command:

netdom query fsmo


Check and Update DNS

launch the DNS Manager

You’ll need to expand out EVERY folder for both forward and reverse lookup zones on the left – you’re going to comb through EVERY one of these – checking for previous, no longer existent domain controllers listed, and ensuring that each zone has only current domain controllers listed…

So in the various AD-specific zones & meta data, check that no old DC’s remain – remove any old ones

For each zone, right click and select Properties, then click the Name Servers tab

Check & confirm that only current servers are listed – remove any old ones

Dcdiag to perform a final AD health check

Using an elevated command prompt on each domain controller, issue the command:

dcdiag /e

Check the output for errors

If either DC has a VSS-level backup, or has been rebooted within the last 24 hours, you will get errors for DFRSEvent stating:

There are warning or error events within the last 24 hours after the SYSVOL has been shared.  Failing SYSVOL replication problems may cause Group Policy problems.

This is normal – often caused by backups, VSS tasks and reboots, however, good practice to browse to each DC in Explorer to ensure the NETLOGON and SYSVOL shares are present on each DC and contain relevant data.

The rest of the output in a healthy AD environment will pass every check / test

Conclusion:

You’ve successfully stood up a new domain controller to an existing AD and migrated the various FSMO & PDC Emulation roles to the new DC.

NETLOGON and SYSVOL Shares Not Available On New Domain Controller – DFSR Errors 4612, 6016

Scenario:

You have promoted a new domain controller into an existing Active Directory environment. The new DC however does not have the NETLOGON or SYSVOL shares locally.

You see event log errors in the DFS Replication logs such as 4612, 6016, etc.

You’ve rebooted each DC and waited more time with no changes to the issue.

Solutions:

You may need to perform what known as a D2 and/or D4 FRS Authoritive Restore.

Note: D2 and D4 are technically FRS terms but have made their way into DFSR although completely unrelated.

In most cases, you’ll need to skip right past the non-authoritve restore and go straight to an authoritive restore, but in some cases, a non-authoritive restore can work, so we’ll document that process here…

Non-Authoritive Restore:

In the ADSIEDIT.MSC tool, modify the following distinguished name (DN) value and attribute on each of the domain controllers (DCs) that you want to make non-authoritative:

CN=SYSVOL Subscription,CN=Domain System Volume,CN=DFSR-LocalSettings,CN=<the server name>,OU=Domain Controllers,DC=<domain>
msDFSR-Enabled=FALSE

Force AD replication throughout the domain – run the below command on each DC:

repadmin /syncall

Poll AD changes in DFSR:

DFSRDIAG POLLAD

You’ll see Event ID 4114 in the DFSR event log indicating sysvol replication is no longer being replicated.

On the same DN from Step 1, set msDFSR-Enabled=TRUE

Force AD replication throughout the domain – run the below command on each DC:

repadmin /syncall

Poll AD changes in DFSR:

DFSRDIAG POLLAD

You’ll see Event ID 4614 and 4604 in the DFSR event log indicating sysvol replication has been initialized. That domain controller has now done a D2 of sysvol replication.

Authoritive Restore:

Set the DFS Replication service Startup Type to Manual, and stop the service on all domain controllers in the domain.

In the ADSIEDIT.MSC tool, modify the following DN and two attributes on the domain controller you want to make authoritative (preferably the PDC Emulator, which is usually the most up-to-date for sysvol replication contents):

CN=SYSVOL Subscription,CN=Domain System Volume,CN=DFSR-LocalSettings,CN=<the server name>,OU=Domain Controllers,DC=<domain>

msDFSR-Enabled=FALSE
msDFSR-options=1

Modify the following DN and single attribute on all other domain controllers in that domain:

CN=SYSVOL Subscription,CN=Domain System Volume,CN=DFSR-LocalSettings,CN=<each other server name>,OU=Domain Controllers,DC=<domain>

msDFSR-Enabled=FALSE

Force AD replication throughout the domain – run the below command on each DC:

repadmin /syncall

Start the DFSR service on the domain controller that was set as authoritative.

You’ll see Event ID 4114 in the DFSR event log indicating sysvol replication is no longer being replicated.

On the same DN on the same DC, set msDFSR-Enabled=TRUE.

Force AD replication throughout the domain – run the below command on each DC:

repadmin /syncall

Poll AD changes in DFSR:

DFSRDIAG POLLAD

You’ll see Event ID 4602 in the DFSR event log indicating sysvol replication has been initialized. That domain controller has now done a D4 of sysvol replication.

Start the DFSR service on the other non-authoritative DCs. You’ll see Event ID 4114 in the DFSR event log indicating sysvol replication is no longer being replicated on each of them.

Modify the following DN and single attribute on all other domain controllers in that domain:

CN=SYSVOL Subscription,CN=Domain System Volume,CN=DFSR-LocalSettings,CN=<each other server name>,OU=Domain Controllers,DC=<domain>

msDFSR-Enabled=TRUE

Run the following command from an elevated command prompt on all non-authoritative DCs (that is, all but the formerly authoritative one):

DFSRDIAG POLLAD

Return the DFSR service to its original Startup Type (Automatic) on all DCs.

Wait about 15-30 mins.

Now check all DCs to ensure that both the NETLOGON and SYSvol shares are available for every DC, that all content is the same in each share on each DC and monitor event logs for errors.

More information and notes here: https://learn.microsoft.com/en-us/troubleshoot/windows-server/group-policy/force-authoritative-non-authoritative-synchronization

Installing a new DC into an existing AD environment

Pre-requisites:

You must perform tasks required as outlined here to ensure the AD is healthy and functioning properly

If the current AD is using File Replication Services (FRS) instead of Distributed File Services Replication (DFSr), and you’re adding a Windows Server 2019 or newer, then you must take steps required to upgrade the FRS to DFSr here

If any DC is older that Windows Server 2008 R2 (or Windows SBS 2011), then they will need to be demoted before FRS to DFSr migration can take place. If there is only one domain controller and its an older version of Windows that doesn’t support DFSr, then there are considerations that need to take place, options might include promoting a temporary Windows 2016 server as a DC before demoting the old DC, or building an entirely new directory. If in doubt, consult a senior engineer.

The new server needs to be added as a member server to AD before commencing with promotion to a domain controller.

Note: In Windows Server 2022, if you find that it installed with a default timezone of US Canada and you can’t change it in Windows Settings (as ts greyed out), launch an elevated PowerShell session or Command Prompt, then execute timedate.cpl which will launch the older Control Panel version. From here you can change the date & time without issues.


New Server Preparations:

DNS:

On the new server, ensure you:

  • Configure static IPv4 on the NIC
  • Configure static netmask & gateway on the NIC
  • Configure statis DNS Address(es) on the NIC. Each DNS IP should be a domain controller, not the router or any other DNS IP addresses
  • As the last DNS IP address, add in the IPv4 address of this server

In the Advanced network settings > DNS, add the AD domain name in the DNS suffix field and tick both tick boxes directly below:

Ensure that in command prompt, all existing domain controllers resolve to IP using both just their hostname and their FQDN:

Finally, confirm that the AD domain name resolves to the IPv4 address of an existing domain controller:

Join to AD:

Now, join this server to Active Directory as a member system and reboot when prompted.

Install Roles & Services:

Using Server Manager, install the following Server Roles:

  • Active Directory Domain Services
  • DNS Server
  • DHCP Server (if applicable to this server)
  • File Server
  • DFS Namespace
  • DFS Replication (if appliable)

Install the following Features (optional, not required):

  • .NET Framwork 3.5 (includes .NET 2.0 and 3.0)
  • .NET Framework 4.x
  • .NET Framework
  • ASP.NET
  • SMB 1.0/CIFS File Sharing Support (if required for other devices on this network)

Note: The installation of .NET Framwork 2 & 3.5 will require access to the Windows installation files located on the Windows installation media in x:\Sources\SxS

Windows Firewall:

This is a recent learning, but has been an unspoken Microsoft recommendation for some time, but recently bit me costing a few hours of project overrun when adding a Windows 2022 server to an existing AD with Windows 2016/2019 as a pre-existing domain controller…

We need each domain controller to have a custom firewall rule added to allow all other DC’s any inbound access, so before we promote our new Windows Server 2022 to DC, lets get the firewall rules added…

On our new server, open Windows Firewall with Advanced Security

Select Inbound Rules and to the right, click New Rule…

For the Rule Type, we’re going to go with Custom

Next, in Program, leave this as Any, and in Protocols and Ports we’ll leave these also as Any

In the Scope section, we will specify the IP address of every other domain controller in the network – regardless of which AD site they reside

The IP address(es) are listed in the remote IP addresses section:

In the Action section, leave this to Allow the connection

In Profile, leave all defaults selected, and finally in the Name section, give it something meaningfule, like Domain Controllers In or something like this…

Now go back to every other domain controller and create the same rules, allowing all other DC’s inbound ANY just as above!

Note: As stated above, the addition of this firewall step is a recent learning due to security updates in Windows Server 2022 that were introduced in Sept 2023, which seems to cause issues with DFSr initial replications post promotion & DCDIAG errors in other areas, not performing the above steps will highly likely result in you needing to spend some additional time performing authoritive restores in AD SYSVOL replications, and the more domain controllers in the network, the more work is required to fix this.

Promote to DC:

Login to the new server with a domain admin account that is a member of both the Domain Admins and Enterprise Admins groups.

Launch Server Manager

Up the top right there should be a flag icon with a yellow exclamation warning over it

Click it and then select under Post-deployment Configuration, the blue text that reads Promote this server to a domain controller

Follow the wizard to Add a domain controller to an existing domain

It should auto populate with the AD domain and the domain admin account you’re logged into the server with

In the next screen, ensure that DNS option is selected, and is most cases, global catalog as well.

In rare cases, we may be required to create this DC as a read only domain controller (RODC), and if so, click this as well, but in 99.99% of cases, this doesn’t not apply so leave unticked.

In a multi-site AD, ensure the correct site name is selected for this domain controller to reside, in single site AD environments, there will only be one site to select from

Enter in the DSRM password and document this!

Now just Next, Next, Next your way through the wizard, until you reach the prerequisites checks summary

Check through this, look for errors (red coloured icon) which will prevent you from proceeding and fix these errors, but there should be nothing but warnings.

Check the warnings for any show stoppers, but in most cases, you should be fine to click the Install button

Notes:

In 99% of cases where the DNS delegation warning is present, this will be resolved shortly…

Due to some recent updates to Sever 2016-2022, I’ve been disabling IPv6 on the NIC of all DCs, and until this bug is fixed, I would recommend you do the same here (unless IPv6 is required on this network)

Once the install is completed, the server will reboot.

At this time, go to all other domain controllers on the network and add the IP address of this new DC to their network adapter DNS IP lists

Post Promotion:

Once the new domain controller has rebooted and you’ve logged in, go back into the network adapter settings > advanced and DNS, then at the bottom of the DNS server IP addresses, add in its own IP (if you skipped this earlier) and 127.0.0.1

Launch Active Directory Sites and Services

Drill down to Sites > IP and double-click on DEFAULTIPSITELINK

Change the default replication time down from 180 mins to something more frequent but still reasonable, say 30 mins:

Ensure the required sites are added to the link as well.

Now drill down into the site where the new DC was installed into, and ensure its listed there. Check this across all domain controllers

Note that if replication hasn’t occured to all DCs, then the new DC might not be listed just yet – you might have to wait until replication occurs.

Let the new DC sit for about 24 hours, then perform DCDIAG tests using elevated command prompts on every domain controller.

At the very end of the process, DCDIAG should return little to know errors, and you should be able to use Windows Explorer on the new DC to browse to \\localhost\ and see SYSVOL and NETLOGON shares available:

Hint: You can also check this using the NET SHARE command.

If the new DC doesn’t have these shares and its been online for several hours, check the DFSR Event logs for errors like the ones below:

If you’re seeing logs that state DFS is trying to initialise but nothing to suggest it completed, then you may need to perform what’s known as a D2 and/or D4 Authoritive Restore – see here! As mentioned above, this is likely due to the newly discovered requirement for a Windows firewall rule to allow any<>any traffic between all domain controllers.


Upgrade FRS to DFSR

Active Directory Domain Controllers need to replicate data & files with each other – NETLOGON share, GPO’s settings, etc… Traditionally, server used File Replication Service (FRS) to perform this task. FRS however is old, limited in its functionality, and as such, no longer supported beyond Windows Server 2016. Microsoft has replaced FRS with Distribution File System Replication (DFSR or DFSr) so in this guide, we’ll cover the steps to identify which service is in use (FRS or DFSR) and how to migrate from FRS to DFSR.

As DFSR was introduced with most of its functionality in Windows Server 2008 R2, AD environments with Windows Server 2008 (non-R2) and older do not support being migrated to DFSR and cannot exist as domain controllers where DFSR is in use between other domain controllers. In such instances, the best practice method is to deploy a middle-ground domain controller running Windows Server 2016, migrate all FSMO roles, decommission the old domain controller(s), then from there migrate from FRS to DFSR, then deploy the new actual domain controller(s) as per the project scope.

Checking for FRS vs DFSR:

On the domain controller, launch an elevated command prompt and issue the command:

dfsrmig /getmigrationstate

If the output migration state is “Eliminated” then FRS is not in use, so no need to follow this guide any further.

If the output migration state is “Start” then FRS is in use and is ready for migrations to DFSR.

Note: the possible outputs are: Start, Prepared, Redirected, and Eliminated.

Upgrade from FRS to DFSR:

There are four key steps to migrate from FRS to DFSR and they’re all performed in an elevated command prompt or elevated powershell session

First step is to change the migration state to 1:

dfsrmig /setglobalstate 1

Once this has been issued, you can then reissue the following to get the state status:

dfsrmig /getmigrationstate

once its completed, you can move on to step 2

Next step is to change the migration state to 2:

dfsrmig /setglobalstate 2

Once this has been issued, you can then reissue the following to get the state status:

dfsrmig /getmigrationstate

once its completed, you can move on to step 3

Next step is to change the migration state to 3:

dfsrmig /setglobalstate 3

Once this has been issued, you can then reissue the following to get the state status:

dfsrmig /getmigrationstate

once its completed, you can move on to step 4

Final step is to change the migration state to 4:

dfsrmig /setglobalstate 4

Once this has been issued, you can then reissue the following to get the state status:

dfsrmig /getmigrationstate

once its completed (Eliminated), migration from FRS to DFSR has been completed.

Checking in Services.msc, FRS service should have already been stopped and DFSR should now be running & set to Automatic Start.