Raspbian / Debian apt-get update buster InRelease changed its suite from stable to oldstable

Issue:

Running Debian or Raspbian Buster and issuing the command(s):

apt-get update

or

sudo apt-get update

Doesn’t appear to go through and provides the following output messages:

Get:1 http://raspbian.raspberrypi.org/raspbian buster InRelease [15.0 kB]
Get:2 http://archive.raspberrypi.org/debian buster InRelease [32.6 kB]
Reading package lists... Done
E: Repository 'http://raspbian.raspberrypi.org/raspbian buster InRelease' changed its 'Suite' value from 'stable' to 'oldstable'
N: This must be accepted explicitly before updates for this repository can be applied. See apt-secure(8) manpage for details.
E: Repository 'http://archive.raspberrypi.org/debian buster InRelease' changed its 'Suite' value from 'testing' to 'oldstable'
N: This must be accepted explicitly before updates for this repository can be applied. See apt-secure(8) manpage for details.


Cause:

Debian has not too long ago updated the release from Buster to Bullseye, which means that Buster is no longer the ‘In Release’ build of Debian or Raspbian Linux.


Solution:

You need to let APT change the ‘suite’ values from stable to oldstable by issuing the command(s):

apt-get update --allow-releaseinfo-change

or

sudo apt-get update --allow-releaseinfo-change
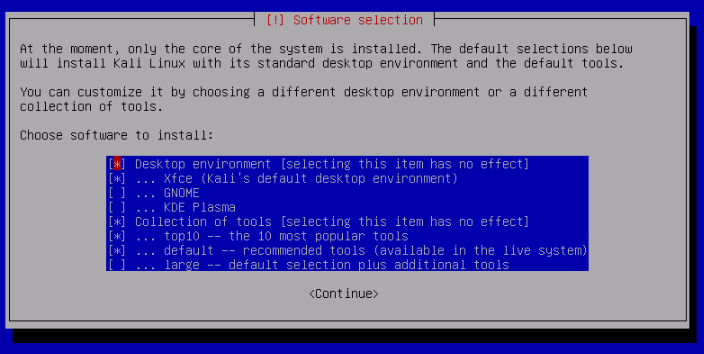


Kali Linux 2022.1 Installation error: “Installation step failed”

Date: 2022-02-21

Kali Linux versions affected: Kali 2022.1 x64 (may also affect others), both GUI and TUI installer environments

Problem:

During the installation of Kali, at the software selection installation, the installer proceeds to copy the files, and produces an error – reducing the package selection down to only the top 10, appears to allow installation without error, but then requires all further package installs to be performed OS installation.

Error Produced:

Workaround:

Access a spare console using either CTRL+F2 or CTRL+F3

Please press Enter to activate this console

BusyBox v1.30.1 (Debian 1:1.30.1-4) built-in shell (ash)
Enter 'help' for a list of built-in-commands.

~ # cd /var/log
/var/log # tail -f syslog

Find the target installation using the command:

df -h

Locate your dev device and comfirm the target folder – for me it was /target

Chroot your way into that folder:

chroot /target

Edit the sources file:

nano /etc/apt/sources.list

Comment out the line for the sources pointing to the cdrom

#deb cdrom:[Kali GNU/Linux 2020.3rc2 _Kali-last-snapshot_ - Official amd64 NETINST with firmware 20200728-20:31]/ kali-rolling contrib main non-free

Now add a new sources line to pull down the repositories from the internet:

deb http://http.kali.org/kali kali-rolling main non-free contrib
deb-src http://http.kali.org/kali kali-rolling main non-free contrib

Save and close the file, then update:

apt-get update

Once updated successfully, head back to the installer by pressing CTRL+F5 or CTRL+F7

Perform the software selection and install the OS. Note that the installation will now pull all sources from the internet instead of the CD / USB resources.

blk_update_request: I/O error, dev fd0, sector 0

Getting this message in the console of a Linux VM?

blk_update_request: I/O error, dev fd0, sector 0

This is because the Linux VM is trying to access the floppy drive, and can’t.

Issue these commands to block the system from trying to access the floppy disk:

sudo rmmod floppy
echo "blacklist floppy" | sudo tee /etc/modprobe.d/blacklist-floppy.conf
sudo dpkg-reconfigure initramfs-tools

From here you should be fine, a reboot may or may not be required.

An alternative if you have Hyper-V, is to shut the VM down, remove the floppy from the VM config and boot it up.

How to open a port in the firewall on CentOS or RHEL

Out of the box, enterprise Linux distributions such as CentOS or RHEL come with a powerful firewall built-in, and their default firewall rules are pretty restrictive. Thus if you install any custom services (e.g., web server, NFS, Samba), chances are their traffic will be blocked by the firewall rules. You need to open up necessary ports on the firewall to allow their traffic.
On CentOS/RHEL 6 or earlier, the iptables service allows users to interact with netfilter kernel modules to configure firewall rules in the user space. Starting with CentOS/RHEL 7, however, a new userland interface called firewalld has been introduced to replace iptables service.
To check the current firewall rules, use this command:
$ sudo iptables -L
Now let’s see how we can update the firewall to open a port on CentOS/RHEL.

Open a Port on CentOS/RHEL 7

Starting with CentOS and RHEL 7, firewall rule settings are managed by firewalld service daemon. A command-line client called firewall-cmd can talk to this daemon to update firewall rules permanently.
To open up a new port (e.g., TCP/80) permanently, use these commands.
$ sudo firewall-cmd --zone=public --add-port=80/tcp --permanent
$ sudo firewall-cmd --reload
Without “–permanent” flag, the firewall rule would not persist across reboots.
Check the updated rules with:
$ firewall-cmd --list-all

Open a Port on CentOS/RHEL 6

On CentOS/RHEL 6 or earlier, the iptables service is responsible for maintaining firewall rules.
Use iptables command to open up a new TCP/UDP port in the firewall. To save the updated rule permanently, you need the second command.
$ sudo iptables -I INPUT -p tcp -m tcp --dport 80 -j ACCEPT
$ sudo service iptables save
Another way to open up a port on CentOS/RHEL 6 is to use a terminal-user interface (TUI) firewall client, named system-config-firewall-tui.
$ sudo system-config-firewall-tui
Choose “Customize” button in the middle and press ENTER.
If you are trying to update the firewall for any well-known service (e.g., web server), you can easily enable the firewall for the service here, and close the tool. If you are trying to open up any arbitrary TCP/UDP port, choose “Forward” button and go to a next window.
Add a new rule by choosing “Add” button.
Specify a port (e.g., 80) or port range (e.g., 3000-3030), and protocol (e.g., tcp or udp).
Finally, save the updated configuration, and close the tool. At this point, the firewall will be saved permanently.