How to Repair Verify Disk Permissions in OS X El Capitan

Open the Terminal application (found in /Applications/Utilities/) and use the following syntax to verify a volumes permissions, this will verify the default root volume of a Mac:

sudo /usr/libexec/repair_packages --verify --standard-pkgs /

If you want to verify permissions on a different drive, specify the volume rather than “/”

The command will run and either show permissions that differ, or nothing, depending on what’s found. Not surprisingly, you’ll likely find some variation of permissions that differs, looking something like:

Permissions differ on "usr/libexec/cups/cgi-bin", should be drwxr-xr-x , they are dr-xr-xr-x .
Permissions differ on "usr/libexec/cups/daemon", should be drwxr-xr-x , they are dr-xr-xr-x .
Permissions differ on "usr/libexec/cups/driver", should be drwxr-xr-x , they are dr-xr-xr-x .
Permissions differ on "usr/libexec/cups/monitor", should be drwxr-xr-x , they are dr-xr-xr-x .

How to Repair Disk Permissions in OS X El Capitan from Command Line

Assuming permissions have been found which differ and you’d like to repair them, replace the –verify flag with –repair, and again point the command at the same volume

sudo /usr/libexec/repair_packages --repair --standard-pkgs --volume /

Repairing permissions may take a while, just like it did from Disk Utility.

Verify and repair disk permissions in OS X from command line

If you execute the repair_packages command without sudo and with no specifications or flags, you’ll get a simple help guide instead:

$ /usr/libexec/repair_packages
Usage: repair_packages [ARGUMENTS]...
Commands:
--help Print this usage guide.
--list-standard-pkgs Display the package ids in the standard set.
--verify Verify permissions on files in the specified package(s).
--repair Repair permissions on files in the specified package(s).
Options:
--pkg PKGID Verify or repair the package PKGID.
--standard-pkgs Verify or repair the standard set of packages.
--volume PATH Perform all operations on the specified volume.
--output-format # Print progress info using a special output format.
--debug Print debuging information while running.

As suggested, this is not really something that should be run on a regular basis as any part of Mac maintenance routine, and it’s rarely necessary, which is likely why Apple pulled it from the Disk Utility application.

By the way, earlier releases of OS X also have a command line approach to repairing disk permissions, but it’s handled through the Disk Utility command line tool instead.
Source: OSXDaily

Useful Xsan administrative commands for Mac OS X MDC’s

  • cvadmin – Administer an Xsan File System (show volumes, stop volumes, start volumes, view storage pools, manage quotas
  • cvaffinity – List or set affinities for storage pools
  • cvcp – Xsan copy utility (use at your own risk)
  • cvdb – Xsan debugger
  • cvdbset – Used to control the Xsan debugger
  • [slider title=”cvfail”]cvfail[/slider]- Fail volumes over between metadata controllers
  • cvfsck – Check consistency and repair Xsan volumes
  • cvfsdb – FileSystem debugging tool
  • cvfsid – Display system identification information (useful when integrating StorNext clients)
  • cvgather – Compile debugging information for Xsan
  • cvlabel – Label LUNs for use with Xsan
  • cvmkdir – Directory creation tool for Xsan
  • cvmkfile – File creation tool for Xsan
  • cvmkfs – File system (volume) creation tool for Xsan
  • cvuntrespass – Recover files that trespass into restricted areas (like when you got caught jumpin’ the fence of that sorority house back in the day)
  • cvupdatefs – Make a change to an existing volume
  • cvversions – Obtain patch level and versioning information for the system, Xsan and when the patches were compiled.
  • fsm – Volume controller process
  • fsmpm – Volume manager that runs on each node
  • mount_acfs – Xsan mounter
  • sndiskmove – Migrate the contents of one LUN to another LUN
  • sndpscfg – Disk proxy server config tool
  • snfsdefrag – Defragment the volume
  • snmetadump – Save and/or process metadata
  • snmetatar – Backup metadata to tar
  • xsanctl – Xsan control tool allows you to quickly and easily ping (check a client), mount/unmount volumes and check that volumes and disks haven’t changed, all client-side
  • xsand – Xsan client daemon, reads the /Library/Filesystems/Xsan/config/automount.plist and mounts volumes as indicated in the property list

Notes and usage for the CVADMIN utility:

Of all the command line tools available to assist you in the management of an Xsan volume, cvadmin serves as the primary command line tool to interface with, troubleshoot, and ultimately administer your Xsan. It provides for capabilities beyond what is available through Apple-provided GUI tools, which can be extremely useful for resolving the more complex problems that can crop up. Given the reported issues with Xsan Admin occasionally misreporting information, cvadmin is one of the tools that can help to make your experience administering an Xsan much less frustrating.

Read more below…

The basics:
Located at /Library/Filesystems/Xsan/bin/cvadmin, this tool can be run either interactively or non-interactively with the ‘-e’ flag. For the purposes of this article, we’ll be using primarily the interactive function of cvadmin. In it’s most basic form, cvadmin is started with no arguments, but must run as root. If you fire up cvadmin from a different user account, the tool will run, but you will not be able to access your filesystems. To get started we’ll launch the program with elevated privileges:

fig. 1
$ sudo /Library/Filesystems/Xsan/bin/cvadmin
Xsan Administrator
Enter command(s)
For command help, enter "help" or "?".

List FSS

File System Services (* indicates service is in control of FS):
1>*MyVolume[0] located on 192.168.56.5:51520 (pid 512)
2> MyVolume[1] located on 192.168.56.6:51520 (pid 509)

Select FSM "MyVolume"

Created : Tue Jan 13 15:33:57 2009
Active Connections: 1
Fs Block Size : 16K
Msg Buffer Size : 4K
Disk Devices : 2
Stripe Groups : 2
Fs Blocks : 61277616 (935.02 GB)
Fs Blocks Free : 61006893 (930.89 GB) (99%)


Xsanadmin (MyVolume) >

When cvadmin is first invoked it displays all of the valid File System Services (which in this context means volumes per metadata controller) and selects our only volume. In this particular instance, you see that there are two entries for “MyVolume”. This is completely normal as you should see one entry per volume per metadata controller. In this case, we have one volume and 2 metadata controllers, so we have 2 entries. The asterisk denotes the active FSS (or active metadata controller), in this case 192.168.56.5.

In order to perform any worth while tasks using these tools, we next need to ‘select’ a volume. In this particular instance, there is only one volume and so cvadmin ‘selected’ the active volume and displayed the statistics for that volume. But in environments where there are multiple volumes you will need to ‘select’ a volume before you proceed with using cvadmin. The cvadmin prompt will always display the active volume (in this case ‘MyVolume’), so there is no confusion as to which is being administered:

Xsanadmin (MyVolume) >

If more than one volume existed, we may desire to operate on a different volume, to do so we can simply run the command “>select volumeName” which would then select the volume “volumeName” and output statistics for it. Alternatively, the select command can be run with no arguments to output a list of all availableFile System Services.

fig 2.
Xsanadmin (MyVolume) > select
List FSS

File System Services (* indicates service is in control of FS):
1>*MyVolume[0] located on 192.168.56.5:51520 (pid 512)
2> MyVolume[1] located on 192.168.56.6:51520 (pid 509)

Practical Administration:
Ok, so we now know how to run the tool and select a particular volume, but what else can we do with it? Well, the answer is “quite a bit”; for the most part, my day-to-day Xsan administration happens only in cvadmin, the only reason that I typically fire up Xsan Admin is to help end users who rely on it. A full list of commands is available in the cvadmin man pages, or by typing “help” in an interactive cvadmin session. That being said, the commands listed below are my most frequently used:

>who

Query client list for the active file system. The output will show the following information for each client.SNFS I.D. – Client identifier Type – Type of connection. The client types are: FSM – File System Manager(FSM) process ADM – Administrative(cvadmin) connection CLI – File system client connection. May be followed by a CLI type character: S – Disk Proxy Server C – Disk Proxy Client H – Disk Proxy Hybrid Client. This is a client that has been configured as a proxy client but is operating as a SAN client. Location – The clients hostname or IP address Up Time – The time since the client connection was initiated License Expires – The date that the current client license will expire

>stats

Prints out volume statistics.

>stop/start MyVolume
>stop/start MyVolume on 192.168.5.5

The stop and start commands are equivalent to starting or stopping the volume in Xsan. However, by specifying a hostname/ip, we can stop file system services only on that particular MDC, which can be handy for maintenance purposes.

>fail MyVolume

This will failover the volume “MyVolume” and initiate a FSS vote amongst your metadata controllers. The metadata controller providing services for this volume with the highest failover priority should win this election. If no failover is available, the volume will failback to the original host that was hosting the volume.

>fsmlist

This will output a list of FSM processes on the machine that is selected, which is useful when determining which volumes it is capable of hosting as a metadata controller.

>repof

This will generate an open file report to /Library/Filesystems/Xsan/data/MyVolume/open_file_report.txt. This report includes a slew of information, but noticeably absent is the actual file name. Arg! It does offer an inode number for the file in question though, so you can use a command such as `find /Volumes/MyVolume -inum X` to determine the actual file from the published inode number. The >repof command can be very useful when attempting to determine why a client will not unmount a volume.

Troubleshooting:
There are also a number of options to help with more complex troubleshooting.

>show
>show long

This will output information about the stripe groups/storage pools used by this volume. It is useful for cross referencing index numbers outputted in system.log to human readable storage pool names. It also provides various statistics and configuration, such as stripe group role, corresponding LUNs, affinity tags, multipath method, and other useful bits of information.

>paths

This will output a list of LUNs visible to the node and the corresponding HBA port used to communicate with that LUN. This option can be helpful when you are getting those pesky “stripe group not found” errors.

>debug 0x01000000

This will output IO latency numbers to /Library/Filesystems/Xsan/data/MyVolume/log/cvlog immediately (which is otherwise done every hour). The key figure to look at in this output is the “sysavg” number for “PIO HiPriWr SUMMARY”. If your metadata is hosted on an Xserve RAID volume, this number should be below 500ms. If you’re using Promise based storage, the active/active controller setup introduces additional latency, you will see numbers in the 805-1000ms range.

>latency-test

Use this command to run latency tests between the FSM and clients. It can be used to isolate problematic clients on the SAN.

>activate MyVolume 192.168.56.5

Use this command to activate FSS services for the specified IP/hostname. Alternatively you can leave off the IP and it will activate the local server (if applicable). This command can be run on an MDC if it is not showing appropriate FSS services available. If you see errors to the effect that an MDC is on ‘standby’, activating the volume on the respective server will often address this issue.

When to Use Another Tool:
The cvadmin tool is very useful when troubleshooting metadata controller behavior. But cvadmin isn’t used when you want to perform Xsan setup or client management operations. To label LUNs you would use cvlabel. To mount and unmount volumes you would likely use the new xsanctl tool or ‘mount -t acfs’. To perform defrag operations and volume maintenance you would use the snfsdefrag and cvfsck tools, respectively. While you can add serial numbers and create volumes from the command line, it is probably much easier to continue performing these operations through the Xsan Admin GUI tool.

All in all, cvadmin can be a very useful tool. It is fast and can help to ease the administrative burden of managing an Xsan once you get used to it. Unlike the GUI, the information that it displays can always be trusted to be an accurate representation of the state of your SAN. It can also provide more insight when you’re troubleshooting and help you to become a more lucid Xsan administrator.
Archive and restore Open Directory data

You archive and restore Open Directory data using the Server app or the command line. To archive or restore a copy of your Open Directory data using the command line, use the slapconfig command. You can archive a copy of the data while the Open Directory master is in service.

The following files are archived:

  • The LDAP directory database (includes password data) and configuration files
  • Kerberos configuration files
  • Keychain data needed by Open Directory

Archives are only used by Open Directory masters. If a replica develops a problem, you can remove it as a replica from the Open Directory master, set up the replica as if it were a new server (with a new host name), then set it up again as a replica of the same master.Important: Carefully safeguard the archive media that contains a copy of the Open Directory password database, the Kerberos database, and the Kerberos keytab file. The archive contains sensitive information. Your security precautions for the archive media should be as stringent as for the Open Directory master server.

If you enable Time Machine on the server, directory and authentication data is automatically archived.

Archive Open Directory data using the Server app

  1. In the Open Directory pane, click Servers.
  2. Choose Archive Open Directory Master from the Action pop-up menu (looks like a gear).
  3. In the Archive File field, enter or choose the path to the folder where you want the Open Directory data archived.
  4. Enter a password for the archive, then click Next.
  5. Confirm your settings, then click Archive.

Archive Open Directory data using the command line

You can archive Open Directory data from the command line.

To archive Open Directory data, open the Terminal app (located in the Other folder in Launchpad), then enter the following command:

$ sudo slapconfig -backupdb /full/path/to/archive For example, /full/path/to/archive could be /Volumes/Data/myODArchive.

Enter a password to encrypt the disk image. Encrypting the image protects the sensitive data in the Open Directory database.

The archive file will have the file extension “.sparseimage”.

Restore Open Directory data using the Server app

  1. In the Open Directory pane, turn Open Directory on.
  2. Select “Restore Open Directory domain from an archive,” then click Next.
  3. In the Archive File field, enter or choose the path to the Open Directory archive file.
  4. Enter the password for the archive, then click Next.
  5. Click Restore.

Restore Open Directory data using the command line

You can restore Open Directory data from the command line.

To restore Open Directory data, open the Terminal app (located in the Other folder in Launchpad), then enter the following command:

sudo slapconfig -restoredb /full/path/to/archive.sparseimage

For example, /full/path/to/archive.sparseimage could be /Volumes/Data/myODArchive.sparseimage.If you entered a password to encrypt the data when you archived it, enter that password when prompted.

Enable External Boot Media on T2 Security Chip-Enabled Macs

This guide covers the process to enabling a T2 security enabled Mac to boot from external media such as USB drives for purposes of reinstall or data recovery & diagnostics.

Applies to:

T2 security enabled Macs include macs below and newer versions thereof:

  • iMac (Retina 5K, 27-inch, 2020)
  • iMac Pro
  • Mac Pro (2019)
  • Mac Pro (Rack, 2019)
  • Mac mini (2018)
  • MacBook Air (Retina, 13-inch, 2020)
  • MacBook Air (Retina, 13-inch, 2019)
  • MacBook Air (Retina, 13-inch, 2018)
  • MacBook Pro (13-inch, 2020, Two Thunderbolt 3 ports)
  • MacBook Pro (13-inch, 2020, Four Thunderbolt 3 ports)
  • MacBook Pro (16-inch, 2019)
  • MacBook Pro (13-inch, 2019, Two Thunderbolt 3 ports)
  • MacBook Pro (15-inch, 2019)
  • MacBook Pro (13-inch, 2019, Four Thunderbolt 3 ports)
  • MacBook Pro (15-inch, 2018)
  • MacBook Pro (13-inch, 2018, Four Thunderbolt 3 ports)

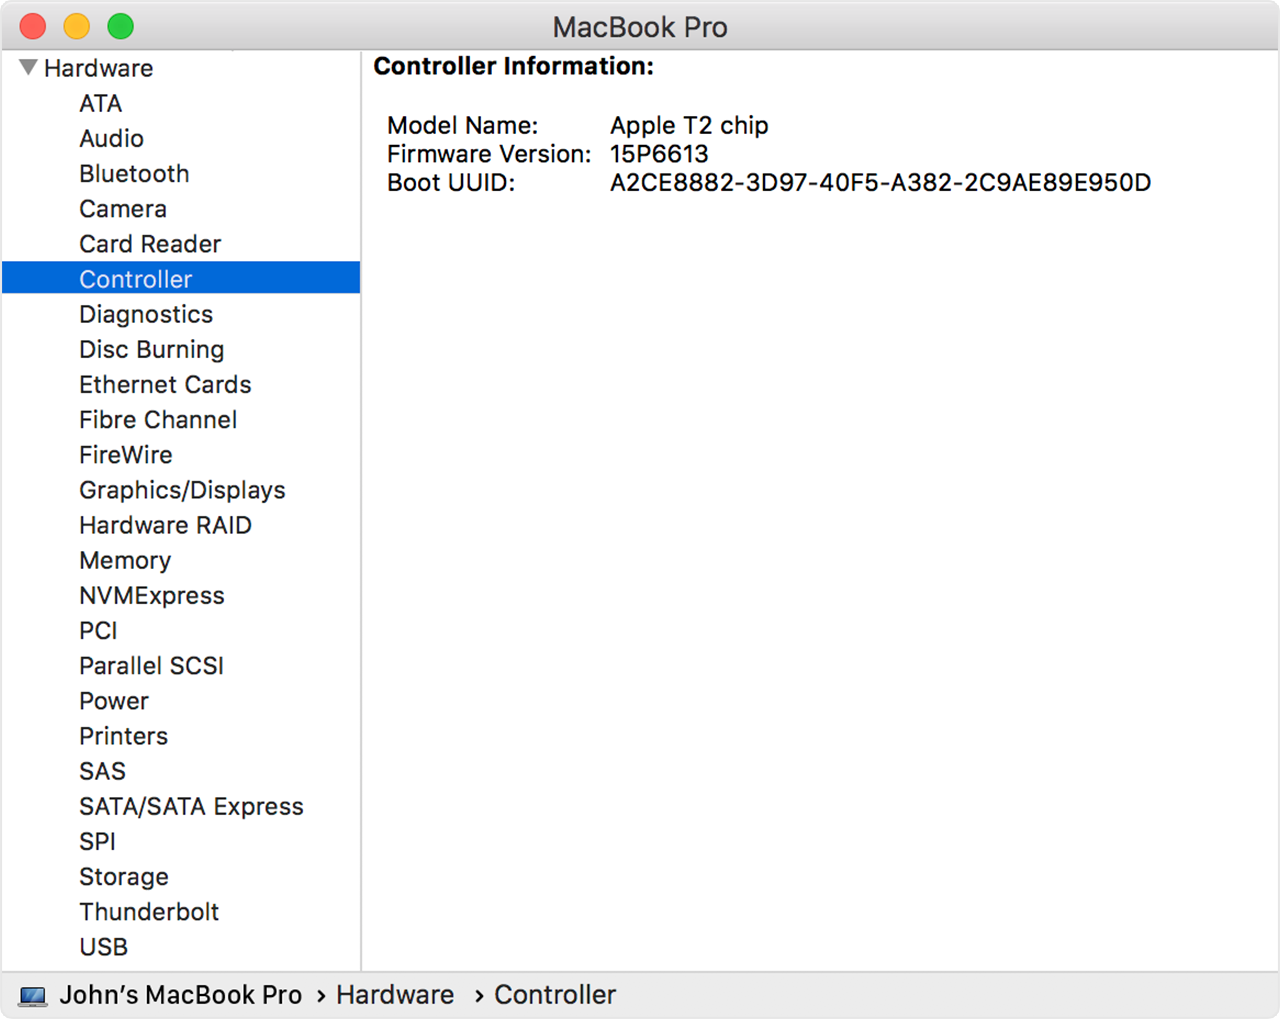
How to confirm if the Mac you’re working on is T2-enabled:

Click the Apple logo top-left > About This Mac > System Information / System Report…

What does T2 actually do?

In short, it provides additional security at a hardware level for the Mac. It provides additional security encryption levels for the OS Disk reducing CPU resources required for the same tasks, helps to prevent malicious code from being injected into the OS core, enhances secure boot, and provides certification of the OS at boot time.

Preparation:

Time required to perform steps outlined: 10-30 mins depending on the Mac and internet speed.

If the Mac already has a firmware password enabled, you will need to know what this is in order to boot into recovery mode & access system utilities.

You will also need to know the password to at least one admin level user account on the system

Steps to complete:

Shutdown the Mac

Power on the Mac holding down the left Alt/Option key

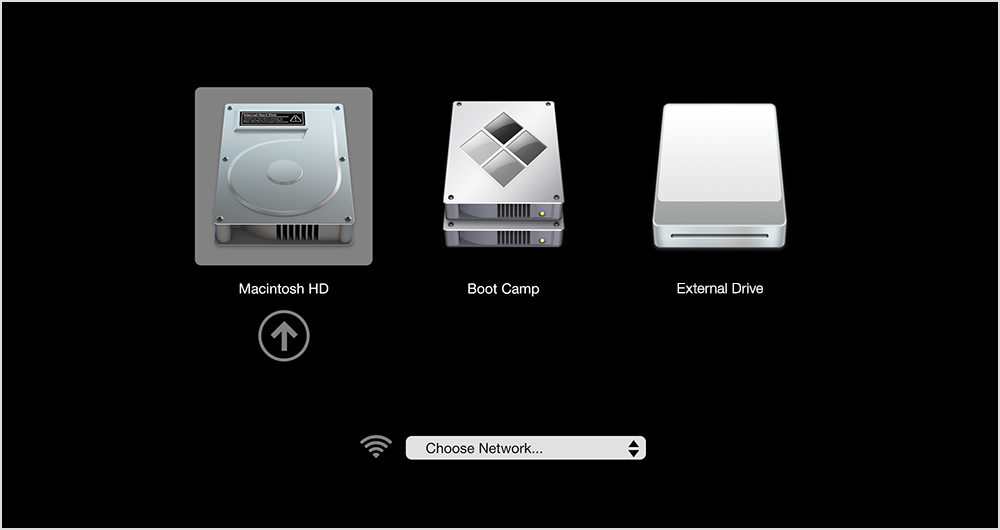
If successful and no firmware password present, you should see a screen similar to the boot screen below:

Image result for apple boot menu

If prompted for a password first, then this will be the firmware password.

At the boot selector screen, hold down the Command key and press R

This will start to boot into recovery mode. If the recovery mode OS is on the local disk, it will verify & boot from here, if not, it will download a copy from the Internet.

Once you reach the recovery environment, select the language, and then you should reach the recovery mode screen

Image result for apple booting recovery mode

From the Utilities menu at the top of the screen, select Startup Security (or similar, depending on OS / recovery mode version).

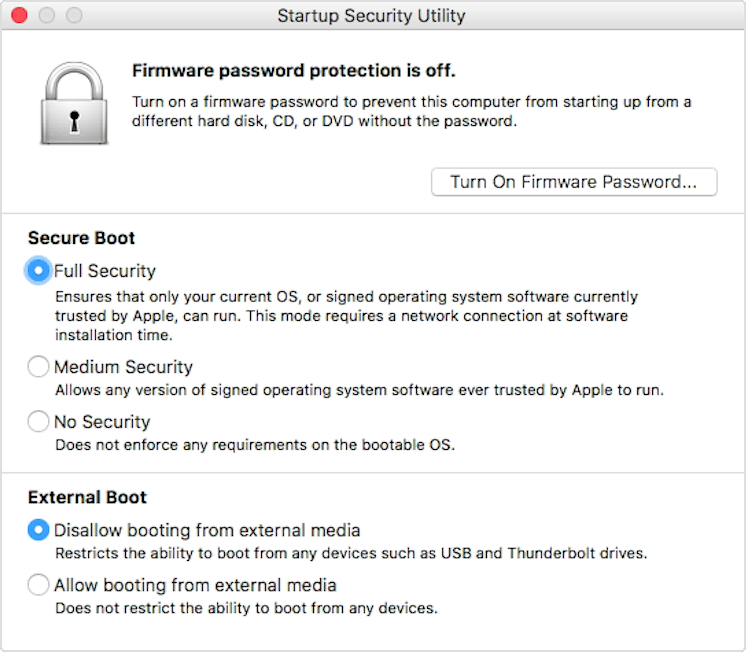
You should reach the below screen:

Startup Security Utility on Mac with Apple T2 Security Chip

Under External Boot, select the radio option for Allow booting from external media

Use Command+Q to quit back to the main screen

Use Command+Q to quit recovery mode, select reboot

Now when you boot up the Mac holding down the Alt/Option key to access the boot menu, inserting external bootable media will show up in the boot menu and allow the Mac to be booted from it.

Additional info:

If these steps still prevent booting from external media, you may need to go back into Startup Security and change the Secure Boot from: Full Security to: Medium Security – especially if the OS wasn’t recently signed by Apple on this Mac.

Configure Firmware Password to better protect Mac

The Firmware password for a Mac is primarily used to protect a Mac from being booted into recovery mode or from external boot media should the Mac fall into the wrong hands.

Think of it like a PC BIOS password that prevents anyone from accessing the BIOS settings or boot menu.

Typically, short of flashing the firmware using a hardware firmware flash tool, it provides excellent protection for portables against theft & resale should they be stolen.

Prerequisites:

If the Mac already has a firmware password enabled, and you need to remove or change it, you will need to know the current firmware password.

Forgotten firmware passwords require a support ticket with Apple along with proof of purchase.

Steps:

Shutdown the Mac

Power on the Mac – holding down the left Alt/Option key until the boot menu is displayed

Image result for apple boot menu

Once here, hold down the Command key and press R

The Mac will now boot into recovery mode

Once booted into recovery mode, select the language and you will then be at the recovery mode home screen

Image result for apple booting recovery mode

In the Utilities menu at the top, select Startup Security (for T2-enable Macs) or Firmware Password Utility (for older Macs)

If no password is currently set, you should have the option to Set Firmware Password…

Startup Security Utility on Mac with Apple T2 Security Chip

Once you have set the password, use Command+Q to exit back to the recovery mode home screen, use Command+Q to quit – selecting Reboot or Restart Mac.

Now whenever you boot the Mac holding down the Alt/Option key or any other startup interactive modes, you will be prompted for the firmware password you have set.

To remove the password, you will need to boot back into recovery mode and turn off the firmware password.

Notes:

As previously stated, it is highly recommended this is configured for all portable Macs where possible. Ideally, the client / user should know & document their firmware password – along with being it documented in both the Autotask configuration item and the ticket as an internal note.

Ticket should have “Firmware Password” in the description area or title for ease of search if its not being done in the initial setup ticket.

Failure to document & recall the password when required will require a password removal via Apple support, which will require the Mac, proof of purchase and the Mac will be out for service for a period of time while Apple technicians re-flash the firmware.

Join Mac to Active Directory – the Right way!

This guide will assist you to joining a Mac to AD. There are plenty of guides online, but many of them leave out certain key aspects that lead to issues when not performed properly.

First step, check AD for the next available computer name and create the computer AD entity in the correct OU.

Document the AD computer description field with useful information such as ticket number, model, user, serial number, etc

Identify & note down any users / groups that should have local administrative rights on the Mac

Setting the local workstation host name:

Apple Menu > System Preferences > Sharing > Computer Name

Now let’s get get domain joined:

System Preferences > Users & Groups > Login Options

Click the  to gain admin access using the local administrator account

Change Display login window as: Name and password

Change Show fast user switching menu as: Full Name

Click the Join… button

Click Open Directory Utility…

Click the  and authenticate to unlock

Highlight Active Directory

Click the pencil  button to edit

Populate the Active Directory Domain field with the AD name

Click the  icon to expand the options

Place a tick next to Create mobile account at login – this tells the Mac to create a local user profile for the AD account so a) the user has somewhere to store data, and b) the user can login when away from the AD network.

Click the Administrative Button

Place a tick next to: Allow administration by:

By default, it will have domain admins and enterprise admins pre-populated.

Use the + button to add in the additional resource users & groups noted earlier that will require local admin rights

Click Bind…

This will first prompt for the local admin password

Then it will prompt for the domain administrator username & password.

If all details are correct and DNS is working, the Mac will be joined to the directory.

If you followed the earlier instructions to pre-create the computer in AD, it will advise you that the computer account exists, and ask you if you want to use the existing computer account – say Yes.

Domain Join over a VPN:

If you need to join over a VPN connection, but the VPN connection is disconnected when switching user accounts, you can cache an AD account from the local admin account when still connected to the VPN post domain join using the below terminal commands:

sudo /System/Library/CoreServices/ManagedClient.app/Contents/Resources/createmobileaccount -n [AD_username]

Once this passes, you will need to cache the login credentials

login

When prompted, login using the user’s username and password.

Note: the password entering will not provide any feedback on-screen.

Ideally, if the Mac is being domain joined over the VPN, you would also cache the domain admin account using this method also.

A Mac already directory bound that isn’t configured to create mobile account at login:

Using terminal, issue the below commands:

sudo dsconfigad -mobile enable

sudo dsconfigad -mobileconfirm disable

The first command forces the system to create mobile (cached) accounts when the user logs in, the second command suppresses the confirmation prompt when creating the account.

A little Terminal bonus:

You can do a quick & dirty AD join from the terminal using the below command:

dsconfigad -prefered yourserver.YOURDOMAIN.SOMETHING -a nameOfYourDevice -domain YOURDOMAIN.SOMETHING -u DomainAdministratorAccount -p 'DomainAdministratorPassword'

Of course doing this, will not set the Mac to create a mobile account at login, won’t configure local admin users…