In this artical I will cover the steps I used to build a fresh Xsan deployment on freshly installed servers and clients using macOS Sequoia – which no longer has a native GUI Server app like former macOS versions.
All configuration is now performed via the CLI in Terminal.
Prerequisites:
- At least one Mac to act as the “server” – the roles on this will include OpenDirectory Master and Xsan MDC.
- At least one Mac to act as the “client” – this is the workstation, assuming users will use the Xsan volume – this could also be another Mac as a server that users don’t use as a desktop
- Each Mac is to have at least one fibre channel HBA such as a Promise SANLink FC or ATTO ThunderLink (these are the Thunderbolt variants – ATTO also make PCIe HBAs for Mac too)
- A fibre channel storage subsystem such as a Promise VTRak or VessR3600 series
- A fibre channel switch (if your subsystem will utilise more than one controller and/or will have more than 4 devices connected to it)
- Compatible SFP+ adapters
- Fibre leads – typically OM3 or OM4
- Network switch to connect each Mac (not WiFi)
- Administrator access to each Mac
Setting Up Storage:
Ideally, we need at least two storage LUNs presented by the storage subsystem – the first one will usually just be made up of two disks mirrored – this is to be used for meta data & journal, then at least another LUN made up of a number of disks that will be used to store data.
In my lab, I have a Promise VTrak E630d that has two controllers and 16x 2TB SAS disks. Connected to this is a Promise J630d with dual exansion controllers and 16x 3TB SAS disks.
The storage is configured as such:
- LUN 0 = 2x 2TB disks in RAID 1 mirror (total logical size: 2TB)
- LUN 1 = 14x 2TB disks in RAID 10 array (total logical size: 14TB)
- LUN 2 = 16x 3TB disks in RAID 10 array (total logical size: 24TB)
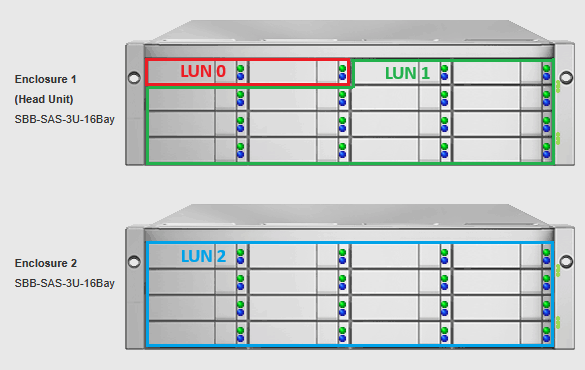
In my testing I found it simpler to make LUN0 the smaller LUN that will be used for both metadata and the journal – I will go into more detail about this further down…
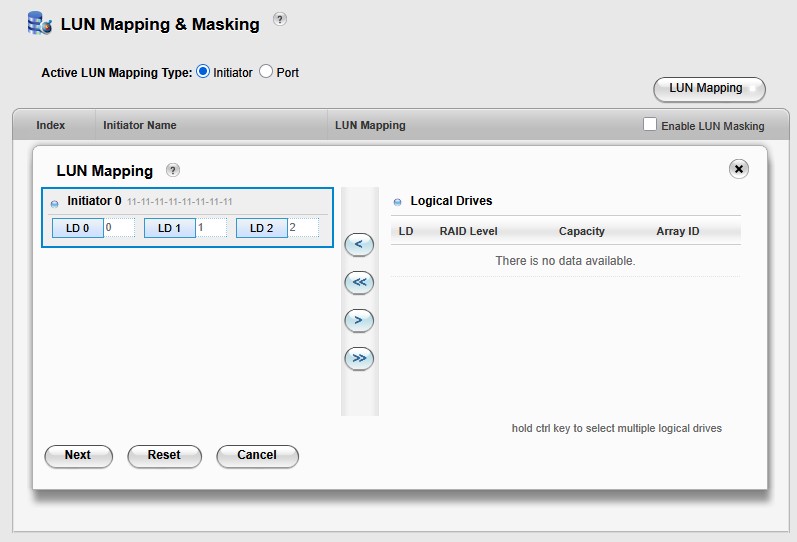
LUN masking set to allow access from any WWN to all three LUNS:
Setting Up Physical Connections:
Next step is to make all the physical connections which include:
- SAS between the VTrak primary subsystem and a storage expansion unit – this will allow me to add 16 more disks to the 16 disk internal to the subsystem
- Fibre Channel links between the VTrak subsystem and the FC switches
- Fibre Channel links between the SANLink Thunderbolt FC HBAs and the FC switches
- Thunderbolt connections between each SANLink and a Mac
- Ethernet connections between all devices
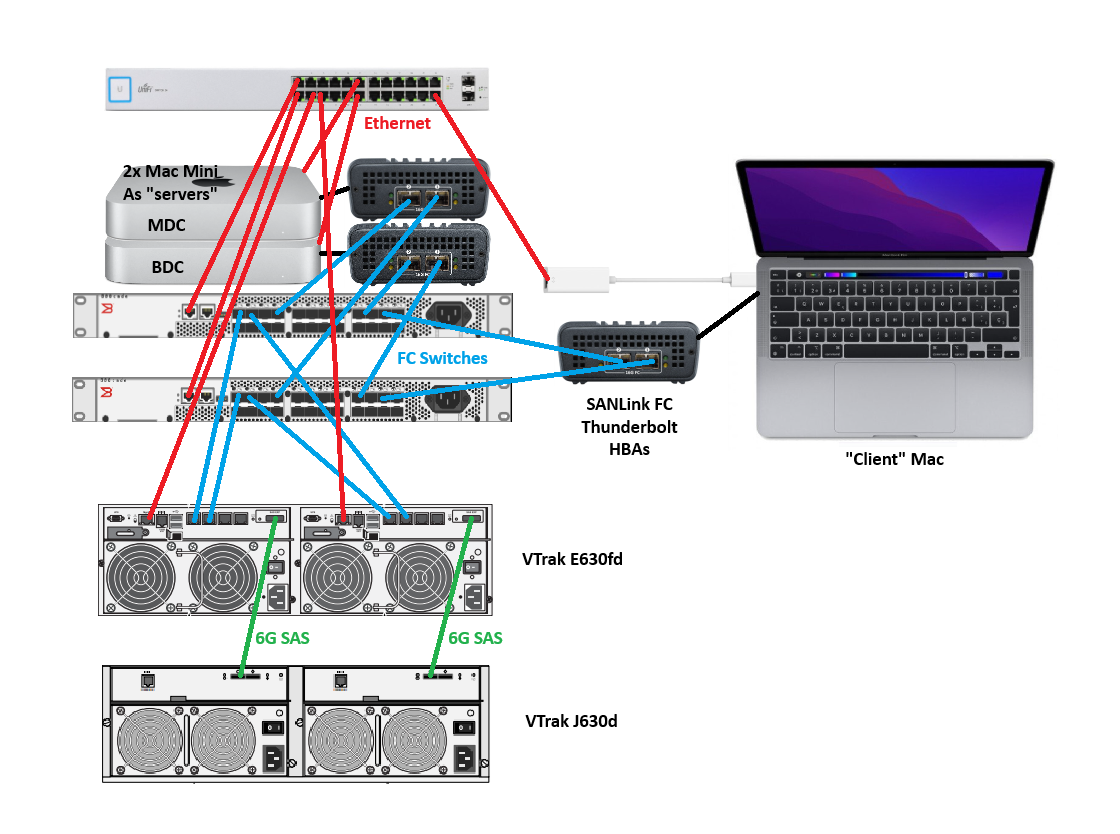
In my lab, the topology is set out very similarly to the below diagram:
Technical Details of the Macs:
Just some notes on the Macs I have in use. As I am doing this in a lab environment, I was being concious of my own costs and wasn’t about to spend good money on a couple of newer Macs. Instead, I upcycled a pair of 2011 Mac Minis to act as the Xsan servers. I upgraded the internal components so they both have 16GB of RAM and a Samsung 870 EVO 500GB SSD – this is about as good as it will get from a hardware perspective for these. They are otherwise identical with an Intel i5 CPU.
Out of the box, these 2011 Mac Minis do not support macOS Sequoia, so I leveraged Open Core Legacy Patcher to get Sequoia running!
The client Mac is a 2020 MacBook Pro 13″ with two Thunderbolt ports, 8GB RAM and 250GB SSD – nothing is user upgradable on this model, but it does natively support macOS Sequoia.
The MacBook Pro also has a USB-C Ethernet adapter to make a physical connection to the switch as WiFi is not recommended at all for Xsan traffic. I’ll set this to DHCP and have it connected to the SANLink3 FC16 so that its just one connection for all things Xsan related.
The two Mac Minis were freshly installed – no upgrade, new SSDs.
General Setup:
I configured static IP addresses on the two Mac Minis and configured their hostnames.
- Hostname of the primary server: XSAN-MDC
- Hostname of the secondary server: XSAN-BDC
- IP Address of the primary server: 10.172.54.31/24
- IP Address of the secondary server: 10.172.54.32/24
The admin user account on both Mac Minis share the same username and password of localadmin | Password123
I installed the latest version of the SANLink2 FC drivers and SANLink Utility on the two Mac Minis. The driver required access to be granted in System Settings security area upon installation completion (prompted for this), followed by a reboot. The SANLink Utility is used to configure things like port speed & operation and allow updating of the firmware. All I needed to do here is ensure the SANLinks didn’t arrive to me (from an eBay seller) with ports hard set to 4gb or something silly).
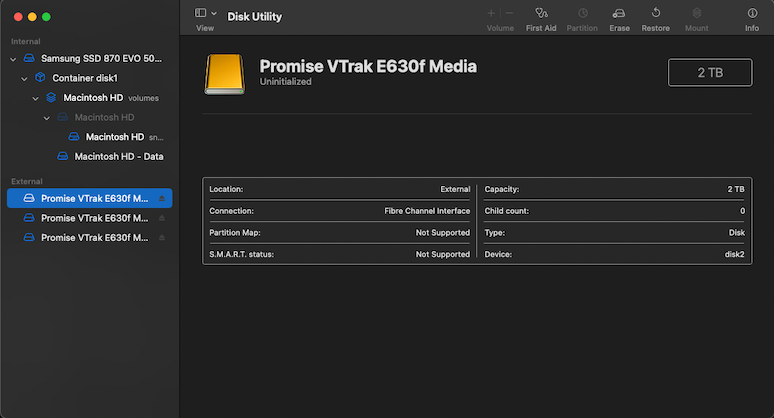
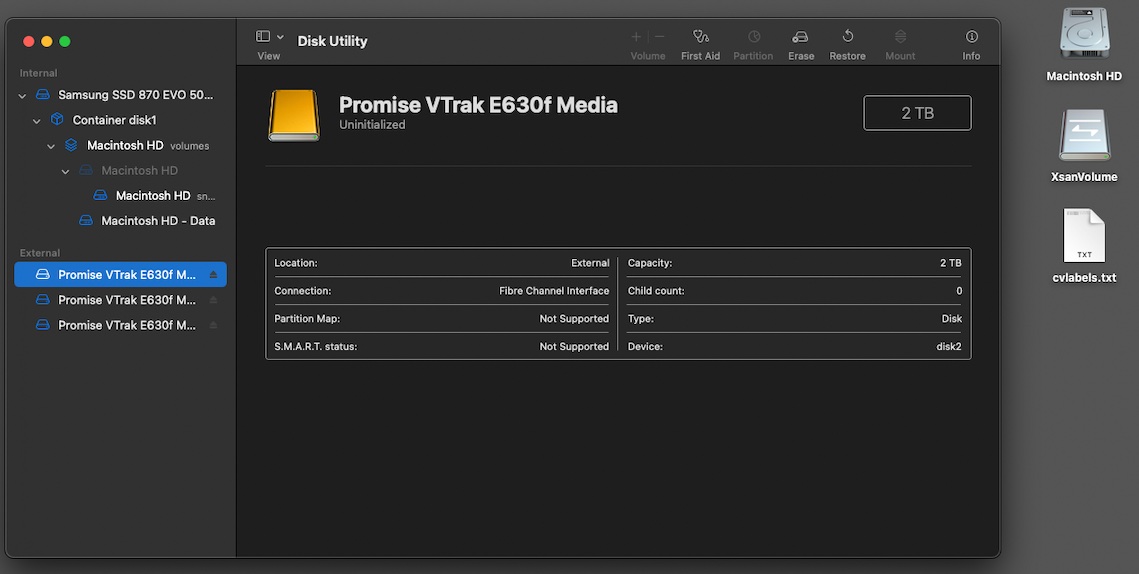
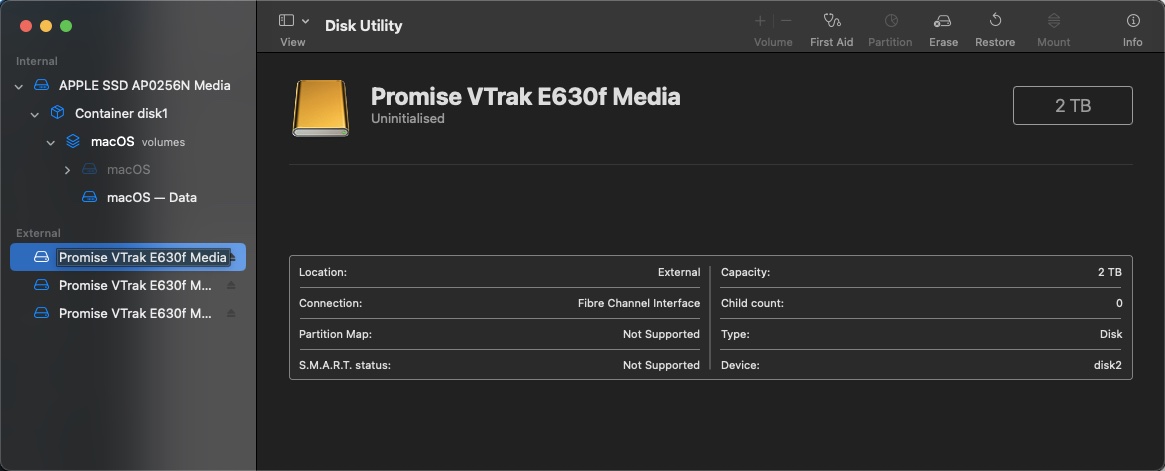
Once the two Macs had the driver installed & rebooted, the link LEDs on the SANLinks lit up as they were already connected to the FC switch & storage. The LUNs showed up as uninitialised disks in Disk Utility and prompted for formating. Ignnore this as they can’t be touched yet – the Xsan configuration steps will take care of this. The important thing here is that the two Mac Minis could see all three LUNs, the sizes were representative of what the configuration on the VTrak indicated, and Disk Utility could show the device path. For me, the device paths were:
- /dev/rdisk2
- /dev/rdisk3
- /dev/rdisk4
Configuration:
Now we get to the fun part – configuration – its all pretty much terminal commands from here on out…
But before we do, we need to properly configure our local DNS. Xsan is heavily reliant of properly configure DNS on the local network.
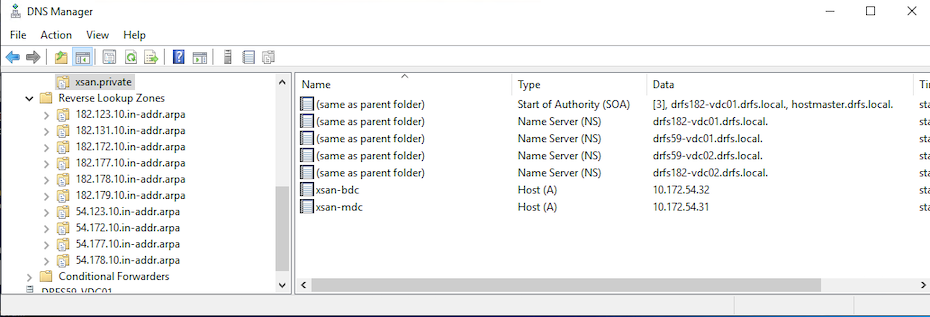
Ideally, our Xsan servers will sit in a domain.private zone, hosting their own OpenDirectory services. My DNS servers are local AD servers with a domain.local DNS zone. On my local AD domain controller, I created a new DNS zone called xsan.private.
I created the two static hosts for the two Mac Minis – including reverse DNS (setting up reverse DNS is important here too – do not overlook this steps).
So on the primary server, launch Terminal.
We need to configure fully qualified hostnames for the two servers
Enter the below command on the primary server:
sudo scutil --set HostName xsan-mdc.xsan.private
On the second server I entered:
sudo scutil --set HostName xsan-bdc.xsan.private
We can verify the host name changes on each server using:
sudo scutil --get HostName
Now back on the primary server we need to export out the LUN labels, change them to something meaningful, and import the new labels back.
sudo cvlabel -c >> /Users/localadmin/Desktop/cvlabels.txt
Open the text file on the desktop. You’ll see the entries for each LUN and they will have names like:
CvfsDisk_UNKNOWN /dev/rdisk2 3906231263 EFI 0 # host 2 lun 0 sectors 3906231263 sector_size 512 inquiry [Promise VTrak E630f 1018] serial 22D8000155D6B8D6
CvfsDisk_UNKNOWN /dev/rdisk3 27343729631 EFI 0 # host 2 lun 1 sectors 27343729631 sector_size 512 inquiry [Promise VTrak E630f 1018] serial 22AD0001552E445C
CvfsDisk_UNKNOWN /dev/rdisk4 46874978271 EFI 0 # host 2 lun 2 sectors 46874978271 sector_size 512 inquiry [Promise VTrak E630f 1018] serial 2260000155002184
I changed the labels at the start of each line to descriptions that made more sense like:
metadata1 /dev/rdisk2 3906231263 EFI 0 # host 2 lun 0 sectors 3906231263 sector_size 512 inquiry [Promise VTrak E630f 1018] serial 22D8000155D6B8D6
datapool1 /dev/rdisk3 27343729631 EFI 0 # host 2 lun 1 sectors 27343729631 sector_size 512 inquiry [Promise VTrak E630f 1018] serial 22AD0001552E445C
datapool2 /dev/rdisk4 46874978271 EFI 0 # host 2 lun 2 sectors 46874978271 sector_size 512 inquiry [Promise VTrak E630f 1018] serial 2260000155002184
Don’t forget to save the file. Then I had to import the new names back in using:
sudo cvlabel /Users/localadmin/Desktop/cvlabels.txt
This will prompt with a Y / N for each entry
Verify the LUN names are registered and none are showing any errors or statuses such as unusable using commands:
sudo cvlabel -c
and
sudo cvlabel -la
While we’re testing stuff, let’s ensure DNS is now working properly.
From each of the Mac Minis, each [Windows] Domain controller, and our MacBook Pro, we’ll check we get proper name resolution against each of the Mac Minis using:
nslookup xsan-mdc.xsan.private

nslookup xsan-bdc.xsan.private
Now its time to prep the OD Master & SAN (as in the Storage Area Network part of the SAN) on the primary server.
sudo xsanctl createSan LABXSAN createMaster --cert-auth-name xsanlabcert --cert-admin-email info@askflorey.com --user localadmin --account localadmin --pass 'Password123'
If successful, you’ll see output not too disimilar from the below:
2025-06-03 22:41:33.996 xsanctl[50653:1029029] create OD master succeed
Unload failed: 5: Input/output error
Try running `launchctl bootout` as root for richer errors.
2025-06-03 22:41:37.244 xsanctl[50653:1029029] buildSanConfig started
2025-06-03 22:41:37.244 xsanctl[50653:1029029] buildSanConfig about to check LDAP
2025-06-03 22:41:37.247 xsanctl[50653:1029029] buildSanConfig: getXsanConfig said nothing
2025-06-03 22:41:37.922 xsanctl[50653:1029029] buildSanConfig step 4 with {
}
2025-06-03 22:41:37.922 xsanctl[50653:1029029] New config time
2025-06-03 22:41:37.922 xsanctl[50653:1029029] We are a new controller inside of buildGlobalConfig
2025-06-03 22:41:37.924 xsanctl[50653:1029029] Hosted set is {(
)}
2025-06-03 22:41:37.924 xsanctl[50653:1029029] needStart is {(
)}
2025-06-03 22:41:37.925 xsanctl[50653:1029029] buildSanConfig saving config {
    globals =     {
        certSetRevision = "DBF0471F-AA39-4B4E-8E2F-A7437E1DE836";
        controllers =         {
            "4E0961C1-D862-5F13-B410-EB23CEC01328" =             {
                IPAddress = "10.172.54.31";
                hostName = "xsan-mdc.xsan.private";
            };
        };
        fsnameservers =         (
                        {
                addr = "10.172.54.31";
                uuid = "4E0961C1-D862-5F13-B410-EB23CEC01328";
            }
        );
        notifications =         {
            FreeSpaceThreshold = 20;
        };
        revision = "00000000-0000-0000-0000-000000000000";
        sanAuthMethod = "auth_secret";
        sanConfigURLs =         (
            "ldaps://xsan-mdc.xsan.private:389"
        );
        sanConfigVersion = 100;
        sanName = LABXSAN;
        sanState = active;
        sanUUID = "B898F1B7-AC5D-41CF-97C9-43DCB605E338";
        sharedSecret = "********";
    };
    volumes =     {
    };
}
SAN successfully created
I’m not too certain why I received an input output error at the start, but in the end, this did succeed. Almost any time I have worked on OD via the CLI, I have had similar errors at the start of the output.
Now on the second server, we need to add this as a OD replica and add it to the SAN using:
sudo xsanctl joinSan LABXSAN --controller-name xsan-mdc.xsan.private --controller-user localadmin --controller-pass 'Password123' createReplica --master xsan-mdc.xsan.private --account localadmin --pass 'Password123'
Again, we should see a successful output:
2025-06-03 22:45:32.675 xsanctl[50423:998078] create OD replica succeed
Unload failed: 5: Input/output error
Try running `launchctl bootout` as root for richer errors.
2025-06-03 22:45:36.239 xsanctl[50423:998078] buildSanConfig started
2025-06-03 22:45:36.239 xsanctl[50423:998078] buildSanConfig about to check LDAP
2025-06-03 22:45:36.241 xsanctl[50423:998078] buildSanConfig step 4 with {
    globals =     {
        certSetRevision = "DBF0471F-AA39-4B4E-8E2F-A7437E1DE836";
        controllers =         {
            "4E0961C1-D862-5F13-B410-EB23CEC01328" =             {
                IPAddress = "10.172.54.31";
                hostName = "xsan-mdc.xsan.private";
            };
        };
        fsnameservers =         (
                        {
                addr = "10.172.54.31";
                uuid = "4E0961C1-D862-5F13-B410-EB23CEC01328";
            }
        );
        notifications =         {
            FreeSpaceThreshold = 20;
        };
        revision = "2874CE08-6D64-4F77-9700-D9588E48B0E6";
        sanAuthMethod = "auth_secret";
        sanConfigURLs =         (
            "ldaps://xsan-mdc.xsan.private:389"
        );
        sanConfigVersion = 100;
        sanName = LABXSAN;
        sanState = active;
        sanUUID = "B898F1B7-AC5D-41CF-97C9-43DCB605E338";
        sharedSecret = "********";
    };
    volumes =     {
    };
}
2025-06-03 22:45:36.242 xsanctl[50423:998078] We are a new controller inside of buildGlobalConfig
2025-06-03 22:45:36.244 xsanctl[50423:998078] Hosted set is {(
)}
2025-06-03 22:45:36.244 xsanctl[50423:998078] needStart is {(
)}
2025-06-03 22:45:36.244 xsanctl[50423:998078] buildSanConfig saving config {
    globals =     {
        certSetRevision = "7FCA87B4-142E-4C5C-BCB7-4FE0F904A580";
        controllers =         {
            "4E0961C1-D862-5F13-B410-EB23CEC01328" =             {
                IPAddress = "10.172.54.31";
                hostName = "xsan-mdc.xsan.private";
            };
            "66C07B8A-6DB7-524C-9785-660EB2382DAE" =             {
                IPAddress = "10.172.54.32";
                hostName = "xsan-bdc.xsan.private";
            };
        };
        fsnameservers =         (
                        {
                addr = "10.172.54.31";
                uuid = "4E0961C1-D862-5F13-B410-EB23CEC01328";
            },
                        {
                addr = "10.172.54.32";
                uuid = "66C07B8A-6DB7-524C-9785-660EB2382DAE";
            }
        );
        revision = "2874CE08-6D64-4F77-9700-D9588E48B0E6";
        sanAuthMethod = "auth_secret";
        sanConfigURLs =         (
            "ldaps://xsan-mdc.xsan.private:389",
            "ldaps://xsan-bdc.xsan.private:389"
        );
        sanConfigVersion = 100;
        sanName = LABXSAN;
        sanState = active;
        sanUUID = "B898F1B7-AC5D-41CF-97C9-43DCB605E338";
        sharedSecret = "********";
    };
    volumes =     {
    };
}
SAN successfully joined
Now we can get into creating the Xsan volume
Initially I attempted to perform the documented process to create the Xsan volume based on a shared metadata & journal LUN, along with two data LUNs merged together to create one large volume of 14TB plus 24TB totalling 38TB – but it kept coming out as either 4TB of 28TB and for the life of me, I’m not too certain why this was the case, using the below:
sudo xsanctl addVolume XsanVolume --defaultFirstPool --addLUN metadata1 --storagePool DataPool --data --addLUN datapool1 --addLUN datapool2
Note: earlier I mentioned creating the first LUN as the RAID 1 mirror for the meta data & journal – this is so the switch –defaultFirstPool can be used to allow both the meta data & journal to share the same LUN. If I attempted to use say LUN 2 as the meta data & journal (assuming LUN 2 was the 2TB mirror), it would fail – also not certain why at this stage.
After stopping & dropping the Xsan volume (using below commands) and recreating it a few times using the same above command and not getting the full 38TB, I opted to create the volume with just the 14TB LUN first then add the 24TB later
To stop the volume – which takes it offline for all servers & clients for maintenance purposes without data destruction, use:
sudo xsanctl stopVolume <volumeName>, eg:
sudo xsanctl stopVolume XsanVolume
To destroy the volume, which removes both the volume configuration and and data you may have on there, use:
sudo xsanctl dropVolume <volumeName>, eg:
sudo xsanctl dropVolume XsanVolume
Now, let’s create the Xsan volume with just the 14TB data LUN first off:
sudo xsanctl addVolume XsanVolume --defaultFirstPool --addLUN metadata1 --storagePool DataPool --data --addLUN datapool1
Now its working at 14TB!
(I also tested using only datapool2 to get a 24TB Xsan volume successfully)
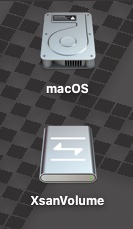
Note that each time we create the Xsan volume, after a short while (maybe 10 seconds or so) the disk appears mounted on the desktop of BOTH servers with the disk having a fibre channel icon on it. Disk Utility on the other hand, still only shows the LUNs and has no capability what so ever to display the virtual or Xsan volume.
Time to add an additional 24TB LUN to the storage pool:
Lets stop (but not drop) the volume:
sudo xsanctl stopVolume XsanVolume
Now lets add the final LUN:
sudo xsanctl editVolume XsanVolume --storagePool DataPool1 --addLUN datapool2
Once this has completed, the Xsan volume will be reactivated and mounted on the desktop of both servers again!
And we measure – 38TB! WOOHOO!
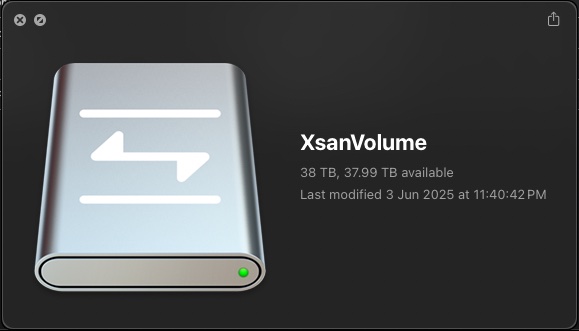
Note that adding additional LUNs to an Xsan volume is a one way affair – to remove the LUN would simply require destruction of the entire volume configuration and ALL data contained within.
Some preliminary disk speed testing:
From the 2011 Mac Mini, the below screen shot shows what speeds I achieved against the Xsan volume – definitely nothing amazing given just how many spinning disks there are in the pool:
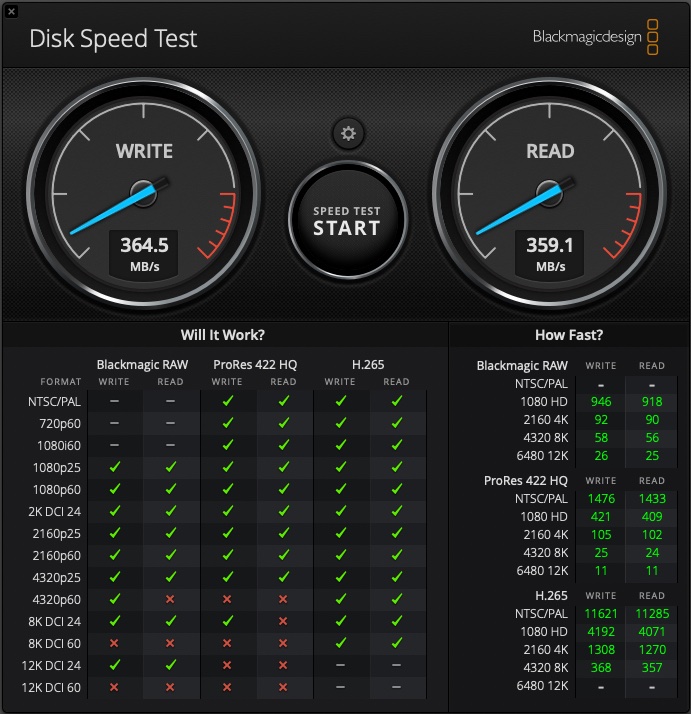
Noting that when I performed this test, I only had one of the two FC switches connected (due to reasons) AND the 2011 Mac Mini only has Thunderbolt 1, so its limited to a line speed maximum of 10gbps. While that should be plenty enough its closer to the limits of my 8gpbs fibre channel links and without multi paths (due to a single link), I don’t think I will see speeds greater than that.
When I configure my MacBook Pro with its Thunderbolt 3 SANLink, we’ll see if I get any better performance from it – especially with both FC switches back online again!
Connecting Clients to our SAN:
Now its time to connect the client Macs.
Physically connect the client Macs to their Thunderbolt HBAs and the same LAN you’ve configured the MDC & BDC on, installed the required drivers for the HBA followed by a reboot.
Once the Mac clients boot up, they too should see the LUNs in Disk Utility just like on the MDC & BDC:
In Terminal on the the MDC (or BDC), run the following command:
sudo xsanctl exportClientProfile
This will export the client profile to the home directory of the account you’re logged into the server with (in my case, localadmin)
Now copy this to each of the Mac clients or use a provisioning tool, like MDM.
If you manually copied the file to the Mac client, double-click on it. This will simply load it into System Preferences:
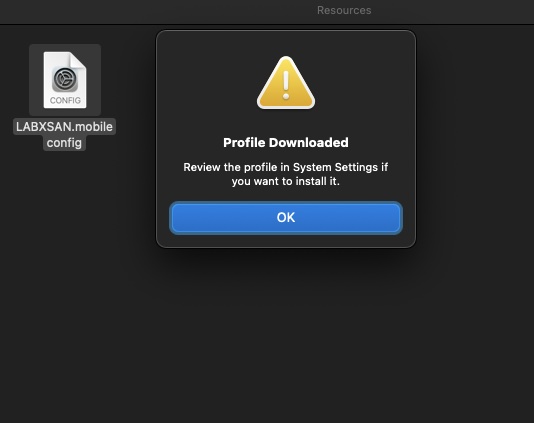
Head to System Preferences and click on Profile downloaded on the left side menu – this will take you to the Profiles management in the General section. Click the + button:
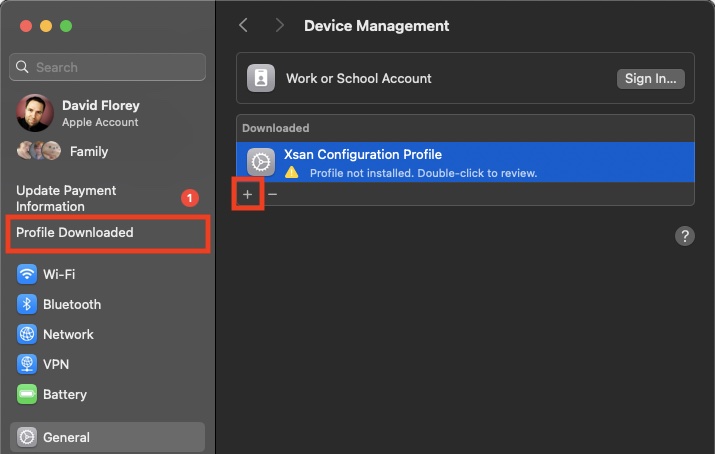
You’ll be shown a preview of the contents within the profile – this should show the name of the SAN (not the Xsan volume name), the paths to the server(s), and the Auth method will show auth_secret (which contains a key or passphrase hidden from view)

Click Install. Click Continue when prompted
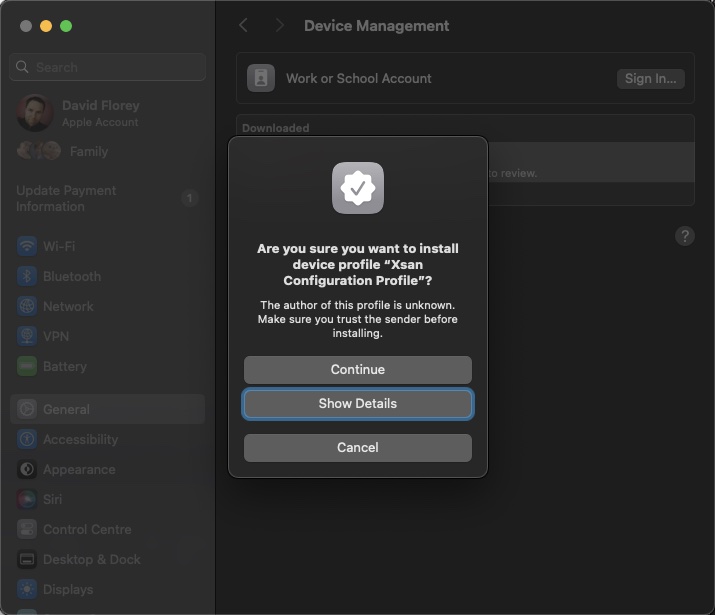
You’ll be prompted for credentials – as far as I am concerned, this will be the localadmin account of the server or another admin account configured during the Xsan configuration above:
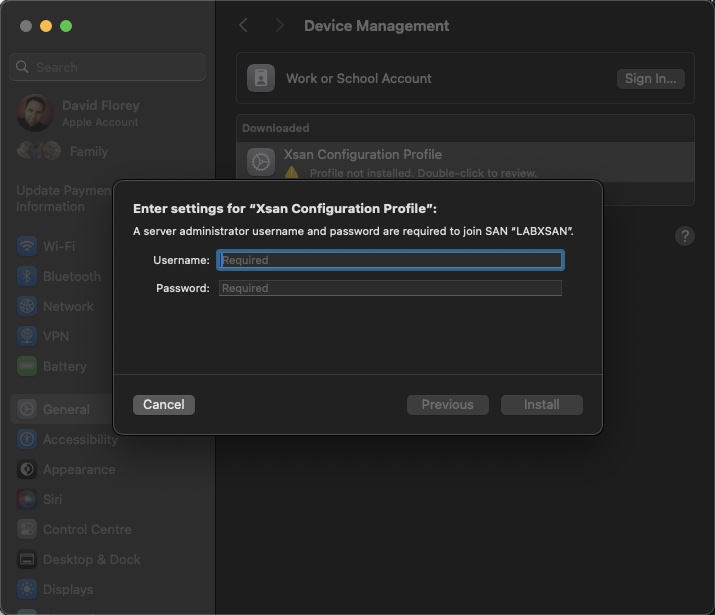
You’ll be prompted again to Install, so click Install, then you’ll be prompted for the local admin account of the Mac client – authenticate this and then if all is working & configured, and DNS is working, the Xsan volume will show up on the desktop:
Lets test the disk speed:
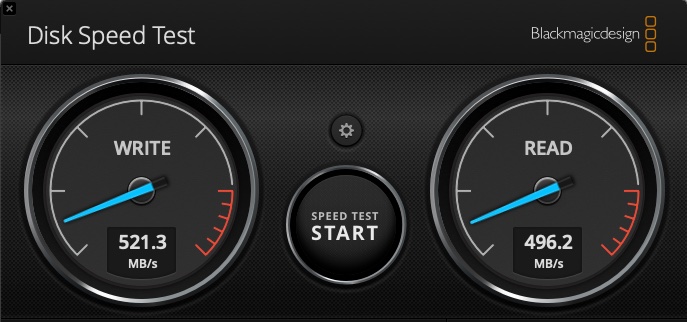
We get some okay results here, I did expect this to run a bit better, but maybe some further tuning will help…
This is based on a Thunderbolt 3 connection between the Mac and the HBA. The HBA is capable of 16G, but has 8G fibre links and everything else is 8G. I have both FC switches connected in this test and the topology is back to looking just like the diagram near the start.
Soon I will be looking to obtaining a pair of 16G FC switches, a load of 16G SFP+ mudules, more 16G HBAs and a storage subsystem capable of 16G FC. I will do a new lab based on 16G FC when I have all the equipment ready, but will likely then repurpose the 16G FC storage subsystem & switches for a hypervisor SAN. I will try do these 16G labs first with the same Mac Minis with Thunderbolt 1 and 8G fibre channel, but the clients and the rest of the environment running at 16G, then I will see about upgrading the Xsan MDC (and maybe BDC) to 16G FC as well to see what impact (if any) this might have on the client’s disk speed test results.
References:
https://developer.apple.com/support/downloads/Xsan-Management-Guide.pdf