When Mac OS X El Capitan was released, Xsan wouldn’t always automount as the Xsan mouting routines took place ahead of time before certain SAN controllers would initialise and OS X wouldn’t then re-attempt to mount later. Users had to use Terminal to manually mount the Xsan volume using:
sudo xsanctl mount <volumeName>
A script was released by Apple’s engineering as a workaround – read more on that here!
In later macOS builds, this script can’t (easily) be installed, and in Monterey, basically not at all… The suggested workaround is to edit the connection address string on affected workstations, in the file:
/Library/Preferences/Xsan/fsnameservers
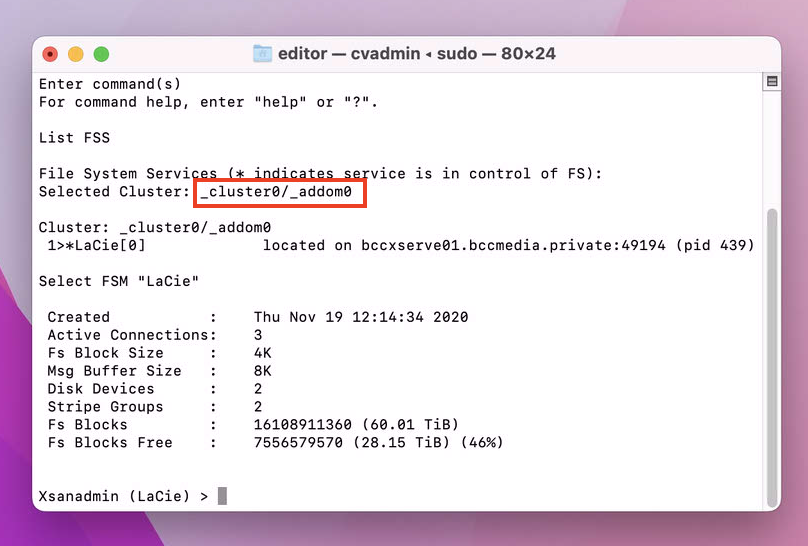
The connection string (whether that be a hostname or IP address), needs to be followed up with @_cluster0/_addom0 – the 0’s need to be confirmed using CVADMIN
When you launch cvadmin (sudo cvadmin) it will tell you about the connected volume and show both the cluster number and the addom number.
Note these down, and issue the quit command to exit CVADMIN.

In the above example, the connection string is bccxserve01.bccmedia.private and the cluster & addom values are both 0.
So you would edit the fsnameservers file to contain:
bccxserve01.bccmedia.private@_cluster0/_addom0
Fix the deployment profile:
If you used Profile Manager to configure & deploy the profile to the workstations, then you could edit the connection string in there instead, and deploy that to the workstations after removing the old profile.