Enable External Boot Media on T2 Security Chip-Enabled Macs

This guide covers the process to enabling a T2 security enabled Mac to boot from external media such as USB drives for purposes of reinstall or data recovery & diagnostics.

Applies to:

T2 security enabled Macs include macs below and newer versions thereof:

  • iMac (Retina 5K, 27-inch, 2020)
  • iMac Pro
  • Mac Pro (2019)
  • Mac Pro (Rack, 2019)
  • Mac mini (2018)
  • MacBook Air (Retina, 13-inch, 2020)
  • MacBook Air (Retina, 13-inch, 2019)
  • MacBook Air (Retina, 13-inch, 2018)
  • MacBook Pro (13-inch, 2020, Two Thunderbolt 3 ports)
  • MacBook Pro (13-inch, 2020, Four Thunderbolt 3 ports)
  • MacBook Pro (16-inch, 2019)
  • MacBook Pro (13-inch, 2019, Two Thunderbolt 3 ports)
  • MacBook Pro (15-inch, 2019)
  • MacBook Pro (13-inch, 2019, Four Thunderbolt 3 ports)
  • MacBook Pro (15-inch, 2018)
  • MacBook Pro (13-inch, 2018, Four Thunderbolt 3 ports)

How to confirm if the Mac you’re working on is T2-enabled:

Click the Apple logo top-left > About This Mac > System Information / System Report…
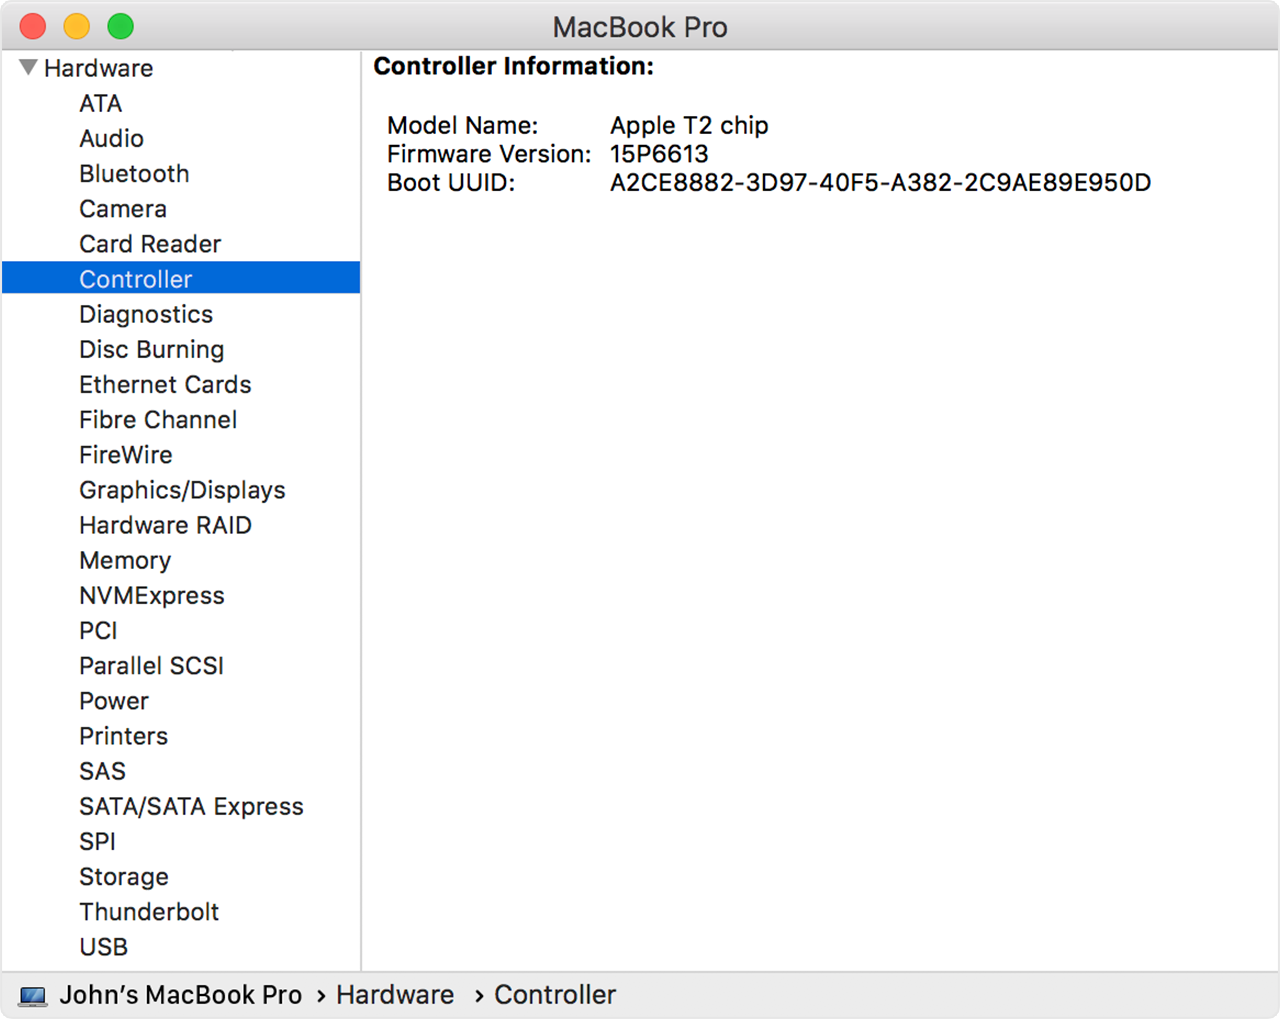
What does T2 actually do?

In short, it provides additional security at a hardware level for the Mac. It provides additional security encryption levels for the OS Disk reducing CPU resources required for the same tasks, helps to prevent malicious code from being injected into the OS core, enhances secure boot, and provides certification of the OS at boot time.

Preparation:

Time required to perform steps outlined: 10-30 mins depending on the Mac and internet speed.

If the Mac already has a firmware password enabled, you will need to know what this is in order to boot into recovery mode & access system utilities.

You will also need to know the password to at least one admin level user account on the system

Steps to complete:

Shutdown the Mac

Power on the Mac holding down the left Alt/Option key

If successful and no firmware password present, you should see a screen similar to the boot screen below:
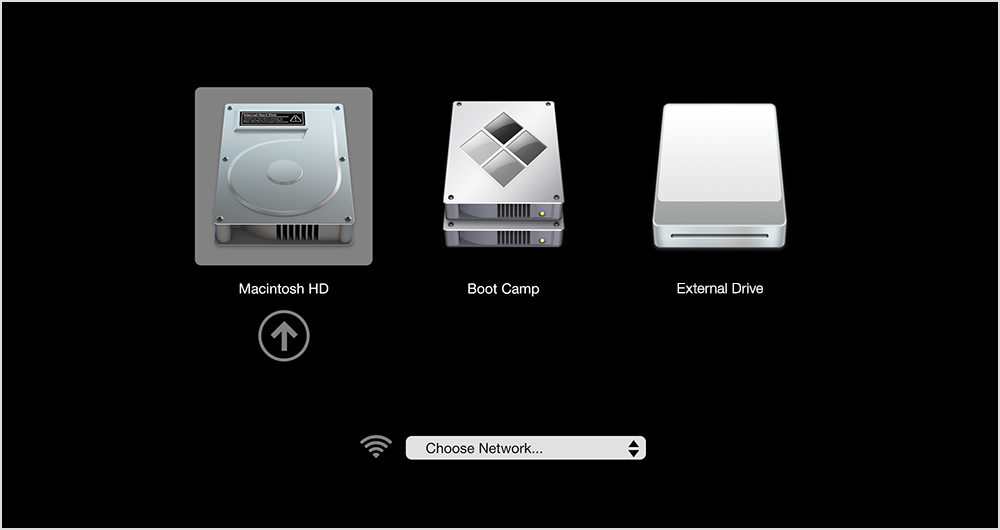
Image result for apple boot menu

If prompted for a password first, then this will be the firmware password.

At the boot selector screen, hold down the Command key and press R

This will start to boot into recovery mode. If the recovery mode OS is on the local disk, it will verify & boot from here, if not, it will download a copy from the Internet.

Once you reach the recovery environment, select the language, and then you should reach the recovery mode screen

Image result for apple booting recovery mode

From the Utilities menu at the top of the screen, select Startup Security (or similar, depending on OS / recovery mode version).

You should reach the below screen:
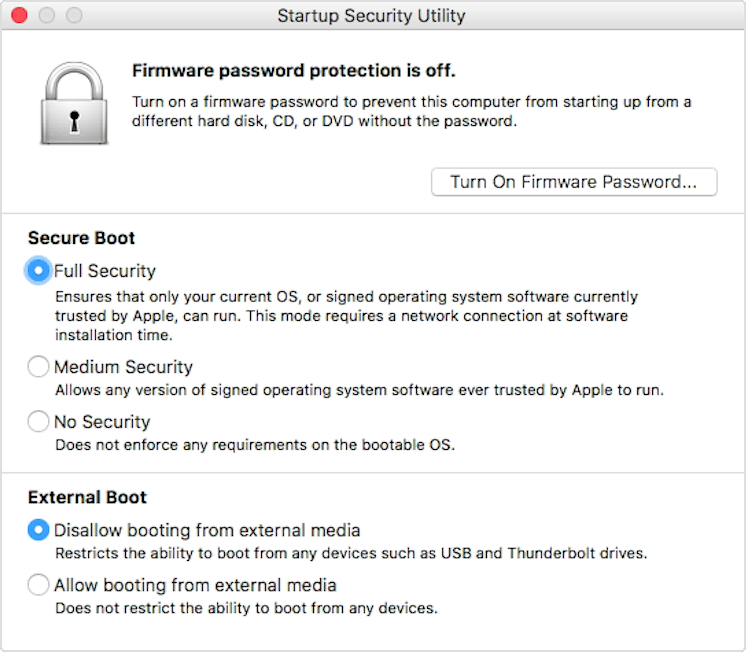
Startup Security Utility on Mac with Apple T2 Security Chip

Under External Boot, select the radio option for Allow booting from external media

Use Command+Q to quit back to the main screen

Use Command+Q to quit recovery mode, select reboot

Now when you boot up the Mac holding down the Alt/Option key to access the boot menu, inserting external bootable media will show up in the boot menu and allow the Mac to be booted from it.

Additional info:

If these steps still prevent booting from external media, you may need to go back into Startup Security and change the Secure Boot from: Full Security to: Medium Security – especially if the OS wasn’t recently signed by Apple on this Mac.

Configure Firmware Password to better protect Mac

The Firmware password for a Mac is primarily used to protect a Mac from being booted into recovery mode or from external boot media should the Mac fall into the wrong hands.

Think of it like a PC BIOS password that prevents anyone from accessing the BIOS settings or boot menu.

Typically, short of flashing the firmware using a hardware firmware flash tool, it provides excellent protection for portables against theft & resale should they be stolen.

Prerequisites:

If the Mac already has a firmware password enabled, and you need to remove or change it, you will need to know the current firmware password.

Forgotten firmware passwords require a support ticket with Apple along with proof of purchase.

Steps:

Shutdown the Mac

Power on the Mac – holding down the left Alt/Option key until the boot menu is displayed

Image result for apple boot menu

Once here, hold down the Command key and press R

The Mac will now boot into recovery mode

Once booted into recovery mode, select the language and you will then be at the recovery mode home screen

Image result for apple booting recovery mode

In the Utilities menu at the top, select Startup Security (for T2-enable Macs) or Firmware Password Utility (for older Macs)

If no password is currently set, you should have the option to Set Firmware Password…

Startup Security Utility on Mac with Apple T2 Security Chip

Once you have set the password, use Command+Q to exit back to the recovery mode home screen, use Command+Q to quit – selecting Reboot or Restart Mac.

Now whenever you boot the Mac holding down the Alt/Option key or any other startup interactive modes, you will be prompted for the firmware password you have set.

To remove the password, you will need to boot back into recovery mode and turn off the firmware password.

Notes:

As previously stated, it is highly recommended this is configured for all portable Macs where possible. Ideally, the client / user should know & document their firmware password – along with being it documented in both the Autotask configuration item and the ticket as an internal note.

Ticket should have “Firmware Password” in the description area or title for ease of search if its not being done in the initial setup ticket.

Failure to document & recall the password when required will require a password removal via Apple support, which will require the Mac, proof of purchase and the Mac will be out for service for a period of time while Apple technicians re-flash the firmware.

Hyper-V 2019 only using every second CPU Core or Thread

Issue: Hyper-V on Windows Server 2019 only using half the available CPU threads, and VM’s with larger CPU core counts often perform very poorly

image

Windows Server 2019, Hyper-V now defaults to a more secure “core scheduler” where previous versions used “classic scheduler” for CPU scheduling and isolation. What this means, is that when you migrate a VM over to Hyper-V on WS2019, you need to update the VM configuration and change some settings, or it will only use a single hardware thread per core, exhibiting the behavior you see above.

In Hyper-V on WS2016, the default setting for number of Hardware Threads per Core is “1”. What we want is to set this to “0” which will inherit the Host’s default configuration for this.

The below PowerShell commands will list all VM’s on the host, list their configuration versions, list the threads count per core, then set the new defaults to inherit settings from Hyper-V

Note: For the last command to work – setting the new defaults, affected VM’s need to be powered off.

#Get your Host supported VM guest configuration versions
Get-VMHostSupportedVersion
#Get your VM guest configuration versions
Get-VM | FT Name, Version
#Update all VMs configuration versions
Get-VM | Update-VMVersion
#Get the VM thread count per core setting
Get-VM | Get-VMProcessor | FT VMName,HwThreadCountPerCore
#Set the VM thread count per core setting
Get-VM | Set-VMProcessor -HwThreadCountPerCore 0

Now that the changes have been applied, here’s the task manager screen shot:

image

Note – this only impacts migrated VM’s. When a VM is created on Windows Server 2019 Hyper-V, this is not an issue as the VM’s inherits the default setting of the Host.